Search models, users, collections, and posts

SpaceX Super Heavy Booster Transport Stand

Print Profile(1)

All
A1
P1S
P1P
H2S
H2D
P2S
X1
A1 mini
X1E
X1 Carbon
H2D Pro
H2C
X2D
A2L

0.4mm nozzle, 0.2mm layer, 2 walls, 12 to 15% infill
Designer
8.5 h
4 plates
5.0(4)

Open in Bambu Studio
Boost
26
42
18
6
48
31
Released 

Bill of Materials

Bambu Filaments
Select all
Black (10101) / Filament with spool / 1kg
Jade White (10100) / Filament with spool / 1kg
Silver (10102) / Refill / 1kg
List other parts
  • N45 or stronger magnets x 20: 3mm diameter x 2mm height

Description

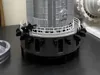
This model is based on the current booster transport stand. It is designed initially for Morethan3D 1:96 Super Heavy Booster models. It should also be compatible with other creators' 1:96 to 1:100 SH as well. The model height is 80mm, and it is pretty simple to assemble. Please refer to the assembly guide below. 


You will need super glue, 5cm length of 1.75mm PLA / PETG filament, and 20 3x2mm (diameter * height) N45 or stronger magnets (Optional if you prefer to glue the legs and stabilizer directly onto the transport stand).


Note that the magnets may NOT be strong enough to hold the legs in place when an external sideward force is applied to the stand.


Assembly Guide: 

Step 1:

Insert 10 3 × 2 mm magnets into the top and bottom holes of the booster transport stand.


Step 2: 

Insert all 20 hold-down clamps into the booster transport stand. Note that you need to press-fit the clamps during the initial assembly.


Step 3:

Glue all 20 actuators into the holes of the hold-down clamps while part of each actuator is inserted into the transport stand. Note that you cannot remove the clamp once the actuator has been glued. The actuators should still slide smoothly after the glue has dried.


Step 4: 

Glue all 4 ladders to the transport stand.


Step 5: 

Glue one magnet into the stabilizing pin base. Use a short length of filament to connect the arm to the base. Insert the stabilizing pin into the arm. Place the assembled stabilizer on the transport stand.


Step 6:

Insert and glue the railings into the gap on the transport stand. 


Step 7:

Glue 8 magnets into the legs and attach them to the base of the transport stand.


Comment & Rating (18)

(0/1000)

Just started printing this aswell as Larsvommars Starship and starbase models. This looks awesome, and such a nice touch for dislaying the booster, and older model boosters if you've printed them (i have several iterations). So MASSIVE thank you as i been searching for a detailed booster/ship stand for several months! Do you have any plans to do a ship transport stand/static fire stand to display the ship in the future? edit: added photos and Boosted!
(Edited)
The designer has replied
designer
1
Reply
Thanks a lot! I really appreciate your kind words — it means a lot. 🙏 I’m currently working on the ship transport stand and the thrust sim for both ship and booster, but I don’t have a static fire stand planned yet. That said, I’ll likely design it before the other two since it seems like a lot of people in the community are looking for it! Also, remember to test the tolerance of the BTS hold-down clamp as it might need a small adjustment depending on your printer’s calibration.
1
Reply
Replying to @Keefe826 :
Thats awesome to hear! I look forward to printing them :D Cool you're doing the thrust sim too! As someone who watches NSF a lot and see's these cool bits of hardware, it will be awesome having models like the thrust sim. It's making me want to make a display of the ship/booster build stages from nosecone, stacking sections, and with things like your thrust sim models include the test stages. Hats off man, can't wait to see them. And thank you, i forgot since my tolences/bridges are usually pretty spot on, but alas they are a bit tight, so have shrunk the z height as in you're instructions :)
designer
1
Reply
photos added to main comment. came out awesome! tolerences are a bit tight on the hold down clamps, i found using a deburring tool to save down the long edges of the clamp allowed them to move in and out freely without sticking. awesome model, i'll be making several if these for the several different boosters i currently have. may have to resort to resin printing for everything else bar the main body. again, awesome model. super looking forward to your future models! do you have a patreon? i almost feel obliged to sub. having the ship and booster models are awesome, but the SpaceX nerd in me is so excited that i can store my boosters as they'd be temp stored/transported for real.
designer
1
Reply
Print Profile
0.4mm nozzle, 0.2mm layer, 2 walls, 12 to 15% infill
1sr Class Need to file pins down to secure correctly
The profile uploader has replied
profile
1
Reply
It's because this stand is design for Super Heavy Booster but not the upper stage Starship 😅 You may check out my Massey Test Stand designed for 1:96 Starship upperstage whichreleased an hr ago!
0
Reply
Replying to @Keefe826 :
100% Know that, but I need to file the pins down so it can hold the booster. apologies for the confusion. great printer user issues not Designer
(Edited)
profile
1
Reply
Replying to @W23RGN :
Ah that makes sense now. Thank you for the clarification and for taking the time to comment! I’ll definitely consider refining the model later as there is still room for improvement, especially around the pin/fit tolerances.
0
Reply
Print Profile
0.4mm nozzle, 0.2mm layer, 2 walls, 12 to 15% infill
great model!
profile
1
Reply
Thank you :-) . We are happy. But my booster (B12) can be on the transport stand. It will soon be 3D printed. Perfect!
Show original
designer
1
Reply
Print Profile
0.4mm nozzle, 0.2mm layer, 2 walls, 12 to 15% infill
awesome. turned out great
0
Reply
Print Profile
0.4mm nozzle, 0.2mm layer, 2 walls, 12 to 15% infill
0
Reply
No more

License

This user content is licensed under a Standard Digital File License.

You shall not share, sub-license, sell, rent, host, transfer, or distribute in any way the digital or 3D printed versions of this object, nor any other derivative work of this object in its digital or physical format (including - but not limited to - remixes of this object, and hosting on other digital platforms). The objects may not be used without permission in any way whatsoever in which you charge money, or collect fees.