Fire HD10 wall mount/bracket w/Senvolon Sensor


Print Profile(1)

Bill of Materials


Description
Boost Me (for free)
Please consider boosting me if you like this design - thanks!
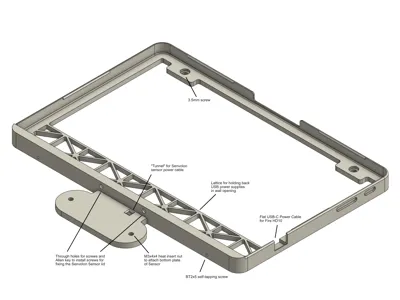
The bracket is designed to work with the current (2023-) version of the Amazon Fire HD tablet, which I'm using as a display for Home Assistant. View the CAD drawings for explanations of the features and screw diameters. The holes for attaching the bottom frame to the wall are designed to fit on the in-wall mounting box for a Busch Jaeger 6136/100 EIB wall display (KNX predecessor) - so if you want to use the frame in a different setting, make sure you have enough space behind the frame for a USB power supply.
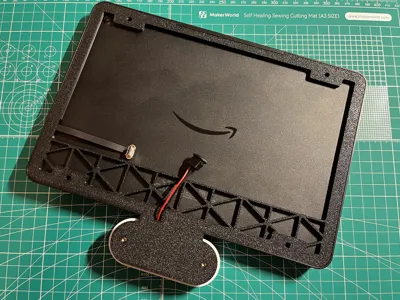
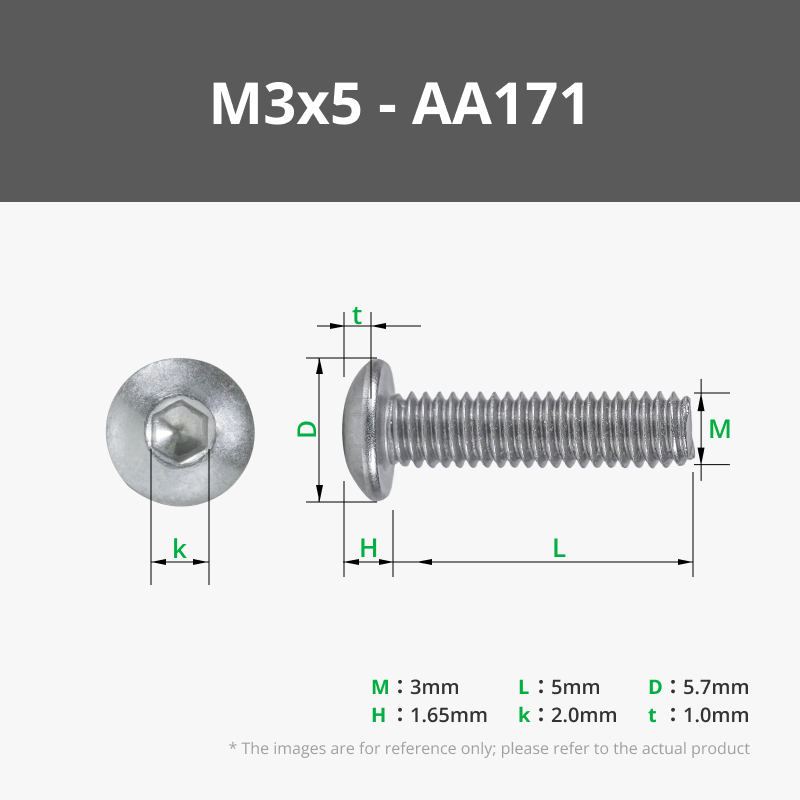
The plate below the display holds a Senvolon presence sensor. Use two M3x4x4 heat insert nuts to attach the sensor bottom plate with M3x5 screws. There's a "tunnel" through the plate for supplying the sensor with power (see photos).
The bracket's bottom part prints with supports to make the "lip" that holds the tablet in the frame strong enough. The top part is printed without supports. There's an extension for the tablet's power button to be able to press it (with a bit of force) when the tablet sits in the bracket (clearance between extension and tablet's on-switch is 0.4mm). The top part of the bracket clips into the bottom part at the top and is fixed with two BT2x5 screws from below.
I'll also post a remix without the sensor plate, if you want to use the bracket for the tablet only. Hope you like the design - feel free to ask questions and please post photos of your prints!
(P.S. I removed the bridge above the USB power cable that's visible in the photo because it was too thin in the end - the CAD screenshots show the final design.)
------
The frame is for a Fire HD10 tablet (2023-current version), which I use as a display for Home Assistant. The drill holes are dimensioned so that the tablet fits the flush-mounted box/bracket for a Busch Jaeger 6136/100 EIB wall display, meaning there must be space behind the tablet to accommodate a USB power supply. This also explains the structure in the lower part of the back panel (to hold the power supply in the wall as long as the tablet is not yet in the frame). Required screw diameters can be found in the pictures - the lid of the frame is hooked in at the top and then secured at the bottom with two BT2x5 screws.
Below the tablet, I have a Senvolon presence sensor for which the mounting plate is designed. For this, melt two M3x4x4 threaded inserts into the mounting plate. The sensor is powered by a two-core cable from behind the tablet - see pictures. You can also see there how to screw the sensor lid through the holes in the frame once the base is fixed on the mounting plate.
The bottom part of the frame is printed with supports because the thin "lip" that holds the tablet in the frame would otherwise not turn out well. The lid prints easily without supports. The extension of the tablet's power button in the lid is designed so that it can be pressed with a little force (the distance between the extension and the power button should be a maximum of 0.4mm according to the design).
I have also created a remix without the plate for the Senvolon sensor, if you only want to mount the tablet on the wall. Feel free to upload photos of your prints, I hope you like the frame!
Comment & Rating (0)