


Print Profile(1)

Description
WHY THIS MODEL?
I broke the stake to a seasonal solar light, so I thought to myself let’s print one! The models on Maker World all have the stakes printed in upright form (from flat end up to the point at top), which makes them really fragile since the layer lines are horizontal.
REASON #1 THIS IS THE BEST SPIKE:I redesigned and oriented a spike that would print with the layer lines being vertical, thus adding natural 3D-printed strength to the spike.
REASON #2 THIS IS THE BEST SPIKE: The spike design also includes one of the vertical quadrants being solid, thus adding significant strength to the spike. It is less prone to twisting or snapping when pushing it into very firm ground.
While I was at it, I made an extra long spike for situations that need it.
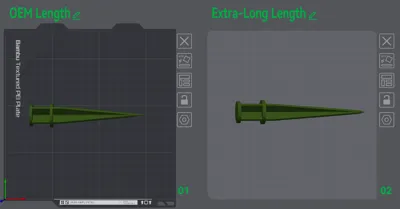
THE MODELS
There are two models – a standard length OEM version and an extra long spike version. I recommend printing the stakes in PETG or PETF-CF for outdoor use. This is a useful model to use up that extra PETG filament that is laying around since a spike doesn’t need much filament at all!
Standard length OEM version: 14 grams of filament, 43mins print time, 0.30grams of support
Extra Long version: 16 grams of filament, 46mins print time, 0.34grams of support
MAKE SURE IT FITS YOUR SOLAR LIGHT STEM
Measure the inside diameter of our solar light stem tube and ensure the printed model fits your tube. It’s easy to resize the spike model to the proper diameter. To do it properly, set the spike on end using the Lay On Face (F) command and choose the flat end of the spike. Adjust the bottom diameter to fit your solar light tube, ensuring the ‘uniform scale’ checkbox is checked when sizing the spike. Then, flip the spike back on its side using the Lay On Face (F) command. DON’T TRY TO RESIZE THE SPIKE LAYING ON ITS SIDE – IT WONT SCALE PROPERLY.
Thanks for looking at my model and good luck on your prints. Be sure to post a photo of your awesome completed prints to share with others!
License
You may create derivative works based on this object, provided that all such derivative works are published exclusively on the MakerWorld platform and include proper attribution to the original creator. You may not share, upload, host, distribute, or publish this object—or any derivative work of this object—on any other digital platform, marketplace, or distribution channel. Commercial use of this object and any derivative works is strictly prohibited. This includes, but is not limited to, selling, renting, sublicensing, or using the object in any context in which you receive monetary compensation or other financial benefits.
Comment & Rating (1)