Nighthawk FPV Drone


Print Profile(1)

Description
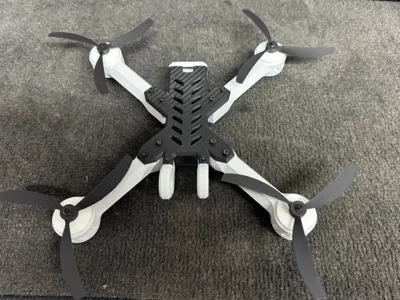
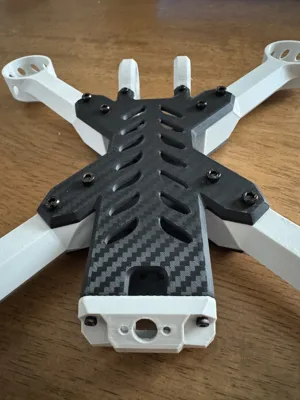
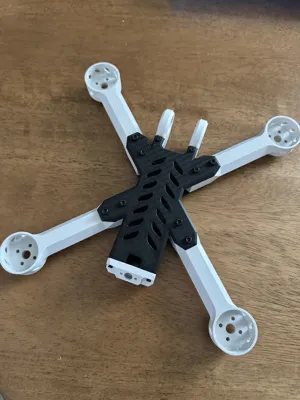
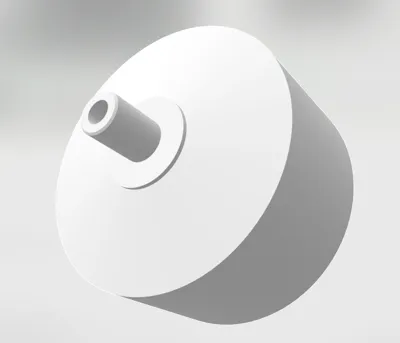
This model was initially created by @ProgrammaDan and uploaded to Printables along with recommendations for parts to make a flyable model. I took the shell of the designed model and created my own representative motors and props so that this drone can be used as a training aid. I used 2mm and 3mm brass inserts to bolt everything together. I also used the Bambu carbon plate (with recommended settings) to make the top and bottom plates look carbon fiber. The model comes out very cool and got a lot of compliments at work.
Note: For safety, if you build a flyable kit, do not use my printed blades as they were intended for show only.
---------------------------------------------------------------------------
Here are the original notes from @ProgrammaDan:
Description
A performance optimized beast, designed for easy manufacture and repair, and an elegant improvement over its predecessor, this one is truly enough to bring a tear of beauty to the eye of any pilot. I give you, the Nighthawk drone.
The following is a list of components that I am using to get the best performance
Electronics:
- Stack: SKYSTARS F722FC &AM32 55A 4IN1 ESC MINI 20×20mm - https://www.aliexpress.us/item/3256804144261062.html?spm=a2g0o.order_list.order_list_main.14.4ddc1802CsAKZZ&gatewayAdapt=glo2usa
- VTX: RUSHFPV RUSH TANK SOLO 5.8G VTX - https://www.aliexpress.us/item/3256805328872792.html?spm=a2g0o.productlist.main.3.3e9e5bfdtX34X0&algo_pvid=92b17587-e440-4f40-8d0a-c75133d49d0b&aem_p4p_detail=2023070220143813744292889210800014175770&algo_exp_id=92b17587-e440-4f40-8d0a-c75133d49d0b-1&pdp_npi=3%40dis%21USD%2149.26%2139.41%21%21%21%21%21%40211bf4c516883540787011368d0767%2112000033375181183%21sea%21US%212015206608&curPageLogUid=Cb0BI3iDnZGu&search_p4p_id=2023070220143813744292889210800014175770_2
- VTX antenna: Foxeer Lollipop - https://www.amazon.com/gp/product/B07D12XS6K/ref=ppx_yo_dt_b_search_asin_image?ie=UTF8&psc=1
- VTX antenna adapter: RushFPV 90° MMCX-SMA Adapter Cable - https://www.getfpv.com/rushfpv-90-mmcx-sma-adapter-cable.html
- FPV camera: Foxeer Razer Mini - https://www.amazon.com/gp/product/B07ZCMCVPC/ref=ppx_yo_dt_b_search_asin_image?ie=UTF8&psc=1
- ELRS receiver: Happymodel ExpressLRS Nano 2.4GHz EP1 RX - https://www.getfpv.com/happymodel-expresslrs-nano-2-4ghz-ep1-rx.html?utm_source=google&utm_medium=cpc&utm_campaign=DM+-+B+-+PMax+-+Shop+-+SM+-+ALL&utm_content=pmax_x&utm_keyword=&utm_matchtype=&campaign_id=17881616054&network=x&device=c&gclid=CjwKCAjwjYKjBhB5EiwAiFdSfh6IXQ85I85Dr_vE_szwLTvxC-40hGUYcr3SXxJvlweI0lMqrSHbbRoCk2QQAvD_BwE
- 2207 brushless motors: Emax ECO II 2207 1900kv - https://www.aliexpress.us/item/3256801419337876.html?spm=a2g0o.order_list.order_list_main.30.4ddc1802CsAKZZ&gatewayAdapt=glo2usa
- LiPo Battery - Tattu R-Line 1050mah 95C 6S: https://www.amazon.com/gp/product/B07G26NJWC/ref=ppx_yo_dt_b_search_asin_image?ie=UTF8&psc=1
- ELRS Transmitter:
- iFlight Commando 8 - https://www.defiancerc.com/products/iflight-commando-8-expresslrs-2-4ghz-radio-transmitter?variant=40149241593925¤cy=USD&utm_medium=product_sync&utm_source=google&utm_content=sag_organic&utm_campaign=sag_organic&gclid=CjwKCAiAuaKfBhBtEiwAht6H73xb5lqtmJCr2-SpOMYZx0KNoJ802KjWH14zCv9fZTnCzhpVU2akDxoCWRIQAvD_BwE
- Radiomaster TX16S ERLS - https://www.amazon.com/RadioMaster-2-4GHz-Channel-Transmitter-Gimbals/dp/B09XWSNTR8/ref=sr_1_3?crid=12WHBK8YZ9GS8&keywords=radiomaster%2Btx1%3D6&qid=1688354676&s=electronics&sprefix=radiomaster%2Btx1%2B6%2Celectronics%2C62&sr=1-3&ufe=app_do%3Aamzn1.fos.18ed3cb5-28d5-4975-8bc7-93deae8f9840&th=1
Mechanical Parts:
- 16x M3x3 insert nuts (4 per arm)
- 32x M3x8 10.9 steel screws (4 per arm, 4 per motor)
- 2x M2x25 screw (for attaching camera guards)
- 6x M2x12 screw (for attaching camera and VTX)
- 4x M2x20 screw (for attaching FC ESC stack)
- 4x M2x8 screw (for attaching rear cover)
- 2x M2x4 screw (for attaching vtx atn adapter)
- 12x 2mm male bullet connector (3 per motor)
- 12x 2mm female bullet connector (3 for each ESC motor output)
- 3-4mm diameter heat shrink (for insulating bullet connectors)
- 4x 5 inch propeller
- 20mm x 250mm velcro strap
Assembly Guide:
- Print off all of the parts. You need two copies of arm A and B each. The camera guards and rear plate should be printed from TPU so that they are better and handling impacts.
- Prepare all of the 3d printed parts by inserting all the proper insert nuts. Each drone arm gets four M3x3 insert nuts, two on top, and two on the bottom. The bottom plate gets 4 M2x4 insert nuts, two in the front, vertically, and two in the back, horizontally. The top plate gets only two M2x4 nuts, both horizontally in the back.
- Prepare the motors and just the ESC part of the stack with bullet connectors. Pop one motor into one of the arms, snaking its wires down the arm and out the other end. Cut them so that there is about 2 centimeters of slack coming out of the arm, then solder on the male bullet connectors to the ends of the motor wires, insulating with shrink wrap as you go. Once all of the motors are done, place one motor into each arm a tighten using four M3x8 screws. Lastly, solder wires to the ESC motor outputs, which should be about 3 centimeters in length, then solder on and insulate the female bullet connectors.
- Thread the four M2x20 screws through their spot on the bottom plate. Slide the ESC board into place on the screws and solder on battery wires, (optionally a capacitor), and an XT60 connector, then connect the flight controller board to the ESC board and slide it onto the screws as well. Don't forget to use the rubber O-rings.
- Using eight of the M3x8 screws, attach all the drone arms to the bottom plate, two screws per arm. The orientation is Arm A in the front left and back right, and Arm B in the front right and back left. As you do, connect the motor wires to the ESC wires using the bullet connectors, and tuck the extra wire down into the arms.
- Prepare the camera, receiver, and VTX wires. Make sure that before soldering it to the flight controller the other end of the wire is already connected, or can be connected via a plug. Solder the wires to the camera, receiver, and VTX wires to the fight controller. Thread the long receiver antenna from the back to the front, going under the ESB board of the stack.
- Using four M2x12 screws, and the 8mm spacers, tighten down the VTX, making sure that the battery wires are snaking beneath and down the middle of the module. then, using the two M2x4 screws, attach the vtx antenna adapter to the rear cover. connect the other end of the adapter to the VTX.
- Using two M2x8 screws, connect the rear cover to the bottom plate using only its lower two holes.
- Position the top plate into it proper place on the whole assembly. Use eight M3x8 screws to tighten down the top plate, tightening in a cross formation. Then, use two M2x8 screws to connect the rear cover to the top plate.
- Using two M2x12 screws, connect the left camera guard to the left side of the FPV camera and the right guard to the right. Tighten them lightly, just enough the feel a bit of resistance. Slide this camera assembly into its place between the top and bottom plates, at the front of the drone. Drop in the two M2x25 screws in from the top through the top plate in order to secure the camera.
- Here, the drone is essentially complete. All that remains is to screw on the propellers and vtx antenna, configure the drone in betalight, and fly.
Ok ok ok. I know. Configuration is not such a simple process. That's why I never told you to mount the props, because you shouldn't until you've configured everything. I'm, not gonna go into detail about that here, but If you are new to this check out Joshua Bardwell on YT. As far as drones go, the guy's my lord and savior. He will teach you everything you need to know. I will say, if you find that your motors are spinning in the wrong direction, you can change that configuration. And with that I'll say, good luck, my fellow air faring comrades.
That said, If you have any question, please leave a comment and I'll help you out.

Comment & Rating (3)