Search models, users, collections, and posts

Nautilus speaker

Print Profile(0)


Add the first print profile to earn points

Boost
238
387
49
32
299
3
Released 

Description

Boost Me (for free)

Thank You :)

B&W Nautilus Speakers

I will appreciate any support. Thank you.

Video guides from the build can be found on my Instagram:


https://www.instagram.com/jan.bachnak?igsh=M2pnd3N5cjhjZDM4&utm_source=qr
 

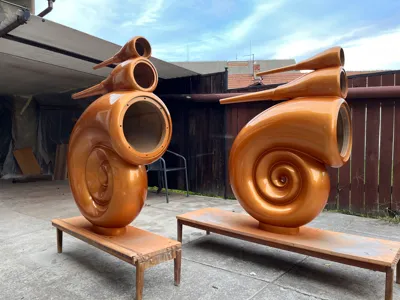
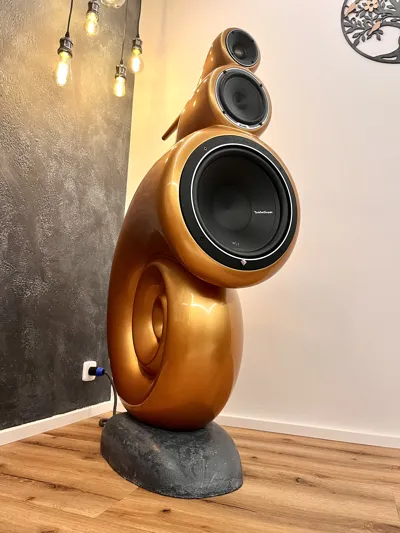
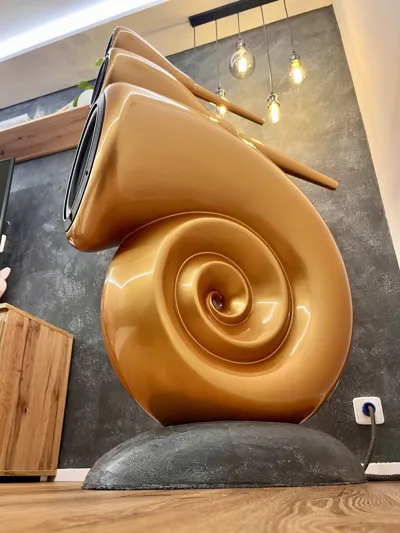
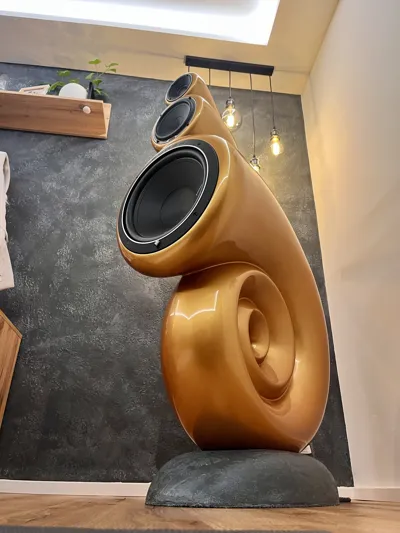
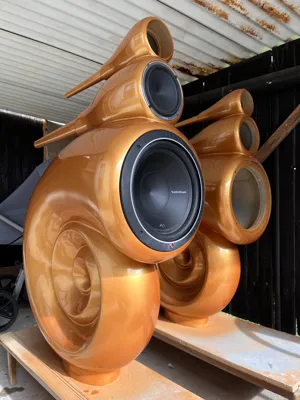
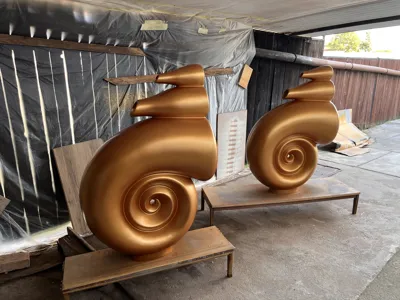
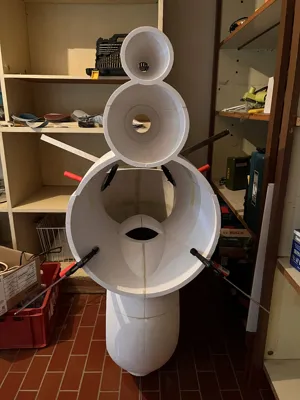
This is a clone of the well-known B&W speakers.

They are three-way loudspeakers.

I have loved music since childhood. I always wanted to build speakers that would sound beautiful and look amazing. After discovering 3D printing, the idea was clear — I had to make something no one had done before. And that’s how the Nautilus project began.


Modeling:

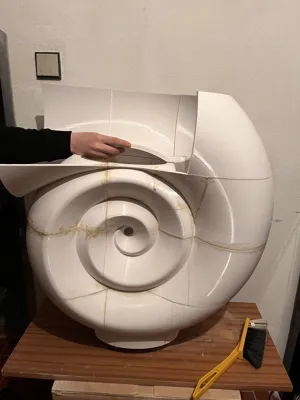
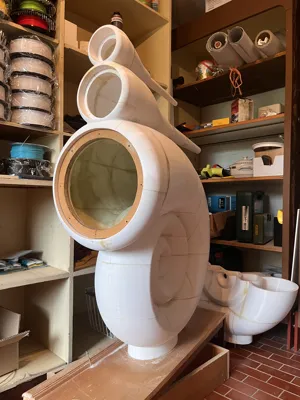
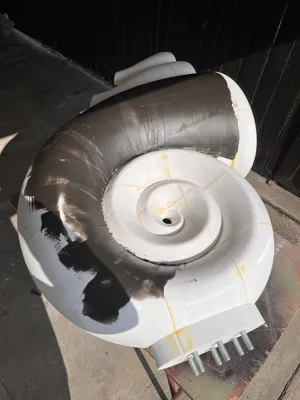
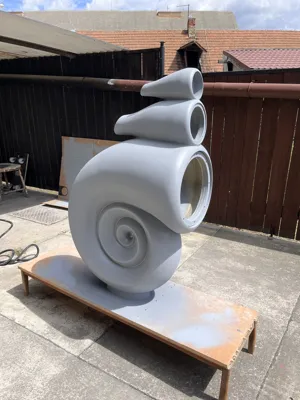
The model was created in Fusion 360. I wanted a more modern design compared to the original speakers, so the bass tube is cylindrical with a sharper edge, and there is a hole in the center of the spiral tube. Since I am a beginner in modeling, there were small inaccuracies which I later fixed with filler.


Printing:

All parts were printed on a Prusa MK3S+. The total printing time was around 153 days and the total filament used was about 84 kg for a pair of speakers. The material is PRUSAMENT PET-G Signal White.

Most parts were printed with 100% infill for sanding purposes. Only the bass section has 25% infill and 30 perimeters.


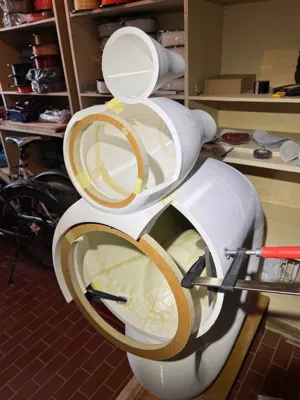
Bonding & Lamination:

I used a two-component Bison adhesive. It sands well and fills gaps between parts. The glued sections were reinforced with fiberglass. The biggest challenge was that the parts didn’t fit perfectly and required a lot of sanding and improvisation.


Filling:

I initially thought only the joints would need filling, but the surface wasn’t smooth enough. In the end, I applied filler over the entire speaker.


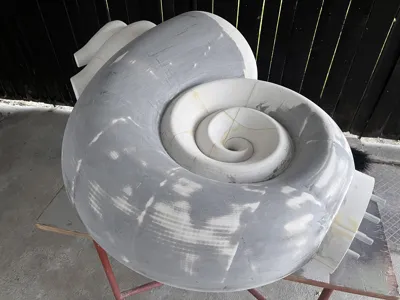
Spray Filler/Primer-Filler:

I used a two-component filler, applied in three layers. Total consumption was about 2 kg.


Sanding:

I sanded with 400, 800 and then 1200 grit wet sandpaper. This step took a long time because the surface had to be flawless.
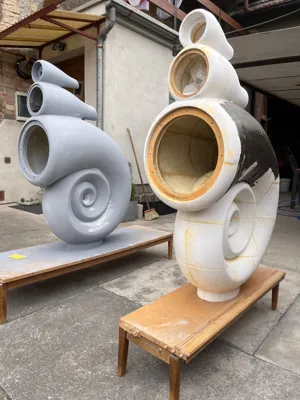
 

Painting:

The color is a brown pearl metallic. Due to difficult access inside the curved tube, paint consumption was higher — approximately 0.6 L of paint and 0.6 L of clear coat in three layers.
 

Polishing & Waxing:

Paint imperfections were sanded, polished and finished with wax.
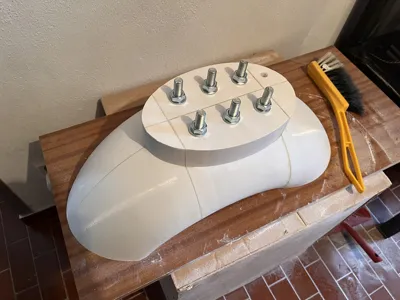
 

Assembly:

The speakers are mounted to a concrete base using six M16 bolts, 10 cm long.

The build is extremely demanding, so consider whether you have enough time, resources and experience. The sound is unique — unlike typical speakers.


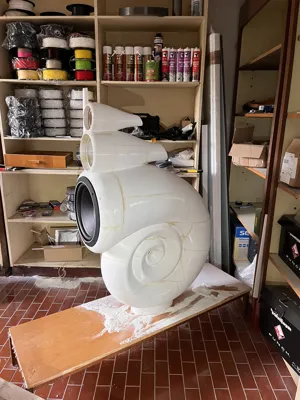
I used the drivers I had available. If I had none, I would have chosen different ones:


  1. Woofer: Rockford Fosgate PUNCH P1S2-12
  2. Mid-bass: Hertz MP 165.3 PRO
  3. Tweeter: Melodavid CB25Nd (planned upgrade)


  • 12 × M14/M16 bolts (22 mm wrench) for mounting to the base.


Comment & Rating (49)

(0/1000)

I'm shocked by your project !!! first time I see such a huge project that it's not just a display toy ..... I'm also looking for a more "crazy" speaker design, but this is way over my head. Too bad I have no boosts to give you. Anyway.... 84 kg of filament ? probably because of the infill. Just saw some tests done by someone and the result was that there was very little difference between 10% and 60% infill ... and it was worse at 100% walls. I think because the air pockets helps in fact. Either way ... congrats on your project! the result looks fabulous!!!!
The designer has replied
4
Reply
1. Thank you 🙂 84 kg is the total filament consumption. One speaker weighs about 40 kg. The speakers are quite large. 40 kg sounds like a lot, but when you see them in person, the weight feels appropriate for their size and they actually seem light relative to how big they are. I had to use 100% infill for three reasons. The first reason is that with such a large model, the printed parts don’t fit together perfectly, and around the 3rd–4th layer I had deviations of up to 4 mm in some places. I had to sand it down. So from a 12 mm wall thickness, in some joints it was only about 8 mm. I was surprised by how large these deviations were. The front part of the bass speaker has 60% infill and 25 perimeters (for sanding). The second reason is that the material is PET-G, which is flexible. That’s a problem for speakers. With 100% infill, however, it was no longer flexible.
4
Reply
2. The third reason is the bass speaker itself. You need the stiffest possible enclosure to get the best bass response. With lower infill, the enclosure was flexible and it was noticeable. When I tested lower infill and reinforced it with fiberglass, the sound was excellent, so the choice was clear: 100% infill + fiberglass. After all, this is a serious bass speaker. The infill test you mentioned was done using PLA, which has different properties than PET-G, so the results come out completely differently. I spent a long time testing and tuning everything, and for PET-G the best results were with 100% infill. I also reinforced it with fiberglass. I did a lot of testing before I started production. The original speakers use molded fiberglass and also have a wall thickness of 12 mm. They definitely knew what they were doing 😀 and I arrived at the same conclusion. I didn’t want to print it in PLA.
5
Reply
@Honza25 Thank you very much for the detailed information about your project. I just want to be clear, that i didn't want to sound like i know better and you made it wrongly. Far from that. Now, i was thinking it was printed in PLA, sorry I missed the PETG in the description. You were right to use something a bit stronger than PLA for such a big project. Also i understand that PETG is way more easy to sand. But indeed, PETG is a lot more flexible than matte PLA. Shocked to hear that you had deviations of up to 4 mm. Was that because of the printer ? or material shrinking ? Either way, thank you very much for more details on your decisions and congrats for the huge amount of work you invested. The end product looks fantastic !
2
Reply
I'll probably never print this, but what a project !!! That deserves great recognition !!!!!!!
The designer has replied
Show original
3
Reply
Thank you. I assume that not many people will actually print it, but at least I might inspire someone with what can be printed. I’m planning to design smaller 2-way speakers, I just don’t know yet when that will be.
1
Reply
this is absolutely amazing. where do you live? I'll give you a few bucks to let me hear them.
The designer has replied
2
Reply
Thank you. There was a lot of work, improvisation, and nerves involved. Every moment I was dealing with a different problem. I learned a lot. I live in the Czech Republic.
1
Reply
Replying to @Honza25 :
oh wow. only thing I know about that is Rimac and Adam Ondra. Do you think a scaled down model could be made? and also don't you have one extra driver?
0
Reply
this is cool! do you think it would be possible to make a miniature desktop version with some smaller speakers?
The designer has replied
0
Reply
Thank you. I’m planning to make a smaller speaker for a PC, but I haven’t gotten around to it yet. I’ve been very busy. I’ve had the project in progress for a year now. Maybe I’ll get to it around Christmas. Once it’s finished, I’ll definitely upload the model for download.
0
Reply
there already is a small desktop version on makerworld, I printed it , looks great https://makerworld.com/en/models/745249-desktop-miniature-nautilus-hifi-speaker-with-bass#profileId-678116
(Edited)
0
Reply
Hello, first of all congratulations I’m considering replicating the speakers and I’d like to better understand the acoustic design in order to select appropriate drivers. Regarding the woofer chamber: What is the net internal volume in liters?Is that volume net or gross, and does it already subtract driver displacement, internal tubes, and bracing?Is the chamber intended as sealed or bass reflex?Was it designed around a specific woofer and T/S parameters?Regarding the cabinet structure: What is the effective structural wall thickness?Is it uniform or variable? Was it designed for solid printing or with infill? Regarding the rear tubes (midrange/tweeter):What is the effective internal path length of the midrange tube Is it progressively tapered and closed at the end? Was it dimensioned for a specific target frequency? I’m planning to use professional-grade drivers and would like to calculate everything accurately before proceeding. Thank you in advance..
The designer has replied
0
Reply
1.Hello.Thank you. First of all, I’d like to inform you that this is an amateur design. I’m not a professional. When modeling it, a friend helped me calculate the volume on an amateur level as well. We estimated the volume approximately. It’s quite difficult to calculate the volume because tubular speakers behave completely differently from classic speaker enclosure designs. Some values I adjusted according to the sound. I don’t remember the volume figures. I modeled it back in 2021, and even then they were only approximate. I tried tuning the tube lengths by ear based on the sound. But I want to emphasize that everything was done on an amateur basis. If you want to approach this professionally, I wouldn’t recommend using my model. It would require a lot of recalculating, remodeling, and especially testing. I tested several tube variants myself. The tubes are open at the end. The bass tube is closed. The wall thickness is 12 mm for the bass driver and 8 mm for the midrange and tweeter.
0
Reply
2.Printing is done with 100% infill. Only the front section where the bass driver is mounted has about 25% infill and 30 perimeters (for stability and sanding purposes). If you’re planning to do this professionally, don’t use my model. There’s really a big difference when you use a different driver. Another issue will be the crossover, because the sound from a tubular construction is completely different from a classic speaker cabinet, and tuning it is very demanding. I use an active crossover and a 6-channel amplifier. I don’t think it’s suitable for you. There isn’t much information on the internet regarding tubular speakers. One last thing — the project is very demanding. If you want the result to be beautifully lacquered speakers, I spent several days just sanding. It’s difficult to sand. A lot of the sanding I had to do by hand. Painting/lacquering is also very demanding. You also have to make a base/stand. Honestly, I wouldn’t go into it a second time 😀
0
Reply
THIS is a project i'm going to have to pursue.... how's the performance? Your result is incredible, is p&c another hobby of yours?
The designer has replied
1
Reply
I’m using an active crossover, so each speaker has its own separate amplifier channel. 2 × 250 W, 4 × 160 W. I’m still tuning the crossover. I’m quite busy time-wise, so the tuning is taking me a long time. In any case, I wouldn’t recommend getting into this. It’s extremely demanding in terms of time and patience 😀 — a lot of problems come up along the way. Just the filling alone took me several full days of work. P&C? A little bit. This is only my third model, and at the same time the most demanding one I’ve ever done.
2
Reply
mega !!! Insane!!! Great !!! I will try to replicate it. possibly as a four-way system. what crossover was used? probably also a DIY or
The designer has replied
Show original
1
Reply
“Thank you :) The crossover is a 3-way active one. I’m still testing it for now. The crossover frequencies are 250 Hz and 3100 Hz. I’ll see which frequencies will be final. I don’t have much time to finish it. When I’m done, I’ll share more information.”
1
Reply
Top High End work
The designer has replied
1
Reply
Thank you :)
0
Reply
Shocking project
The designer has replied
Show original
1
Reply
Thank you🙂
0
Reply
Simply amazing your project
The designer has replied
Show original
1
Reply
Thank you🙂
0
Reply

License

This user content is licensed under a Standard Digital File License.

You shall not share, sub-license, sell, rent, host, transfer, or distribute in any way the digital or 3D printed versions of this object, nor any other derivative work of this object in its digital or physical format (including - but not limited to - remixes of this object, and hosting on other digital platforms). The objects may not be used without permission in any way whatsoever in which you charge money, or collect fees.