Search models, users, collections, and posts
Coil Winding Auxiliary Device
IP Report


Print Profile(1)

0.16mm layer, 2 walls, 15% infill
Designer
1.7 h
2 plates
Open in Bambu Studio
Boost
2
9
0
0
5
3
Released
Description
Content has been automatically translated.
👋 Introduction | Introduction
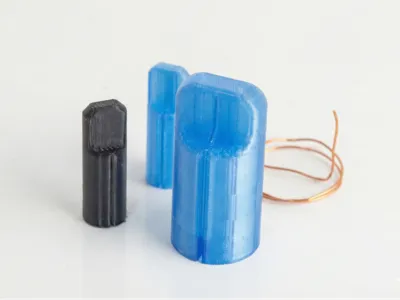
This is a Coil Winding Aid designed specifically for electronics DIY enthusiasts. If you have ever tried winding electromagnetic coils by hand, you know how difficult it is to get them neat and tight. This tool can help you easily wind standard air-core coils or coils with bobbins.
This is a handy tool designed for winding copper coils. It helps you create neat and tight coils easily, perfect for DIY electromagnets, inductors, or motors.
✨ Main Features | Features
- Multi-size Compatibility: Optimized for 0.6mm enameled wire, but tested to be perfectly compatible with enameled wire under 0.8mm.
- Two Sizes: Includes 10mm and 20mm inner diameter specifications to meet the needs of different projects.
- Wire Slot Design: The top is designed with a wire guide groove to easily secure the starting end of the wire and prevent it from coming loose.
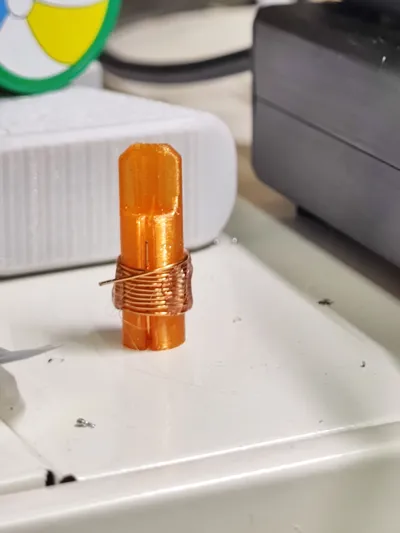
- Easy to Operate: The handle part is designed (as shown in the pictures) for easy handheld use or rotation with tools.
⚙️ Printing Suggestions | Print Settings
- Material: PLA, PETG are both suitable.
- Infill: Recommended 20% - 30% to ensure strength and prevent deformation when tightening the wire.
- Layer Height: 0.2mm (standard) or 0.16mm (finer surface, easier demolding).
- Supports: No supports needed. The design is optimized for direct upright printing.
- Orientation: It is recommended to place it upright with the wider end (base) facing down.
🔧 Usage Tips | Tips
- Pass one end of the enameled wire through the top guide groove to secure it.
- Begin winding the coil tightly.
- After winding is complete, you can use Hot Glue or electrical tape to temporarily secure the outside of the coil (as shown in the pictures) before removing it.
- If used as a demolding tool, it is recommended to properly adjust the horizontal hole compensation before printing, or apply a small amount of petroleum jelly to the surface to facilitate coil removal.
License
This user content is licensed under a
Creative Commons Attribution
Comment & Rating (0)