Dwarven Shin Armor in Lord of the Rings Style


Print Profile(1)

Description
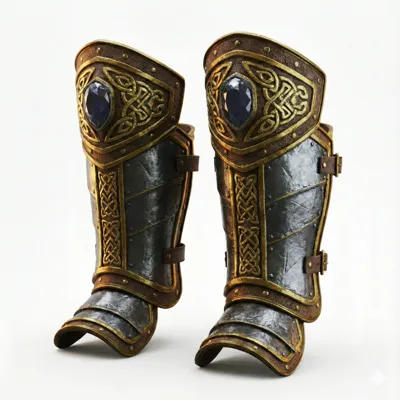
⛏️ Dwarven Shin Armor – Cosplay & Decoration (LotR inspired)
Immerse yourself in the Mines of Moria or the Halls of Erebor!
This 3D model is the perfect addition to any dwarven warrior's cosplay, whether for LARP, conventions, or as an impressive display piece for all fans of The Lord of the Rings and The Hobbit.
✨ About the Model
Inspired by the robust and artful armor craft of the Dwarves from Tolkien's legendary world, this pair of shin guards combines:
- Massive Plate Look: Realistic design that imitates heavy, worn metal plates.
- Dwarven Craftsmanship: Filigree golden decorative elements with traditional knot and rune patterns.
- Gemstone Accent: A large, faceted blue gemstone in the upper plate as a central eye-catcher.
- Practical Design: The model is designed to fit snugly on the leg and can be secured with straps (separate parts or printed slots provided).
📐 Print Details & Recommendations
| Component | Recommended Material | Layer Height | Infill |
|---|---|---|---|
| Main Plates (Metal Look) | PLA, PETG (for robustness) | 0.16mm - 0.2mm | 15–20% (Cubic/Grid) |
| Decorative Elements (Gold Look) | PLA (Silk Gold/Bronze) | 0.12mm (for fine details) | 10% |
| Gemstone | Transparent or translucent filament (e.g., Blue PLA) | 0.10mm - 0.12mm | 100% (for clarity) |
- Scaling: IMPORTANT! Measure your lower leg and scale the model accordingly to ensure a perfect fit.
- Painting: For the realistic "metal" look, I recommend a primer, followed by gunmetal paint and a final weathering (dry-brushing with silver and black/brown washes).
- Multi-Color Printing: Ideally, print with an AMS (like Bambu Lab) to get the decorative elements and the stone directly in the correct color, simplifying assembly and painting!
🛠️ Assembly Instructions
The model is disassembled into parts (main plate, decorative strips, gemstone) for optimal printing and easy Painting/Finishing.
- Printing: Print all parts with the recommended settings.
- Cleaning & Sanding: Remove support structures and smooth edges if necessary.
- Painting: Paint and age the parts.
- Bonding: Glue the decorative elements and the gemstone into the recesses of the main plate (superglue or epoxy resin).
- Attachment: Thread leather straps or printed straps through the loops to secure the shin guards to the leg.
Have fun printing and may your armor be as durable as the mountains of Khazad-dûm!
Boost Me (for free)
🔧✨ Like what you see Click the Boost button to support my work and help it reach more makers 📌 Don't forget to follow me to stay updated on my latest designs – more cool stuff coming soon ❤️
License
You shall not share, sub-license, sell, rent, host, transfer, or distribute in any way the digital or 3D printed versions of this object, nor any other derivative work of this object in its digital or physical format (including - but not limited to - remixes of this object, and hosting on other digital platforms). The objects may not be used without permission in any way whatsoever in which you charge money, or collect fees.
Comment & Rating (0)