Doorbell Chime Cover (Japanese Stone Lantern)


Print Profile(1)

Bill of Materials
- A4 Mulberry Fiber Rice Paper (2 Sheets) x 1: https://a.co/d/5fU2k0O
- SUNLU Marble PLA, Ashen Concrete x 1: https://store.sunlu.com/products/high-speed-pla-marble-3d-printer-filament-1kg?_pos=1&_sid=0d36791d3&_ss=r&variant=49959980269850
Description
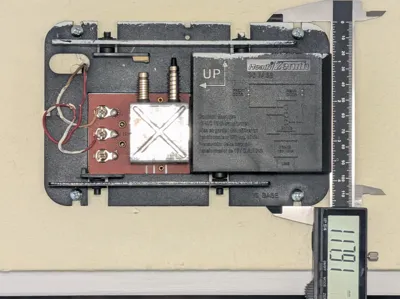
This is a replacement Doorbell Chime Cover I designed in the style of a Japanese Stone Lantern. It prints in three parts with the main outer case using fuzzy skin and Hilbert curve top surface to get a stone-like look. It also has a Shoji screen frame and inner case with rice paper sandwiched in between. It assembles and installs onto the doorbell chime with no fasteners required, and the only tool needed is a sharp blade. This is designed to fit onto a Heath/Zenith Doorbell chime, which has an approximate base size of 180mm x 118mm (~7in x 4.6in) with insets at the top & bottom center that the cover snaps onto.
Notes:
- As pictured: Outer case printed in SUNLU Ashen Concrete Marble PLA, Inner case printed in SUNLU Black PLA+, and Shoji screen frame in SUNLU Walnut Real Wood Fiber PLA
- Rice paper used for model: https://a.co/d/1bhfb4f
- Included profile is configured to use a support interface material (ex: Bambu Lab Support for PLA/PETG filament, or using PETG for a PLA model or PLA for a PETG model, etc)
- If you don't use a support interface material, you will need to adjust the support settings (especially the Top Z distance)
- Outer case also looks great printed with Bambu Lab PLA Metal filament in Iron Gray Metallic
- Shoji screen frame can also look good and be a less finicky print with standard brown matte PLA filament
Assembly/Install Instructions:
Remove supports (when using the standard profile with support interface material, these should remove clean and easy)


Sandwich two sheets of the Rice paper together, and Cut so that they are the same width as the Shoji screen
(the cut doesn't need to be perfect, but should be close)


Install Shoji screen frame into the outer case


Place cut Rice paper sheets on the Outer case with Shoji screen installed, and Center over opening

Fit the Inner case into the Outer case with the Rice paper sheets in place, and press about 2/3 of the way into the outer case

Hold the Inner case in place while pulling each side of the sandwiched Rice paper sheets taut. (this shouldn't take much force)
With Rice paper sheets taut to the inner case, Press the Inner case all the way down into the outer case.
(when seated, the inner case will lock into the outer case with clips in the center of each of the short sides)


Trim off excess Rice paper using a sharp blade


Inspect to make sure things look good with the Rice paper tightly sandwiched between the shoji frame and inner case


Attach the Assembly to the Doorbell Chime Base
a. Tilt the top of the assembly toward the wall and seat it against the wall and onto the top edge of the doorbell chime base
b. Press the bottom face of the assembly toward the wall to seat it fully onto the doorbell


If you dig my model, please post a pic of your finished print. It's fun to see other makes!
Comment & Rating (4)