Lady Chicky - Zkull Urban Collection


Print Profile(1)

Description
Boost Me (for free)
Thank you for your support, each boost encourages me a little more ! :)

Modular multi-part skull figurine (ZKULL edition).
Single-extruder friendly (no AMS required), friction-fit pegs, glue optional, easy color swaps.
Streetwear vibe. Files include optimized print orientations + ready-to-use Bambu Studio profiles.
– Feel free to follow the collection for more ZKULL models. Click Here -


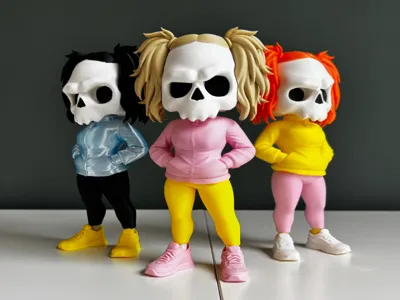
LADY CHICKY – (ZKULL EDITION #12)
They don’t just walk, they show up.
Three bright silhouettes, as adorable as a candy store, yet there’s something in those hollow eyes that sends a pleasant chill down the spine.
Cute… but not harmless.

Their hair flickers like flames or rippling waves, hoodies soft like armor.
Lady Chicky moves with calm confidence, hands in pockets, like the city already belongs to her.
Small shadow, big presence.
A sugary mystery with sharp edges.
You hesitate to get close and somehow you step closer anyway. That’s the charm.
Every street corner becomes a stage: concrete, rain, asphalt reflecting their bright colors.
They don’t need to speak you feel them.
An aura like a perfume too sweet to be innocent.
Lady Chicky is tenderness with fangs,
cuteness that can fight back,
a charm that sticks to your mind long after she’s gone.
When night falls, they don’t fade.
They glow tiny queens of crosswalks, urban phantoms with flawless drip.
And in the echo of sneakers and neon buzz, a story floats:
the story of those who are bright, charming…
and never to be underestimated.
Summary
Important Note – Hair Assembly
When attaching the hair to the head, ensure correct orientation (upper strands pointing toward the eyes).
Center the connector with the hole on the head first, then press firmly until the head’s ears snap into the inner slots of the hair piece.
Model designed in multiple parts, assembled using friction-fit connectors.
Parts fit together without glue, provided your material tolerances and printer calibration are accurate.
The included files already feature optimized orientations (for supports and positioning), do not reorient parts unless you fully understand the implications.
Printing Instructions
Keep the provided presets: the Bambu Lab / Bambu Studio profiles included in the archive were tested for this model and can be used as-is for reliable printing.
Orientation & Supports
All parts are positioned in the files to minimize support material and simplify post-processing.
Avoid reorienting parts globally; if you modify orientation, verify support generation carefully.
Assembly – Recommended Method
Dry fit first: Assemble all parts without glue to check alignment and tolerance.
Cleanup: Trim or lightly sand edges and pegs using a file or hobby tool to ensure smooth contact.
Fine adjustments:
• Too tight → very light sanding (200–400 grit).
• Too loose → apply a thin strip of PLA/PTFE tape to the peg (discreetly) or use a small drop of glue.
Optional Glue: Use glue for permanent joints.
Final check: Ensure pattern alignment and verify movement if the model includes mobile elements.
Recommended Print Settings
• Layer height: 0.12–0.20 mm (use 0.12 mm for fine detail)
• Perimeters/Walls: 2–3
• Infill: 10–20% (increase for load-bearing parts)
• Top/Bottom layers: 4
• Supports: Use the provided orientations, handled efficiently in Bambu Studio/profiles.
• Temperatures: Keep default profile settings or adapt according to your filament.
Additional Note on Gluing
Each part may be glued for long-term stability or left unglued if you intend to swap color variations.
However, it is strongly recommended to glue the black eye inserts and the nose, as they are the only parts without designed friction-fit tolerance.
Specific Notes & Best Practices
• Tolerances vary depending on filament, always test on your specific printer.
• Do not glue immediately, prefer dry assembly first to allow color swaps and fit adjustment.
• Labeling: Keep original part names/placement as provided (helps reassembly and support).
Important Note – Hair Assembly
When attaching the hair to the head, ensure correct orientation (upper strands pointing toward the eyes).
Center the connector with the hole on the head first, then press firmly until the head’s ears snap into the inner slots of the hair piece.
Membership
Are you a 3D print seller? Get a commercial license to legally use my models in your shop. Choose the option that fits your needs: Lite License: covers around ten selected models. Standard License: gives you access to all my models for commercial use. Whether you're selling online or at local markets, these licenses allow you to print and sell physical copies of my designs. Support independent creators and grow your business with original models made for makers like you.
License
You shall not share, sub-license, sell, rent, host, transfer, or distribute in any way the digital or 3D printed versions of this object, nor any other derivative work of this object in its digital or physical format (including - but not limited to - remixes of this object, and hosting on other digital platforms). The objects may not be used without permission in any way whatsoever in which you charge money, or collect fees.
Comment & Rating (102)