Humidifier Mist-free Evaporative 14cm fan


Print Profile(1)
Description
Mist-free Evaporative Humidifier with 14cm fan (1L water storage capacity)
Used with a Mijia smart plug and temperature/humidity sensor, the humidifier can be set to start and stop automatically
Feel free to share photos of your prints in the comments section
Benefits of an evaporative humidifier
1 Unlike humidifiers that directly spray mist, evaporative humidification is safer
2 Adaptive humidity control, the higher the humidity, the slower the evaporation
3 Humidity will generally stabilize around 70%+ preventing excessive humidity
Real cost analysis (not special offer, not including printer)
14cm fan: 20 RMB (flexible)
DC power supply: 7 RMB (Pinduoduo)
DC female connector: 1 RMB (Pinduoduo)
PWM module: 4 RMB (3 for 12 RMB)
M4 screws and nuts: 4 RMB (20 pairs)
Material: 10 RMB (PETG [22 RMB per roll], 419 g)
Electricity cost: 2 RMB
Total 48 RMB Purchase recommendations are at the end of the article
Boost Me (for free)
2026-01-25: +1cm and +2cm versions of the water tank were created using boolean operations in Bambu Studio
2026-01-09: Preparing to test the +7cm air duct (actually, multiple original-sized ones can be stacked, no need to print a taller version) to utilize the full length of a wet wipe
Multiple original-sized pieces can be stacked to form a taller air duct, as printing it as a single piece carries higher risks


2026-01-08: Humidity comparison test using the default height version in a room [approx 12m²] with the door closed for sleep and the air conditioner's fresh air [low setting] on. Actual humidity showed a 12% increase, which felt decent

2026-01-07:
Added reinforcement ribs to the heightened air duct to prevent layer shift defects caused by vibration when printing tall and thin

2026-01-06:
Added more heightened air ducts from +3 to +7 to easily accommodate wet wipes of different lengths
2025-12-09:
1 Added 2 types of lids: no mesh and sparse infill


2 Air duct now has a perforated version

2025-12-10: 1cm and 2cm versions of both the air duct and water tank were added (achieved by splitting and joining in Bambu Studio)

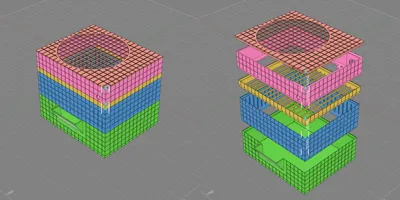
Photos

Stacking:
1 Flexible and easy to print
2 Colors can be freely matched
3 Different modules can be designed and replaced later based on various absorbent materials


Required parts:
1 14cm fan (Recommended: Thermalright TL-C14C, very quiet, keep an eye on JD.com's self-operated store for occasional price drops, can be bought for 15-16 RMB)

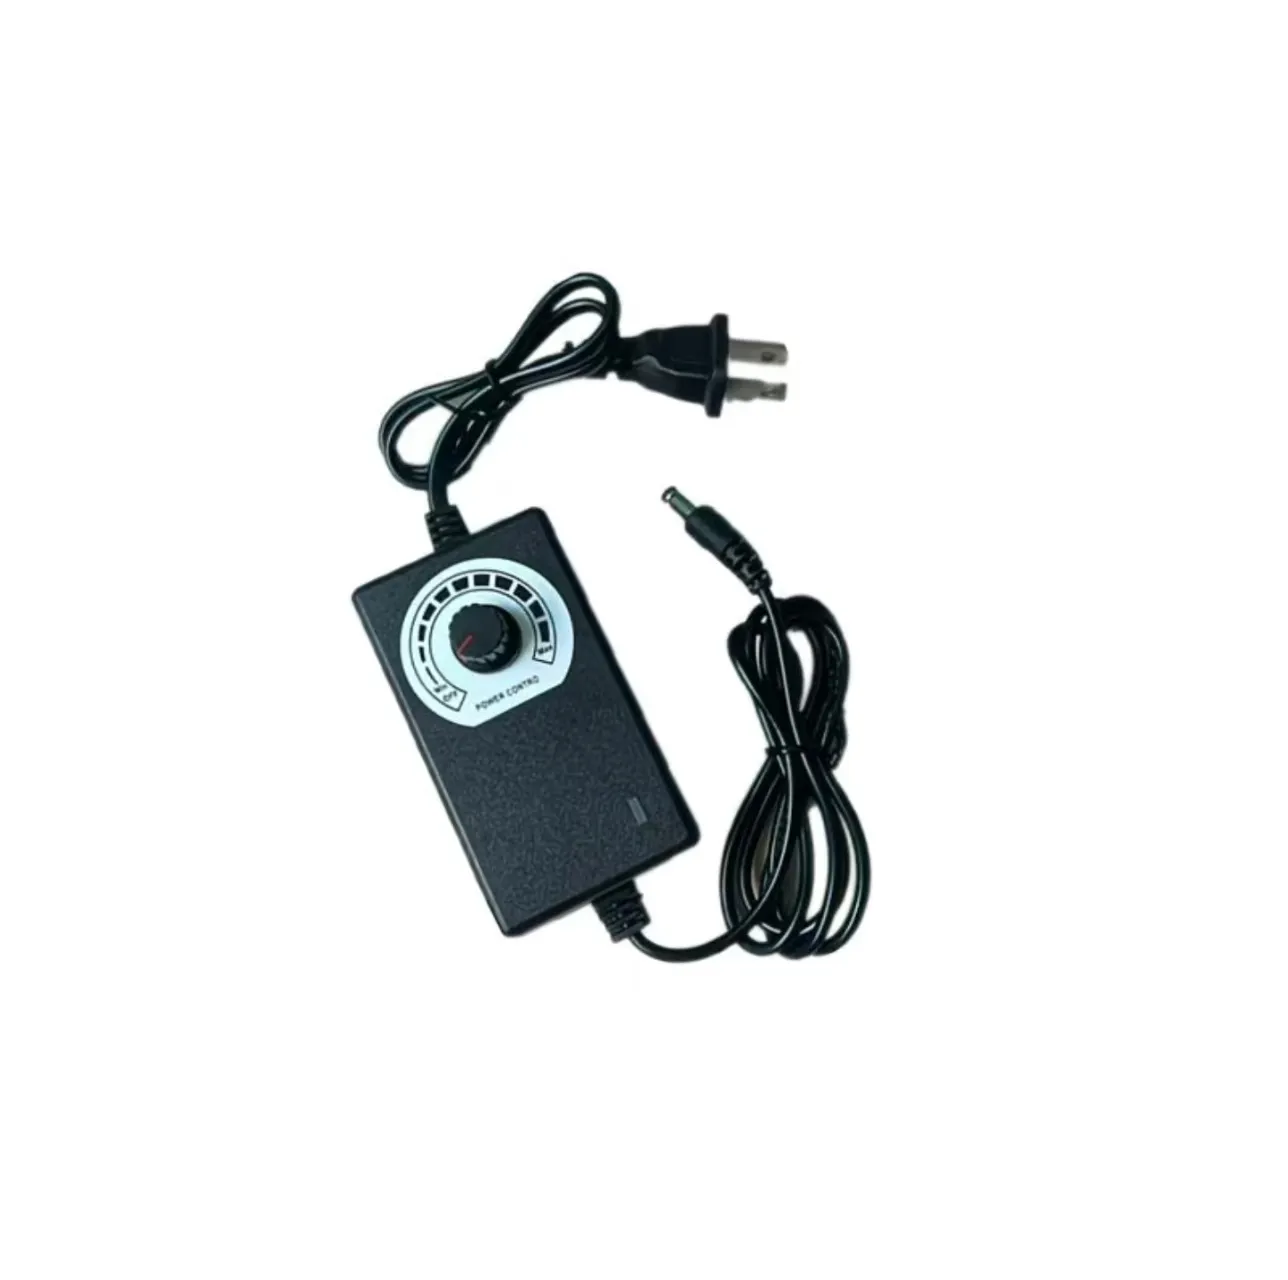
2 PWM speed control module (Pre-reserved holes are compatible with similar modules bought online, it's recommended to buy one similar to the example below for easier wiring)

If the speed control module's connector doesn't perfectly match, you can trim either the male or female connector to fit

3 DC female jack (Keywords: DC099, 5.5*2.1, with 10cm wire)

4 DC power supply (any 5.5*2.1 will work, with or without speed control is fine)

5 M4 screws (>=30mm will work, because: fan 25mm + plate thickness 2mm + nut 3.1mm)
6 M4 nuts
Installation instructions:
1 Water tank (for water storage, designed to be thicker to reduce the risk of leaks due to printing defects)

2 Air duct

3 Hanger (hang wet wipes/paper towels/thick cotton thread, wet wipes are recommended, the heavier the better the effect, paper towels tend to stick together if too close)

4 Bracket (install the fan and related parts, screws are not strictly necessary)
Fan direction, each has pros and cons:
Blowing upwards can prevent foreign objects like dust and insects from falling in
Blowing downwards, wet wipes/paper towels are less likely to stick together


5 Lid

Through the water inlet, you can directly refill water and observe the water level

To reduce shrinkage and deformation that commonly occurs when printing large models:
1 Grooved texture on the outside of the model
2 Ear-shaped brim added to all four corners in the print profile
3 Infill uses spiral pattern
4 It is recommended to use high-quality filament with low shrinkage rate
Furthermore, you can set additional measures to combat shrinkage:
5 Add a brim around the outside of the water tank
6 Maintain chamber temperature

The long overhangs of the stacking slots have added supports to ensure successful printing

IMPORTANT
To prevent leaks: the settings for the water tank plate are different:
1 Reduce layer height, use 0.16
2 100% infill
3 (Optional, depending on actual conditions) Increase the flow rate in the material settings

Printing large models often presents waterproofing challenges
as large models inherently tend to shrink to some extent
which can lead to gaps and holes
Of course, a simple and brute-force method is to apply a layer of resin directly to the inside after printing, perfect
The failed prints from earlier tests could also be used after applying glue
The thickened version printed later, combined with the aforementioned print profile optimizations, finally succeeded in not leaking, and the wasted material was worth it

License
You shall not share, sub-license, sell, rent, host, transfer, or distribute in any way the digital or 3D printed versions of this object, nor any other derivative work of this object in its digital or physical format (including - but not limited to - remixes of this object, and hosting on other digital platforms). The objects may not be used without permission in any way whatsoever in which you charge money, or collect fees.
Comment & Rating (0)