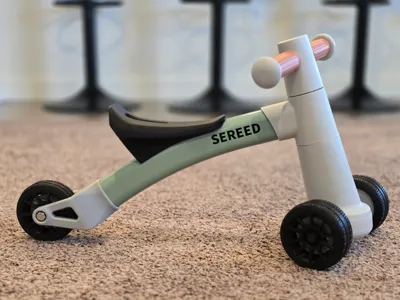
SEREED Small Single Rear Wheel


Print Profile(1)

Description
Single small rear wheel for a SEREED balance bike to prevent the riders heels from hitting the wheels. Designed to fit with my smaller front wheels (use the “select parts to print” feature to only print two of the four wheels): https://makerworld.com/en/models/1676633-small-wheels-for-sereed-balance-bike#profileId-1775703
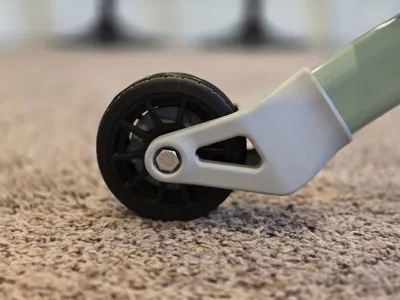
Requires glue, a 5/16 x 2.5" long bolt, and a nylon lock nut (or loctite) to replace the rear axle. I used a 3" long bolt cut down to 2.5" so the wheel was entirely on the unthreaded part of the bolt. Alternatively, you could cut down the original axle if you have the ability to create a new groove for the circlip.
The tire has two grooves for optional 4mm thick, 90mm-95mm diameter O-rings to roll smoother and quieter.
The axle mount has two glue in reinforcement arms to prevent all of the riders weight from being supported by the layer bonds. I suggest using Cyanoacrylate (aka superglue)
The tire/wheel is self aligning if glued together in the correct order:
- Glue one half of the wheel to the thinner half of the tire
- Glue the other thicker half of the tire to the thinner tire half
- Glue the final wheel half to the assembly (glue both the tire and the wheel to the final wheel half)
Remove the original rear wheels and axle mount: pull off the wheel covers, remove the circlip, remove the axle and wheels, remove the axle mount by pushing in the spring button (hidden behind the wheels).
The new axle mount is effectively a press fit design, it is intended to be quite snug and may shave a bit of plastic off during installation. I used a small piece of a 2x4 board placed between the legs of the axle mount to help tap it on. The spring button should pop in when it is fully seated.
Optional: I put some plastic-safe white lithium grease inside the wheel to help it roll better before installing the axle
Put the spacers on either side of the wheel (with the chamfer facing towards the wheel) and slip the spacers and wheel between the axle mounts. Install the bolt through the axle mounts, spacers, and wheel. Ensure the bolt is installed in the correct direction, there is an arrow on the bottom side of the axle mount indicating the direction the bolt should be inserted. Do not overtighten the nut, it should be loose to allow free wheel rotation (the lock nut or loctite prevents it from falling off)
Comment & Rating (0)