CyberDrive


Print Profile(2)


Bill of Materials


Description
Boost Me (for free)
Feels good to know people appreciating my work
!!This is the contest entry because my original upload was not verified on time. The Cyberbrick Verified version will be uploaded and This entry will be removed after the contest!!
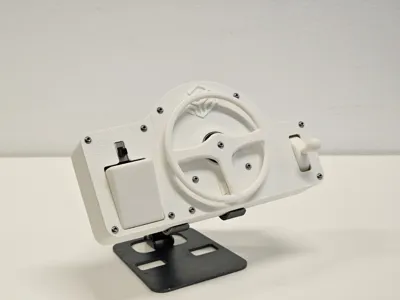
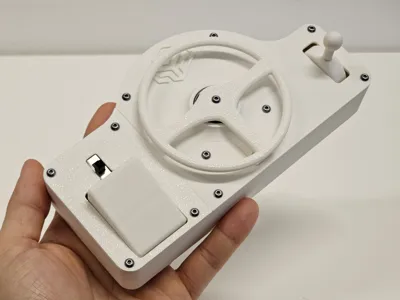
CyberDrive
I am thrilled to share this design. It took more time than I anticipated, but I managed to finish it just in time for the contest. This specific control set concept has been on my mind ever since I first got my hands on the Cyberbricks kit.
Please check the included PDF for a step-by-step assembly guide.
Hardware Requirements
To assemble the CyberDrive, you will need:
- 22x Cyberbricks kit screws
- 1x 608 Bearing (Snap-fit)
- Allen key
Critical Printing Instructions
The model is designed to print generally without supports. However, there are two specific parts that require careful orientation to ensure mechanical function and durability.
1. Gearshift Stick
- Orientation: You must print this sideways with supports.
- Reason: Do not print it vertically. Vertical printing makes the part brittle due to layer line orientation, and it will almost certainly break inside the mechanism during insertion.
2. Pedal
- Orientation: You must print the pedal on its side.
- Reason: If printed upright, the layer lines will prevent the joystick underneath from gliding smoothly. The layer lines must match the direction of motion.
- Note: The pedal may have minor issues printing the first layer, but this does not cause any functional or cosmetic problems. I plan to address this in a future update.
Assembly Notes
- Screw Holes: I extensively optimized the screw holes for a tight fit. Please let me know if you encounter any tolerance issues so I can further improve the design.
- Power Button: You will need to apply some pressure to push the power button into alignment with the screw hole. This tension is intentional and creates a very secure connection once tightened.
- Battery Compartment: When closing the cap, pay attention to the cable routing. You need to ensure the cables are tucked out of the way of the gas pedal mechanism.
Configuration
The included configuration file simply declares the inputs and outputs. It is intended as a baseline; you should configure the logic according to your specific project needs.
I hope you enjoy the build. I cannot wait to see people using CyberDrive to control all kinds of RC toys!
Documentation (2)
License
You shall not share, sub-license, sell, rent, host, transfer, or distribute in any way the digital or 3D printed versions of this object, nor any other derivative work of this object in its digital or physical format (including - but not limited to - remixes of this object, and hosting on other digital platforms). The objects may not be used without permission in any way whatsoever in which you charge money, or collect fees.
Comment & Rating (4)