Adjustable Juice Groove Jig (for Cutting Boards)


Print Profile(2)

Bill of Materials

- M4x6mm Machine Screw (or similar) x 8:
Description
Adjustable jig for cutting juice grooves into cutting boards using a handheld/palm router. Avoid the complexity of building a DIY adjustment system, or paying $100 for a pre-made jig.
Build Instructions:
1) Decide on the maximum size cutting board you want to handle using this jig
2) Cut 2 strips of ¾" plywood into 2.5" wide strips, with a length equal to the max cutting board length + 2"
3) Cut 2 strips of ¾" plywood into 2.5" wide strips, with a length equal to the max cutting board width + 2"
4) Insert one end of each plywood strip into the blind slot in each of the printed jig parts (one for each corner). To secure the parts together use an M4 machine screw (or similar) screwed into the hole on top of the part.
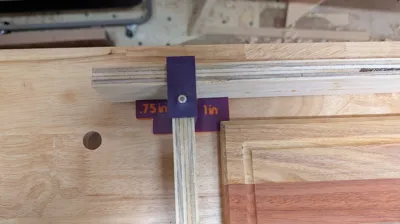
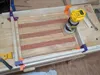
5) Connect each of the 4 walls of the jig together by sliding each of the 4 plywood boards into the perpendicular slot on the next board (see image for final configuration). Note: The jig has spacers for both 1" and ¾" from the cutting board edge, to allow the user to both accommodate different sized palm router bases, or to move the groove closer or further from the edge. Simply reverse the direction you slot each of the parts through to switch between the two spacings.
Operation Instructions:
1) Place your cutting board inside the jig, slide the 4 corners of the jig in to snug against the corners of the cutting board.
2) Once you have the cutting board tightly secured between the 4 corners of the jig, you can use another M4 machine screw per corner to clamp down on the neighboring jig wall and secure them in place (see demo image).
3) Use clamps or other fixturing to secure the entire jig + cutting board assembly to your benchtop
4) Using an appropriate router-bit for the task, run the edge of the palm router base-plate against the wall of the jig, maintaining contact at all times, particularly when rounding corners.
5) Cut down to final depth in increments for a safer and cleaner cut. Consider a very light finishing pass to eliminate any scorch marks.
Disclaimer: Use at your own risk; routers are dangerous and can cause serious injury.
Comment & Rating (18)