Tesla WC3 Wireless Charger Upgrade


Print Profile(1)


Description
⚠️ WARNING — READ BEFORE ATTEMPTING ⚠️
This modification replaces Tesla’s OEM wireless charging module with custom, non-OEM electronics. Performing this upgrade requires working with vehicle power, custom wiring, and third-party components. You undertake this entirely at your own risk and must judge your own level of competence before attempting it.
This modification will almost certainly void your warranty for the affected components and may void wider vehicle warranty coverage. If you are not confident, do not attempt this.
Intro
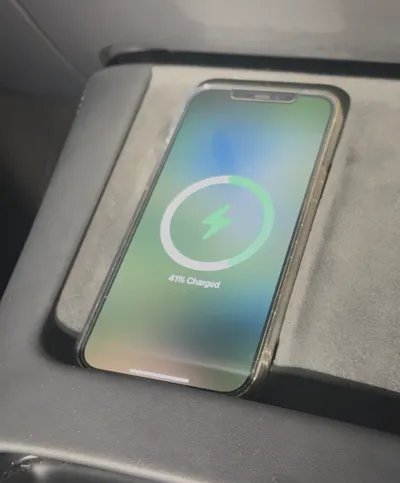
Tesla’s OEM WC3 wireless charger in the 2021–2023 Model 3/Y looks great, but many owners know the reality: inconsistent charging, overheating phones, and charging that cuts out the moment you accelerate or take a corner.
I wanted a true OEM-looking fix, but found that nobody had designed a drop-in frame for aftermarket modules without sacrificing quality or aesthetics.
This project retains the OEM 16V connector, fits the WC3 mounting points, and is completely hidden once installed. If preferred, this design can also be adapted for wireless modules that use USB-C input instead of a 12–24V input. Using USB-C would make the build completely solderless and plug-and-play by routing a USB cable into the centre console. This would require the 3D model to be slightly re-designed.
Real-World Testing
I drove ~250 miles across 1 week including:
• Hard acceleration
• Cornering
• Cold morning defrosting at max temperature
• Normal interior temps (20–22°C)
Performance was flawless:
• No dropouts
• No overheating
• No warping of the PETG-CF housing
• Charges iPhone 16 consistently
Compatibility Notes
This is designed for any Model 3 or Model Y using the WC3 module.
Likely fits:
• 2021–2023 Model 3
• 2021–2023 Model Y
Always check your trim first, as Tesla revisions are unpredictable.
If your setup matches the teardown video or the reference photos below, this housing should be compatible.

Video References
Trim Removal: https://www.youtube.com/watch?v=H3M1pYr679o
WC3 Module Teardown: https://www.youtube.com/watch?v=HpOf7gatf34
Remove your trim first and confirm your vehicle uses the WC3 module before printing this housing.
Optional: Buy the Printed Housing
For users without a 3D printer or those with printers too small for the part, I have listed the housing (no electronics included) on my eBay store.
Future DIY bundles including the electronics may be added depending on interest.
Materials & Tools
3D Printing
• Filament: PETG-CF recommended (heat-resistant).
• PLA is unsuitable — it will deform from heat.
• PC or ABS also work if your printer supports them.
Electronics & Hardware
• 2× 20W Wireless Charging Modules (12–24V input type)
• Automotive Connector + Pins + Crimping Tool - Amazon kit used: https://www.amazon.co.uk/dp/B0FLF8VYJH
• Screws: 4× small 3 mm screws + the original Tesla OEM screws
• TORX T20 screwdriver or bit
Optional:
• JST connectors (for modularity)
• Soldering iron & solder
Alternative Wiring Method (No Crimp Tool Required)
If you do not want to source the OEM-style automotive connector and pins, you can bypass it entirely.
An alternative is to cut the OEM charging connector off the original WC3 module harness and expose the positive and negative wires.
These can then be connected to the wireless charger modules using:
• A small terminal block, or
• JST connectors (or any type of connector designed to handle 16v+)
• Direct soldering + heat-shrink
This avoids the need for crimp pins or a crimping tool, but requires cutting the original connector.
Only attempt this if you are competent and understand the consequences and you understand the warrenty ramifications)

3D Printed Housing Overview
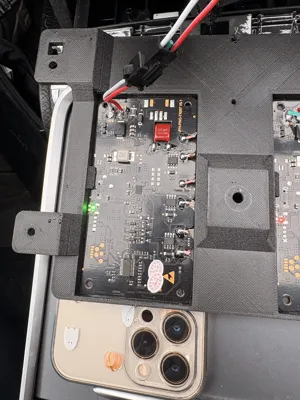
The housing is designed specifically for the linked 20W modules with the drop-in coil + board layout.
Other boards may require changes to the model.

How it works
• The module’s charging coil is glued to a heat-resistant backer plate.
• The plate and coil feed through the front slot.
• The coil sits directly behind the OEM charging surface closer than OEM original.
• The PCB locks under a rear retaining lip.
The print profile is tuned so that the OEM connector cavity prints without internal supports, allowing the built-in latch geometry to function.
Step-by-Step Build Guide
1. Remove the OEM Charging Module
- Follow the video linked above to remove the charger from your Tesla.
- undo the three torx screws holding the WC3 module.
- Lift the module out
2. Prepare the Wireless Charger Modules
• Feed the coil + plate through the slot.
• Press the PCB under the retaining lip into its recess.
• Stick the adhesive backer plate to the inner surface.
Repeat for the second module.

3. Wire the Tesla-Style Connector
Important: Compatibility is only guaranteed with the exact parts listed, if you are purchasing from other countries or different components you may need to modify the 3D files.
The OEM 16V Ports internal latches were designed specifically for the pins from the linked kit.
Different pins may not lock correctly and may require modification.
Each charging module requires:
• Positive + (12–24V)
• Negative – (Ground)
Wiring steps:
• Crimp the pins onto the module wires.
• Push pins into the OEM connector until they lock.
• JST connectors may be added in between for modularity.
• Secure the connector to the housing using two 3–3.5mm screws.

4. Test Before Installation
Before bolting anything in:
Disconnect the Tesla low-voltage battery.
Then:
• Plug the connector into the vehicle (or use an external 12–24V PSU).
• Red light = standby
• Green light = charging
Test using a phone.
Only proceed once both modules work correctly.
Reconnect the low-voltage battery afterwards.


5. Install in Vehicle
• Place the housing where the OEM module was.
• Secure with the original screws plus two extra trim screws.
• Reinstall the trim panel.

License
You shall not share, sub-license, sell, rent, host, transfer, or distribute in any way the digital or 3D printed versions of this object, nor any other derivative work of this object in its digital or physical format (including - but not limited to - remixes of this object, and hosting on other digital platforms). The objects may not be used without permission in any way whatsoever in which you charge money, or collect fees.
Comment & Rating (5)