Sweetheart Cupcake Keepsake Container-Magnetic Lid


Print Profile(1)

Bill of Materials


Description
Sweetheart Cupcake Keepsake Container – Printable Treat Box with Message Signs.
✅ Overview
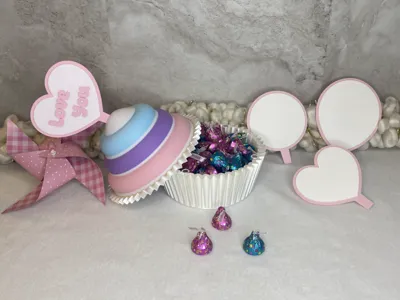
This pastel-stacked frosted cupcake hides a secret: the top “icing swirl” is actually a removable lid that reveals a roomy internal storage compartment. Smooth contours, clean color transitions, and a polished heart-topped sign make it perfect for Valentine’s Day, anniversaries, birthdays, party favors, desk décor, or anywhere you want a little pocket of joy.
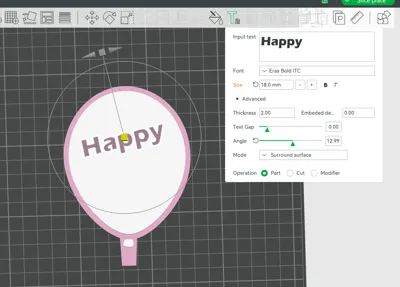
A premade “Love You” heart sign is included, but three blank signs—circle, balloon, and heart—are also provided so you can add your own custom message in Bambu Studio (perfect for multicolor text, names, initials, dates, or tiny icons).
The result feels like a gift from a whimsical bakery… except it’s 3D printed. The Sweetheart Cupcake Keepsake measures 134mm (5 1/4 in) H x 147mm (5 3/4 in) W.
Every detail of this print was modeled manually—no AI assistance—to capture the classic candy form in accurate proportion and tactile realism.
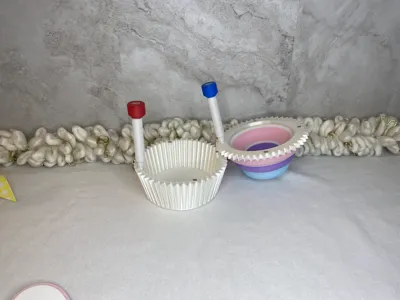
Magnetic Lid System
Four 6 × 3 mm neodymium magnets align precisely to hold the lid tight—strong enough to feel secure, yet effortless to open with a simple slide-off motion. For correct polarity every time, use the Magnet Presser with Stand when installing your magnets.
🧩 Why Magnets Instead of Threads to be
- Smooth Access: no twisting, lift or slide.
- Durability: magnets never strip or seize.
- Cleaner look: preserves the plate-stack silhouette.
- Fast Printing: no need for threaded tolerances or supports.
- Tactile Satisfaction: every open and close gives that solid “click.”
🖨️ Recommended Print Settings
- Minimum bed: 150 × 150 mm
- Layer height: 0.16 mm (to help reduce layer lines)
- Fuzzy Skin: Pre-set for frosting
- Walls: 5
- Top/Bottom: 5 layers
Infill: 10–15 % gyroid
💡 Fun Ideas
This cupcake container shines brightest when paired with a color theme that matches the occasion. Below are curated combinations—pastel, bold, seasonal, or shimmering—each chosen to bring out different moods and uses.
Romantic & Sweet Moments
Perfect for anniversaries, Valentine’s Day, or just letting someone know they matter.
Color Suggestions:
- Pastel Pink + Baby Blue + Lavender frosting
- Matte White cupcake liner
- Bubblegum Pink sign border
These colors lean soft and affectionate—ideal for the included “Love You” sign.
Use it for:
- A surprise candy or jewelry holder
- Romantic desk décor
- Breakfast-in-bed note presentations
Birthday & Celebration Gift Container
A little party on top of your printer.
Color Suggestions:
- Rainbow Layered Frosting using AMS color swaps
- Pearl White liner
- Confetti Speckle or gradient pastel topper sign
This palette feels lively and festive without overwhelming the design.
Use it for:
- Party favors with names printed on the blank toppers
- Gift-card delivery with a personalized message
- Celebration centerpieces
Baby Shower & New Arrival Keepsake
Soft, calm, and gentle—perfect for welcoming a little one.
Color Suggestions:
- Powder Blue, Mint, or Buttercream Yellow frosting tiers
- White or Oatmeal Matte liner
- Soft Blush or Sky Blue sign frame
Keeps everything warm, sweet, and nursery-friendly.
Use it for:
- “It’s a Girl/Boy” message toppers
- Gift containers for pacifiers, socks, or small keepsakes
- Table décor for baby showers
Kids’ Craft Fun & Everyday Joy
A whimsical palette brings out the playful side.
Color Suggestions:
- Bright Aqua, Lime, Hot Pink, or Grape Purple
- White or Light Gray liner
- Bold Color Sign such as teal or yellow
Kids love vibrant, “candy-store” colors.
Use it for:
- A tiny treasure chest
- A storage spot for stickers, erasers, and small toys
- A mailbox for little daily notes (“pull-tab messages”)
Teacher Appreciation & Classroom Gifts
Simple, cheerful colors—friendly without being overly sweet.
Color Suggestions:
- Chalkboard Black frosting base with Sunflower Yellow and Red Apple accent tiers
- White liner
- Red or Gold sign frame
Gives a subtle nod to classic classroom motifs.
Use it for:
- Personalized “Thank You” or “Best Teacher” messages
- Desk treats
- Gift-card holders
Holiday & Seasonal Displays
Make your cupcake match the season.
Color Suggestions:
- Spring: Lavender, Mint, Pastel Yellow
- Summer: Coral, Aqua, Tangerine
- Autumn: Pumpkin Orange, Chocolate Brown, Cream
- Winter: Ice Blue, Silver Silk, White Pearl
With color swaps in Bambu Studio, seasonal shifts are effortless.
Use it for:
- Table centerpieces
- Seasonal décor around the home or office
- Giftable containers filled with themed candy or ornaments
📦 Bill of Materials
- 8× round magnets – 6 mm diameter x 3 mm thick
- 4 magnets for the lid
- 4 magnets for the box body
- A drop of CA (super glue) for securing magnets (optional but recommended).
Tip: Mark one face of all magnets with a marker before installation so you keep polarity consistent.
All primary parts are 3D printed.
🔧 Assembly Instructions
Tools Needed
- A small amount of CA gel adhesive
- Magnet Presser with Stand (recommended for perfect polarity and depth alignment)
- Optional: Lightweight Hammer
1️⃣ Install Insert
- Apply a few drops of gel CA glue to the lid and place the insert, centered in the lid. Note: There should be a slight gap around the edges to resemble a cupcake wrapper loosing up.
2️⃣ Install Magnets in the Container
- Place the first magnet into the Red Magnet Presser.
- Apply a tiny drop of gel CA into the magnet location of the container. Use the Magnet Presser to press the magnet gently into its pocket.
- The presser ensures even pressure and prevents chipping or tilting.
- A small hobby hammer may be needed to press in place.
- Ensure the magnet is level with the surface or very slightly below. Note: if the magnet is raised above the surface, a gap will form between the lid and the container.
- Repeat for the remaining three recesses using the Red Magnet Presser.
3️⃣ Align and Install Magnets in the Lid
- Repeat Step 2 for the lid using the Blue Magnet Presser, ensuring the magnet poles face each other and the lid “clicks” shut cleanly every time.
4️⃣ Cure and Test Fit
- Allow adhesive to cure fully (usually 10–15 min).
- Once cured, test-fit the lid. It should align magnetically and slide open with a smooth pull.
License
You shall not share, sub-license, sell, rent, host, transfer, or distribute in any way the digital or 3D printed versions of this object, nor any other derivative work of this object in its digital or physical format (including - but not limited to - remixes of this object, and hosting on other digital platforms). The objects may not be used without permission in any way whatsoever in which you charge money, or collect fees.
Comment & Rating (0)