Star Trek Type 15 Shuttlepod / Shuttlecraft


Print Profile(2)


Description
UPDATED!!! Star Trek Type 15 Shuttlepod / Shuttlecraft MOC (40768 Modification)
UPDATE:
I have put the instructions for the original 40768 Shuttlepod Type 15 online
A few parts are different, but they can be replaced with the parts from the model
 → replace with a 2x4 and 2x2 plate
 → replaced by a 1x3 plate or simply print multiple times
I haven't changed my print profiles yet, but it should be possible with the parts from the profiles
If not, just send me a message and I will adjust them accordingly
--------------------
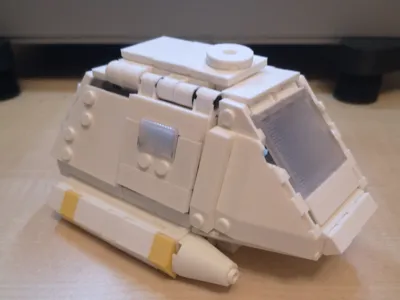
I am providing you with a brick version of the Type 15 Shuttlepod from Star Trek for download
It is a MOC of the 40768
A big thank you goes to the MOC designer MoppeW40k
- 261 parts
- no generators used
- glue recommended
- no supports, unless absolutely necessary
No generators were used for creation
The individual bricks fit together very well, but for a better hold I recommend a few drops of glue
Please note my warnings/tips, and you will get a nice model
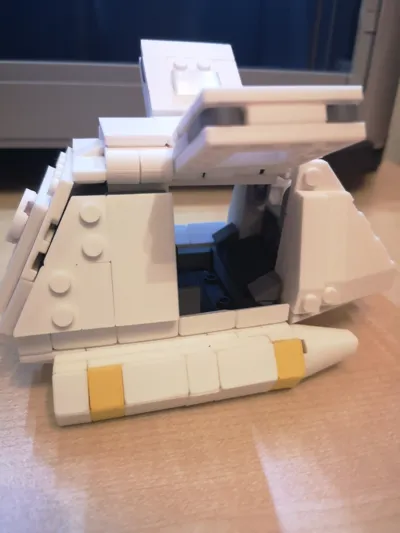
It is doable, as you can see from my pictures
---- Warning - Tips ----
The instructions are not very easy
I have added tips, so you won't make the mistakes I made during assembly
Please don't always use glue immediately, as some construction steps will need to be disassembled later
I have marked them in the instructions
Some parts (joints) break very easily because they are very thin and need to be printed again or slightly reworked
Therefore, don't always glue immediately
Please don't give me a bad rating because of the instructions, I only took them from MoppeW40k
My tip:

Here I cut off the studs, which makes assembly much easier
My failed attempts because I glued immediately. Therefore, pay attention to the instructions

GLASS PETG Transparent
I used PETG transparent for the window
For printing plate 7 you must choose a smooth printing plate (Smooth PEI Plate/High Temp Plate), otherwise you won't get the glass effect
Please switch
I copied the settings for this printing plate from Ale
With his print profile PETG Glass Effect 100% transparent I got the best results
Please ensure that the filament profile Glass PETG Transparent is also adopted when changing printers

Or you use his print profile and import the 60581.stl from my model there
My many own attempts that didn't turn out so well until I discovered his print profile
With his profile, it worked perfectly

I am very happy with the model, I hope you like it as much as I do
I appreciate any feedback
Without feedback, I cannot improve my models
Please support my work
Many thanks
Boost Me (for free)
I appreciate all support
Documentation (2)
License
You shall not share, sub-license, sell, rent, host, transfer, or distribute in any way the digital or 3D printed versions of this object, nor any other derivative work of this object in its digital or physical format (including - but not limited to - remixes of this object, and hosting on other digital platforms). The objects may not be used without permission in any way whatsoever in which you charge money, or collect fees.
Comment & Rating (11)