3D Scanning Markers with Dual Magnets


Print Profile(1)

Description
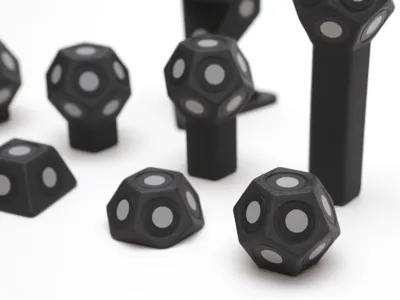
This is a remix of @Whity2K’s most awesome magnetic markers for scanning.
I wanted to have a travel set of markers that I could:
- Utilize the shorter sizes only (up to the 20mm riser size)
- stack to create higher marker towers if needed
- place in a custom-fitted box so they don’t scatter all over (Parametric Sliding Lid Box Maker)
So, I modified Whity2K’s marker set to include magnets on top as well. This allows them to be stackable without having to print out the larger ones, which I use less frequently.
I have only created one profile for my mods – a profile with 0.16mm layer lines and pauses to insert 8x3mm magnets at the right moments. I print most of my models that I want to look aesthetically pleasing with 0.15mm or 0.16mm layer lines instead of a 0.20mm layer line. They come out looking polished and professional with thinner layer lines, in my opinion. If you choose to print at a different layer height, just double-check the pause commands for the models you wish to print, to ensure they are at the right layers. They should be fine, but just in case…
CRITICAL MAGNET TIPS (do not ignore these or your markers won’t magnetically stack properly!) :
- To ensure the magnets are always polarity-aligned, stack them all on top of one another. Find which end of the stack magnetically affixes to your scanning bed or rotating scanning plate. Color the bottom of the magnet stack with a sharpie. This marked magnet at the bottom of your stack of magnets will be the “polarity indicator” magnet and should not be used until it is the last one. This is the BOTTOM of your magnet stack.

- Then, at a print pause, take a magnet from the TOP of the stack, mentally note the bottom of the magnet and place it in the paused recess with the bottom of the magnet facing downward. The magnet should be in the SAME orientation as it was when taken from the stack. If you do this for all placed magnets, they will all be polarity-aligned and will stack easily.
When at a pause, place a drop of super glue made for plastic in the magnet recess area. Not much, just a drop. Then place the magnet in the recess before continuing. Regular cyanoacrylate (super glue) works fine for inserted magnets; I prefer super glue made specifically for plastics - https://amzn.to/4ryNZTp.
WHAT IS CHANGED FROM THE ORIGINAL MODEL?
- Magnets have been added to the models where a top magnet can be used
- Layer lines have been set to 0.16mm
- Pauses have been inserted at the correct layer lines for the top magnets
RECOMMENDED MATERIALS
- 10x3mm Rare Earth Neodymium magnets https://amzn.to/48kK4k2
- Bambu Lab Charcoal matte PLA PLA Matte | Bambu Lab US Store
- Super Glue for Plastics https://amzn.to/4ryNZTp
TRY OUT THE REVOPOINT MAGNETIC TURNTABLE EXTENSIONS!
Now that you have these awesome magnetic scanning markers, they pair perfectly with my magnetic RevoPoint turntable extensions – click HERE to see what it’s all about. Give ‘em both a try!
Thanks for looking at my model and good luck on your prints. Be sure to post a photo of your awesome completed prints to share with others!
Comment & Rating (7)