


Print Profile(7)


Description
Boost Me (for free)
🔧 Update V4 – Longer Tape Strips
With Update V4 you can now cut longer tape strips
There are two new gear pairs for the tape cutter
- 48 mm Gears
- 1× small gear_V4_48mm_0.4mm
- 1× large gear_V4_48mm
- Result: approx. 48 mm long strips
- 66 mm Gears
- 1× small gear_V4_66mm_0.4mm
- 1× large gear_V4_66mm
- Result: approx. 66 mm long strips
💡 Important:
- All other parts remain unchanged – only the gear pair needs to be replaced
- This allows you to flexibly switch between 48 mm, 66 mm, or the standard V3 gears by simply inserting the corresponding gears
💾 Note:
- The gears are uploaded as a separate print profile and can be downloaded individually
- All files are also available individually as a 3mf file
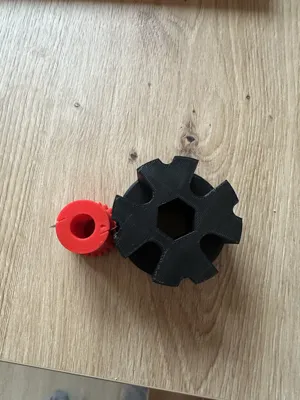
- Pay attention to the correct assembly of the gears: The arrow on the small gear must be centered in a groove of the large gear
🔧 Update V3 – New Small Gear (Improved Cutting Performance)
For all who still desire cleaner and more powerful cuts, there is now a new small V3 gear.
All other components remain unchanged – so only this one part needs to be reprinted
What's New with the Small V3 Gear?
- 5° angled and inclined blade guide
→ The blades are slightly inclined, leading to a significantly better cutting action, similar to a slicing cut - Assembly marking with an arrow
→ A small arrow is located on the end face
→ This arrow must be positioned exactly in the middle of a cutting groove during assembly
→ Only then will the blade operate in the correct cutting area of the large gear
Advantages of the New V3 Gear
- Cleaner cuts
- Less effort
- Precise razor blade fit
- Compatible with all previous parts
Recommendation
For the update, only one part needs to be reprinted
1× small gear V3_0.40 mm gap_new or small gear V3_0.35 mm gap_new (depending on desired blade tightness)
All other components remain unchanged and can be reused
Note
- The new V3 gears are already integrated into the print profiles
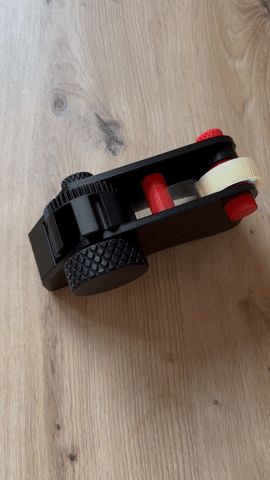
Tape Dispenser / Tape Cutter – 100% 3D Printable ⚙️✂️
This fully mechanical tape cutter operates without electronics, springs, or additional connecting parts. By turning the large gear 🔄, the integrated cutting mechanism is moved, and the tape is separated precisely and reliably.
All components (except the blade) can be conveniently 3D printed and assembled without tools. 🧩🖨️
🔩 Included 3D Printed Parts (13 parts)
- 3× nuts
- 3× bolts
- 2× adapters
- 2× gears (1× large, 1× small) ⚙️
- 2× outer parts (housing / casing)
- 1× tape holder / roll adapter
📁 Additional Variants
- 🦷 Alternative small gear with 0.35 mm blade gap
→ For a more precise fit depending on printer tolerance - 🎨 Design variant with cut-out side panels
→ modern look + lower material consumption
⚠️ Required Third-Party Part
- 1× utility knife blade (standard, 9 mm)
Recommendation: approx. 4 segments

🔪 Inserting the Utility Knife Blade (Important!)
- Insert the blade from the front or place it further forward into the groove
- Then push it all the way back to the stop
- The blade is deliberately seated 1–2 mm recessed so that nothing protrudes – for added safety
- Always insert with pliers! 🧰⚠️
- Push the blade all the way to the back with pliers so that it sits correctly and securely.
- Optional: Wear protective gloves
Check: A blade segment must sit in one of the grooves of the large gear → this is where the cutting process takes place ✂️

Fit Notes
Tolerances may vary depending on the printer
- If the blade is too loose → use a very small drop of glue
- Always be aware of the risk of cuts when handling the blade 🩹
Assembly Instructions
1. Prepare the Left Side Plate
Place the left outer part flat on the table. This serves as the base for assembly
2. Insert the Adapters
Insert the two adapters onto the designated positions on the left plate
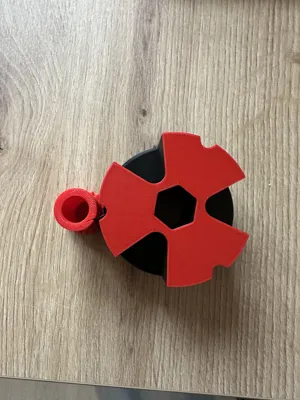
3. Mount the Gears
- Place the large gear in its position. Pay attention to the images in this description!
- Place the small gear in its position. Pay attention to the images in this description and the arrow marking on the small gear!
- Important: Make sure the blade position of the small gear is in the correct groove of the large gear. Pay attention to the images in this description!
4. Attach the Right Side Plate
Now carefully press the right outer part onto the already assembled components until all pins snap cleanly into place
5. Insert the Bolts
Insert the two bolts for the large and small gears from the outside through the openings in the right plate
6. Secure the Nuts
Screw the corresponding nuts onto the bolts of the two gears until they run smoothly with no play
7. Insert the Tape
- Slide the tape roll onto the roll adapter
- Then place the roll into the housing
- Secure it with the tape bolt
8. Secure the Nut for the Tape
Screw the "Tape" nut onto the bolt to securely fix the roll
📦 Ideal for
- Desk & Office
- Workshop & Maker Space
- Crafts and Creative Projects
- Packaging & Shipping
Have fun printing and assembling! 🚀😊
Documentation (1)
License
You shall not share, sub-license, sell, rent, host, transfer, or distribute in any way the digital or 3D printed versions of this object, nor any other derivative work of this object in its digital or physical format (including - but not limited to - remixes of this object, and hosting on other digital platforms). The objects may not be used without permission in any way whatsoever in which you charge money, or collect fees.
Comment & Rating (289)