Search models, users, collections, and posts

Snapmaker U1 automatic feeder angle adjustment bracket

Print Profile(1)

All
A1
H2S
H2C
A1 mini
P2S
X1 Carbon
P1S
X1
X1E
H2D
H2D Pro
P1P
X2D
A2L

0.2mm layer, 3 walls, 15% infill
Designer
2.9 h
2 plates
5.0(25)

Open in Bambu Studio
Boost
409
1063
135
44
1.4 k
355
Released 

Description

Boost Me (for free)

If you like this 3D model or design, please follow me and give it a boost—your support fuels my creativity and keeps the designs coming!

  • Updated:Optimized the insufficient preload of the latch that caused disengagement. —tested!! 2026_01_20

  • Updated the incorrectly-uploaded version, adjusted the dimension in the red box—tested!! 2026_01_14


——————————


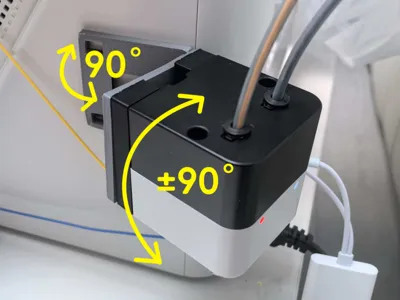
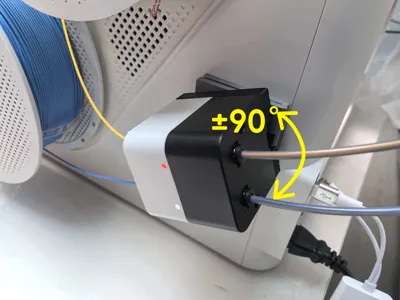
U1 Auto-Feeder Angle-Adjustable Bracket.

  • Designed for scenarios where the angle needs to be adjusted when using a dry-box!!
  • After opening, it does not affect the original wiring harness!
  • The angle adjustment has obvious tactile detents.

【PS:No need to mirror; just print two identical parts for installation—U1's two sides aren't mirrored.】

【PS:无需镜像,直接打印2个一样的使用即可】

update:


——————————

  • Steps to disassemble the automatic feeder


  • If the cable is too short, gently pull it out—there’s plenty of slack inside, it’s just taped to the housing.

  • Two things to watch in the process settings:
    • 1. Set modifier infill to 60 % to reduce the chance of breakage.  
    • 2. Supports are required.

  • For Snapmaker Orca download here!


If you need laser cutting or CNC engraving, you can give the DXF directly to a shop. If you need to edit the drawing yourself, download the first DWG file.

Boost Me (for free)

If you like this 3D model or design, please follow me and give it a boost—your support fuels my creativity and keeps the designs coming!

Comment & Rating (135)

(0/1000)

Great design and I agree with others -- the ratchet mechanism is brilliant. But I am having a little trouble with the attachment to the stock feeder, specifically the lock mechanism. See pics. One shows the feeder unattached with it's lock straight -- just to demonstrate the default position. The other shows attached to this adapter and aligned top to bottom -- the lock remain compressed. In fact, there is some play, but no position where the lock is not compressed, even though you can hear at least a couple of click-like sounds. And of course the lock doesn't actually work and it's friction held -- not the intent. I can't install it like this as it will fatigue the lock plastic over time. It seems like it might be a tolerance issue, but it's hard to observe directly. I downloaded and printed today, so it's today's version on 06-Jan-2026. Any thoughts? For completeness, the adapter to printer interface is perfect, including the lock. The press handle is a nice touch.
(Edited)
The designer has replied
0
Reply
Replying to @user_836068976 :
No, it’s pushed as far as it goes. I am going to skip this design — I don’t want my feeder damaged with time.
0
Reply
Replying to @lexxone :
Thanks for the feedback—I'll give it another check and tweak.
0
Reply
Replying to @user_836068976 :
I had the same problem. It looks like the cutout for the clip isn't quite the right shape (there's a funny curve in there) or size (it needs to widen maybe 1mm earlier).
1
Reply
How you are print that , You use 100% supports and infill 100% or what to possible print it fine . I think print it in other position horizontal with 100% infill or how ? And why in project modifcator zone without any motyfications ?
(Edited)
The designer has replied
1
Reply
You can move this modifier downward so it connects to the base. Be careful not to change the default parameters.
(Edited)
1
Reply
Replying to @user_836068976 :
yes thx, but how print fly elements fine You use 100% supports or what to possible print it fine?
(Edited)
1
Reply
Replying to @NIEDAR :
yeah,use 100% supports
2
Reply
I saw this early on when considering what to do with my printer setup and thankfully saved it as it became a lifesaver when I moved all printers to a new room in my house. I had to make an adjustment so that it would handle both auto loaders. Printed perfectly for me in all my testing .
1
Reply
hello, looks nice, did you use a extention cable for the auto feeder? and if so which one,
0
Reply
How did you get the feeder all the way to the other side like that?
0
Reply
Replying to @TokenTurd :
I uploaded the model (https://makerworld.com/en/models/2475647-snapmaker-u1-double-auto-feeder-angle-bracket) and explained what I did along with a few pictures. If I need to clarify any of it let me know, I'm not the best at always outlining the steps.
(Edited)
0
Reply
this is awesome! I am going to remix this to create a feeder rotation plate so I can feed from my dry box under my U1!
The designer has replied
0
Reply
There are many types of drying boxes on the market. If you have any suggestions for improvements during use, feel free to leave a comment—I’ll keep optimizing!
0
Reply
Replying to @user_836068976 :
This is the idea. Allows the feeder to be put onto the side of the U1 with the inputs on bottom and feed out the top. I am sure you can make a better version! My U1 is still shipping so unable to test anything yet
0
Reply
Replying to @kvandenh1 :
I checked the official drying box and several third-party ones, and they all have a relatively high outlet position, so an additional male-to-female extension cable is needed. However, I already have an idea.
1
Reply
Boosted
Worked great thank you. Printed in PETG.
1
Reply
Perfect picture for my reference! Thank you! My official Snapmaker dry boxes came in recently. This is exactly how I will be setting them up. I REALLY wish they would have made it so you could mount the hygrometers on either side. Kinda' silly that if I want to use the auto feeders then I have to have them facing toward the back instead of toward the front where I can easily see them. Question, are those fittings connected to your auto feeders the ones that came with the dry boxes? I tried to connect them and they didn't screw in. In the setup video, it looks like they just have the connectors jammed into the rubber gaskets of the boxes and the ptfe tube somehow jammed into the auto feeders. I printed one of the brackets and did not change the support from the tree structures. It made a big mess that was hard to remove and left the surface pretty rough. I may try another support structure and see if it turns out cleaner. Can't wait to get it all set up! Been loving my U1 so far!
(Edited)
0
Reply
Boosted
Replying to @Gargoylz :
Yeah it is odd. I'm debating on plugging the back and putting a new hole in the front. Then spinning them. I just don't want to crack the plastic if the bit jams during drilling.
0
Reply
This is more like natural way to feed.👍
3
Reply
What does this piece do and where does it go
The designer has replied
1
Reply
Look at the yellow part in the image—this serves as the spring component.
1
Reply
tried it and find it brilliant printed on U1 and used grid supports the "pins" or the 3 holes are not perfect I had to file them to close completely maybe the screw should have a lock so as not to unscrew Thanks for your work
Show original
1
Reply
I'm having a little trouble with the catch that's supposed to secure it to the side of the printer - it's not really engaging, so the model can slide off without needing to press the tab in - but it isn't a case of it not popping back out into position, it looks like it's not actually bending much at all, so there's no / too little tension. The tolerances of the 4 pins are pretty good, it doesn't have much room to wiggle, so it may be that 1. the clip needs a little adjusting to reduce tolerance against the printer a bit more and ensure alignment and/or 2 it might need a shorter arm/less flexibility (the original motor casing clip is very rigid so holds firmly). What do you think?
(Edited)
The designer has replied
0
Reply
ok!I got!
(Edited)
0
Reply
Replying to @user_836068976 :
The updated version has a different problem - one of the pins that fits into the holes to secure closed the hinged pieces is faulty. The pin has moved, and the corresponding hole has disappeared?
0
Reply
Replying to @liver424 :
e~~~ I realized my version control was messy, so I need reorganized everything and printed/verified each one today again.
0
Reply
The print profile is no longer public
This is one of the must-have accesory for U1.
profile
1
Reply

License

This user content is licensed under the MakerWorld Exclusive License.

You may create derivative works based on this object, provided that all such derivative works are published exclusively on the MakerWorld platform and include proper attribution to the original creator. You may not share, upload, host, distribute, or publish this object—or any derivative work of this object—on any other digital platform, marketplace, or distribution channel. Commercial use of this object and any derivative works is strictly prohibited. This includes, but is not limited to, selling, renting, sublicensing, or using the object in any context in which you receive monetary compensation or other financial benefits.