Calibrated Profile - Polymaker PLA Pro Light Blue


Print Profile(1)

Description
I've spent a lot of time looking around for the best print settings for various filaments and there aren't many out there listed, so I decided to share mine as I make them.
This is a fully calibrated profile for Polymaker PLA Pro / PolyLite PLA Pro filament, color - Light Blue. This was done on a Bambu A1 with the 0.4 hardened steel nozzle using Bambu Studio v2.3.1.51. I used a basic cube as a model for this because it is quick and easy to print for a test, but I have been printing with these settings on various models of various shapes and sizes and its been working great.
Directions for use (there are screenshots to help if you are new to this method):
- Download the print profile
- Open it in Bambu Studio (Click File → Open Project)
- Choose `Polymaker PLA Pro - Light Blue - Fully Calibrated.3mf` file
- Make sure you have the Bambu Lab A1 and the 0.4mm nozzle selected at the top left of the slicer

- Then choose Bambu Basic PLA

- Then select the Polymaker PLA Pro - Light Blue preset in “Project-inside presets”

- If you use a different printer than the A1, you can manually enter the settings in the print profile - I will attach them below.
- Next, you will need to edit your Bambu Lab Basic PLA profile by clicking the “…” button and choosing “Edit”:

- You will need to manually edit the settings to match the settings in the following screenshots (sorry, Bambu does not let custom filament profiles be uploaded to Maker World anymore like they used to):


- Once you are finished, you will click save and name it “Polymaker PLA Pro - Light Blue” (or whatever you want) by clicking the save icon - this box will appear:

- It will not overwrite your Bambu PLA Basic profile as long as you renamed it.
- Now it should be available for you in this menu:

- Next, go to your calibration tab and choose manage result at the bottom:

- You will want to create a new entry by clicking the green button that says “New” - then filling in the boxes to match the below screenshot (for “Name” choose the “Polymaker PLA Pro - Light Blue” or whatever you named it when we created it earlier when manually entering the filament information by editing the Bambu Lab PLA Basic profile):

- Click “Ok” and then go to your device tab - it may look a little different for you, depending on if you have an AMS or not. You'll want to click the edit button on the roll of filament that is the Polymaker PLA Pro - Light Blue roll and choose the appropriate filament in the dropdown box (this will be the same as you chose in the previous step when manually entering the pressure advance value “0.029”. Click “Confirm when you are finished.”

- That's it! If you want to print a different model using my filament preset, just load it like this from any model you open in Bambu Studio:

- To use my print settings, you can load the `Polymaker PLA Pro - Light Blue - Fully Calibrated.3mf` file first, choose the filament preset like in the above step, and then import any model you want to print by going to “File” → “Import” → “Import 3MF/STL/etc”, choosing the file, and then selecting “Import geometry only.”
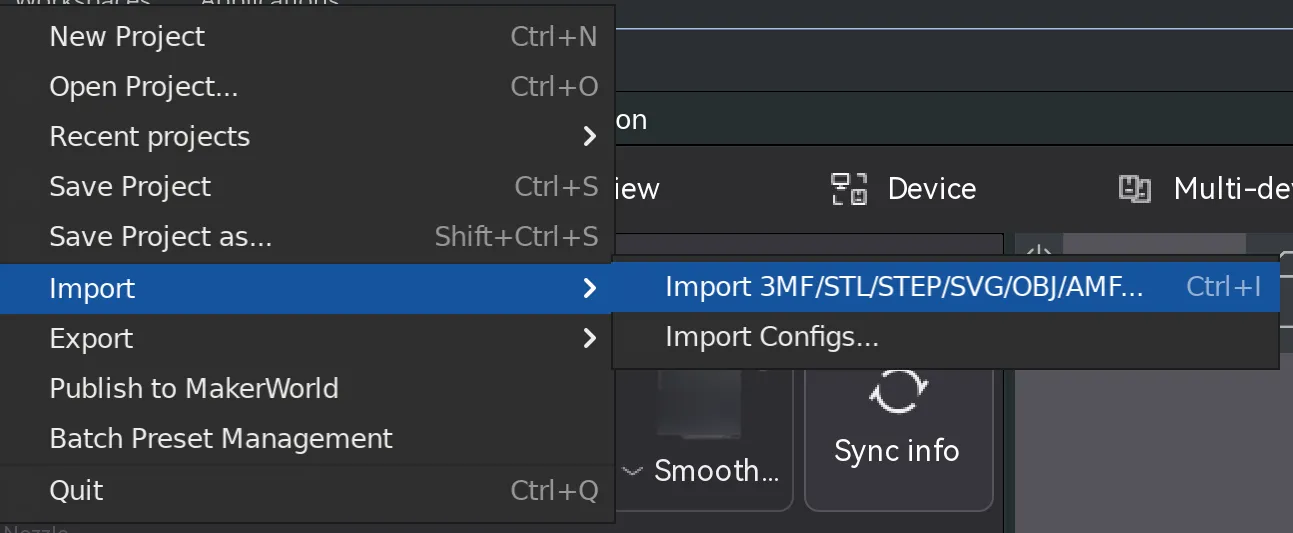

- If you choose “File” → “Open Project” instead, it will load the print settings for the other project and delete mine, FYI.
- That's it! Happy Printing!
I also attached screenshots of the print profile settings below so you can do this manually if you are using a printer that is not an A1 and Bambu Studio is not allowing you to transfer the settings from one printer to another (sometimes it does, sometimes it doesn't), or if you don't want to download and print the model.
It does help me with Makerworld points if you download and print the model though, so I'd certainly appreciate it if you did that regardless of whether you actually need to or not =)
I calibrated the following:
- Nozzle temperature for the hardened steel 0.4mm nozzle (this should be the same for the stainless steel 0.4mm nozzle).
- Bed temperature for the Biqu Frostbite plate, but this should work with basically any plate.
- Flow ratio
- Pressure advance
- Max volumetric speed
- Retraction distance
Print settings optimized for the following:
- Surface Quality
- Layer adhesion
- Wall strength
- (not speed)
The slower the print, the nicer the surface - but if you want to increase the speed this filament should be able to do up to 350 mm/s at a 0.16mm layer height on the A1 without it completely failing. I recommend sticking to 100 mm/s though for the outer walls and top surface at least to keep the print quality looking good.
Please feel free to ask any questions and I'll do my best to answer. Also feel free to boost if this was of help to you. I plan to post more of these as time allows me to calibrate more filaments and colors. The more well received they are, the more motivated I'll be =)
License
You shall not share, sub-license, sell, rent, host, transfer, or distribute in any way the digital or 3D printed versions of this object, nor any other derivative work of this object in its digital or physical format (including - but not limited to - remixes of this object, and hosting on other digital platforms). The objects may not be used without permission in any way whatsoever in which you charge money, or collect fees.
Comment & Rating (0)