CUSTOMIZABLE signs TROFAST IKEA drawers


Print Profile(2)


Description
🏷️ IKEA Trofast Labels
Does your Trofast shelf look like a secret flea market warehouse? Does your child open a box, look inside, close it, and open another… because they have no idea what's in each one? Well, the chaos is over: introducing the IKEA Trofast Labels. Round, simple, and ready to bring order without drama.
The invention works like this:
- A clip that attaches to the Trofast boxes as if it were made for them.
- A round label that fits into the clip and displays whatever you want.
You print them at the same time, they are designed for that, and they remain as firm as a soldier on parade.
Boost Me (for free)
⚡ Give it a Boost
If this invention has saved your living room, your sanity, or the playroom… give it a Boost.
You gain order, I gain motivation to continue taming domestic chaos. Win-win.
The best part: the label comes blank, ready for you to personalize it with any image you like. In the tutorial (which comes next, with photos and all), I'll show you how to add your favorite icon, drawing, or symbol without complicating your life.
And if you don't want to personalize anything… I also provide a giant pack with lots of ready-made labels, which are what I use so my son's toys don't collapse the domestic ecosystem.
Puzzles, cars, dolls, blocks, random pieces no one knows where they came from… I have it all labeled.
https://youtube.com/shorts/-CGQR4VnuI8?si=ime_LSSsGSUb9jW3
🛠️ Important Printing Specifics
- Do not change the orientation you see in the profile. It is set this way so that the parts come out strong, resistant, and without surprises.
- Dry filament, especially if you use PLA. If PLA is damp, it complains. If it's dry: firm, strong, and durable.
- Do you want something practically indestructible? PETG. That's printing for life.
📣 Share and Follow Me
If you print these labels and your Trofast no longer looks like a chaotic flea market, show me. I love seeing how you use them in your homes 🤟
And if you like these designs and want more inventions like this… follow me. I promise to keep the clutter at bay (at least in your drawers 😉).
🎨 How to Customize Your Own Trofast Labels (Without Complicating Your Life) 😎
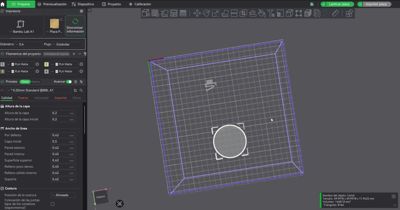
- When you open the project, it will have this orientation, so you need to flip the build plate so it is oriented as if you were looking at it from below (as shown in the following image)

2. This is how the build plate should be oriented, look at the cube and see how the axis arrows are oriented (Y downwards and X to the right).

3. Now do the following: 1. Right-click on the label, 2. select “Add Modifier”, 3. Select “SVG”.
Select the SVG file you have saved on your computer, and it will be imported directly onto the label.
If you don't know how to convert an image to SVG format, it's very simple; I'll leave you a link to a page where you can do it directly online. You just need to import your image and download it as an SVG.
https://imagen.online-convert.com/es/convertir-a-svg
I transform my images to SVG from this page, and it's completely free. As a tip, images should be simple with thick lines and, if possible, in black and white, so the files will be perfectly vectorized.

4. The image will appear very large and off-center; now you need to orient it, reduce its size, and adjust a couple of parameters to make it look incredible.

- Click on “objects” to locate the SVG
- From there, by right-clicking, you can change the color you want to print the image with
- On the right side, you need to configure the SVG.
- DEPTH set it to 0.60 mm
- SIZE, use the slider to enlarge or reduce the image until it fits within the label
- leave the rest as it appears in the image
- MIRROR this is something you have to modify. Think that how you are currently seeing it is how it will be printed.
- MODIFIER. It is important to check this option (not join or cut, only MODIFIER)
5. Click Slice and check that it looks like the image and, DONE!!!! If you have any questions, you can ask me in the comments, and I will be happy to help you.

6. To fit the labels, it's very simple: first, you fit the clip into the box, and then the label into the clip. I'll leave you some photos so you can see it clearly. It offers no resistance; they fit easily.


License
You shall not share, sub-license, sell, rent, host, transfer, or distribute in any way the digital or 3D printed versions of this object, nor any other derivative work of this object in its digital or physical format (including - but not limited to - remixes of this object, and hosting on other digital platforms). The objects may not be used without permission in any way whatsoever in which you charge money, or collect fees.
Comment & Rating (8)