Search models, users, collections, and posts

1meter long backlighted window Christmas landscape

IP Report
GIF

Print Profile(1)

All
A1 mini
X1
P1P
X1E
H2D
P2S
P1S
X1 Carbon
H2C
H2S
H2D Pro
A1
X2D
A2L

0.08mm layer, 100% infill
Designer
8.5 h
6 plates
4.8(4)

Open in Bambu Studio
Boost
149
309
24
15
146
29
Released 

Description

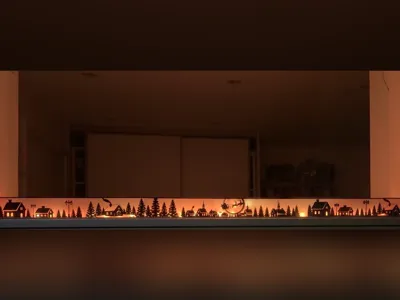
1-meter long, low-cost Christmas landscape light designed for windows.

I created this design for my own needs, but I received a lot of requests to share it, so here it is!


It is designed to be placed on a windowsill. Although it is 108 cm long and 5.5 cm tall, each image only uses ~7 g of filament due to some areas being paper-thin to allow more light to pass through.


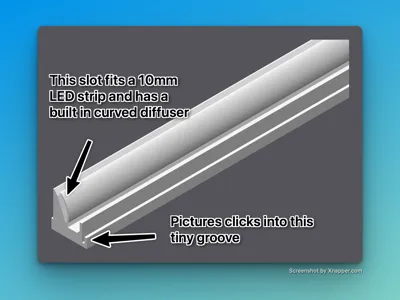
I have designed an optional holder with a slot for a 10 mm LED strip and a built-in curved diffuser. The holder is available both in full length and as small 4 cm versions. If you use the small versions, you need seven of them, which are then placed at each end of the landscape and between each image.


If you prefer to keep it simple, you can also just tape the images to the window and place the light of your choice behind them. Just be careful not to put tape on a very thin part of the print, as there is a risk of tearing it when removing the tape.


I prefer the smaller holders because the light appears more varied, and some of the LED points shine through more, making them look like small stars in the night sky. The photos themselves also act as diffusers.

Instructions

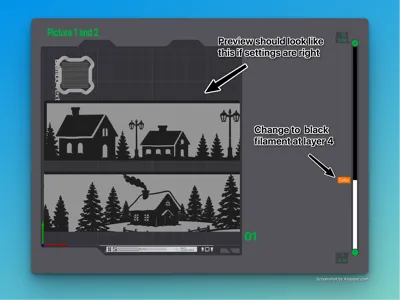
Please make sure that your slicer settings are correct; otherwise it will not look right at all.

  • The layer height of the photos should be set to 0.08 mm.
  • The initial layer height of the photos should be set to 0.16 mm.
  • The sparse infill density of the photos should be set to 100%.
  • I have not tested this, but the photos should be scalable as long as you scale all of them by the exact same amount and do not change the thickness. If you try scaling them, please leave a comment with photos and let me know how it went.
  • I have used these filaments:
    • Bambu Lab Silk+ White
    • Bambu Lab Silk+ Black
    • Bambu Lab Silk+ Titan Gray (for photo #4)
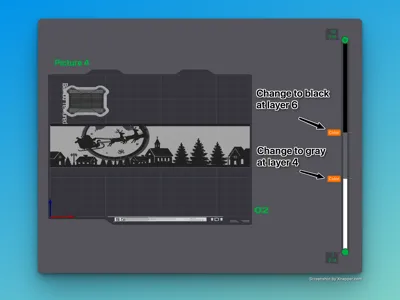
  • Photo number 4, with Santa’s sleigh, uses an additional gray filament to create a beautiful gradient on the moon, which improves the sense of depth.
  • Layer filament settings
    • For photos 1, 2, 3, 5 and 6: start with white and change to black at layer 4.
    • For photo 4 (Santa’s sleigh): start with white, change to gray at layer 4, and to black at layer 6.

Make sure to print the photos on a clean and suitable build plate, for example a Textured PEI plate. 

When the prints are done, let the plate cool down before removing the prints. I placed the build plate outside in the freezing cold for 2 minutes; then the prints came off easily. As mentioned, some areas are paper-thin, and they WILL tear if you try to remove the print while it is warm.


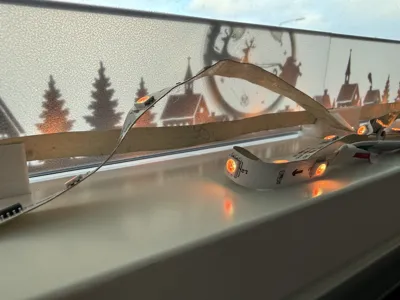
As seen on on if the photos, my LED strip was 2 meter long - and instead of cutting it to size, I decided to bend if at the end of the landscape and place the rest outside of the holders, with 2 pieces of tape to make a small bend behind Santa's sleigh, in order to highlight that area more - and the LED lights outside of the holders, adds some random nice looking star light effects.


Note: I optimised the design and the photo plate layout for my A1 Mini. If you have a larger printer, you may fit more photos on the same plate — but photo #4 should always be printed alone, as it requires different settings.


That should be all — I hope it brings some joy to the dark winter evenings :-)

Comment & Rating (24)

(0/1000)

Printed great on my A1, I was able to scale it either 130% or 135%, not sure which, but it maintained its thickness. I did have to use the larger baseplates, it fell over with the smaller ones. No light yet. Great print, let me know if you’ll do a commercial license, I could sell these!!!
The designer has replied
1
Reply
hey, great to hear that scaling worked as expected :) Yeah I guess the weight balance/ratio and the center point of the pictures changes, when upscaling. I should maybe make the stands parametric and let people customise them for their needs. But I’m glad you got it sorted :) A small piece of double sided tape could also do the work. I will look into creating a license - sent you a message :)
0
Reply
Boosted
This is a really beautiful design. It's a bit finicky to set it all up, because of the thin images, but it's well worth it. It looks a lot warmer and less bright in real life, compared to the pic I took. This obviously depends on the led strip you use. I'm really happy with the result. Thanks for sharing!
The designer has replied
0
Reply
Thank you so much, and thanks for the boost :) I’m glad you like it. I’m quite new to this, so it’s so movivating to see a picture of my print in a home of someone I never met :) I use a RGB strip for mine and set the color to orange and orange-red-ish for every other diode:) Merry Xmas!
(Edited)
0
Reply
Print Profile
0.08mm layer, 100% infill
Overall, this is a very impressive model — the final result looks fantastic. The only challenging part was aligning all the pieces in a perfectly straight line and getting the visuals to match up seamlessly across each segment. It would have been great if there were some simple alignment features to help keep everything straight and consistent. Still, it’s definitely worth printing.
(Edited)
The profile uploader has replied
0
Reply
Thank you very much :) Could you maybe add a photo to your comment/rating? then I could maybe give you some inputs and/or update the description :)
0
Reply
Replying to @MiloMatic :
Thanks for the reply :) I’ve added a photo so you can see what I meant. As shown in the picture, there are some small misalignments between the segments — even if I get one part perfectly aligned, something on the opposite side ends up slightly off again. It’s a bit tricky to have all pieces perfectly straight at the same time. By the way, I used the long stands (I forgot to mention that in my first comment). Still, when looking at it from a normal viewing distance, these small imperfections aren’t very noticeable, and overall I’m really happy with how it turned out.
0
Reply
Replying to @erleg :
ahh, I think I know the issue. try and remove one of the stands, and then place the first image hallways into the stand, then next image and so on. so that each image meets at the center of a stand. then the images holds the stands right together and lines up perfectly :) if you don’t like the first and last 50% having no stand, then you could just cut the last stand at the middle and attach the two pieces :) Hope this helps 😃
0
Reply
Boosted
Really nice design. Simple idea, great execution!
The designer has replied
0
Reply
Thank you very much, I am new in the 3D world, it is so motivating to hear, when people actually can use my ideas in real life :) Thanks for the boost 🚀🙏🏼
0
Reply
Boosted
Replying to @MiloMatic :
Thanks, I was checking out the other entries in the Christmas contest, and I find this one of the nicer models. Keep up the good work! Your cover picture is also quite nice, which is important to get noticed.
(Edited)
0
Reply
Thanks, means a ton:) Regarding the cover photo, are you using mobile or desktop? I was actually thinking about replacing it on mobile, as it’s a vertical format and most of the picture is just filled with “nothing”. Thought about adding a “zoomed in circle” at the bottom, which shows Santas sleigh / the moon in detail, alongside with the current full print view
0
Reply
Boosted
Unfortunately I don't have space for it yet but it's still worth a boost
The designer has replied
Show original
0
Reply
Thank you for the boost 🚀 If you only have a more narrow space for it, you can still use it 😃 You can either scale each picture with the same amount of scaling until their total reaches the available space. or you could simply just don’t print the last or two last pictures. The only small issue to this, is that you won’t have the black border at the end - but you could just add a modifier to (your) last picture or hack it by for example placing a small strip of black tape on it, to fake the border. Or place something linear on the picture and paint it black :)
0
Reply
Boosted
Replying to @MiloMatic :
Thanks for the tips, I will try it out
Show original
1
Reply
Boosted
Awesome design and so much christmas
The designer has replied
0
Reply
Thank you very much, and thanks for the boost 🚀
0
Reply
Brilliant - easy to print
The designer has replied
0
Reply
Thanks a lot 😃 And also for the boost 🙏🏼
0
Reply
Print Profile
0.08mm layer, 100% infill
0
Reply
Print Profile
0.08mm layer, 100% infill
0
Reply
Print Profile
0.08mm layer, 100% infill
0
Reply

License

This user content is licensed under a Standard Digital File License.

You shall not share, sub-license, sell, rent, host, transfer, or distribute in any way the digital or 3D printed versions of this object, nor any other derivative work of this object in its digital or physical format (including - but not limited to - remixes of this object, and hosting on other digital platforms). The objects may not be used without permission in any way whatsoever in which you charge money, or collect fees.