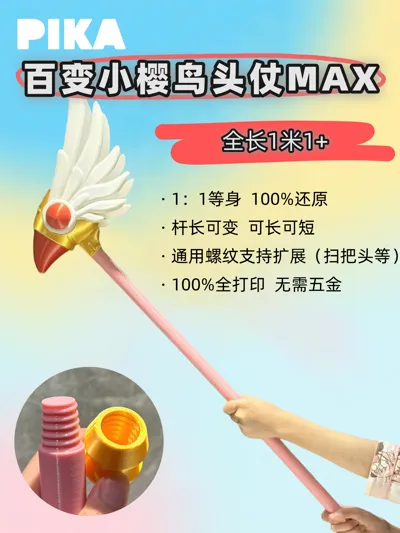
Cardcaptor Sakura Bird Head Staff MAX-PIKA


Print Profile(6)


Description
Original, no commercial use!
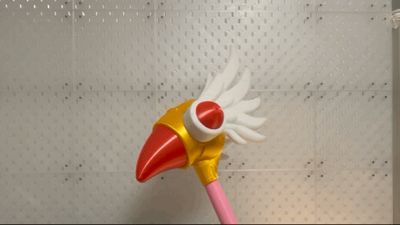
The eagerly awaited 1:1 version of the Bird Head Staff is finally here!
-----------------------
Cardcaptor Sakura Bird Head Staff MAX features:
1. Overall length over 1.1 meters, life-size height
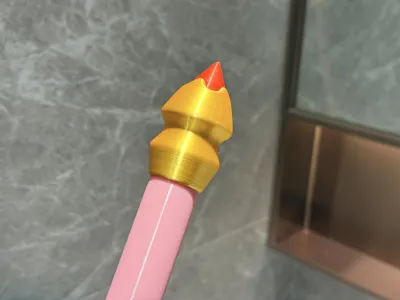
2. Rod length can be freely changed, rod can be printed, replaceable stainless steel tube
3. Universal thread, supports expansion (e.g., broom extension, feather duster, let your imagination run wild)
4. 100% 3D Printed, no hardware required
5. Optimized supports, fool-proof design, easy assembly
-----------------------
MINI version (25cm) portal, click image to go directly:

-----------------------
I researched almost all bird head staffs on the market, and they either felt cheap or were purely injection molded with no details. I couldn't stand it, so I decided to make one myself.
Perfectly restored according to the original, purely original drawings, full of details

Main body: PLA Silk Gold
Mouth, eyes and bottom diamond: PLA Silk Red
Wings: PLA Matte White
Rod: Lotus Pink
Pre-plated and supports optimized, supports one-click printing from mobile
Different filaments have different sinkage rates, theoretically allowing for glue-free assembly, but it is still recommended to use some super glue if it's not tight
*Please note: The back of the bird's head is a support area. If it's not aesthetically pleasing after removal, you can sand it down. It will largely be covered after installing the wings. This printing direction is the best result from multiple tests, ensuring a flawless front appearance and balanced strength. If you mind, you can try adjusting it yourself!
Assembly steps are as follows:
1. First, install all red parts (please note the fool-proof joint under the bird's beak):


2. Install the wings (there is a fool-proof design here, be sure not to install them backward, they won't fit if reversed):

3. Connect the wings to the head (there is also a fool-proof design here)

4. Assemble the rod, tighten the rod threads two by two, then screw on the head and tail


*Detailed instructions for the rod:
1. Each tube is 20cm long, use at least one tube (and it must be the one with two male ends).
2. The default is 4 tubes, making the rod length 80cm. This configuration is the most suitable in terms of size ratio. If extension is needed, simply print one more male and one female rod.
3. The rod's default print profile has 5 walls, and the default filament parameters are for PETG with hidden Z-seam. It can be printed directly without modifying parameters. After multiple tests, the strength is sufficient, but do not swing it vigorously.
4. It can be extended with hollow steel pipes or PVC pipes with an inner diameter of 21mm. Threaded end caps are available in the print profile (initially I only thought of using steel pipes, but steel pipes are difficult to color. Thanks to @775770353 for the idea, pink PVC pipes can be used for higher strength)
*The printed rods and threaded end caps are made according to universal specifications, commonly used for connecting household brooms and dustpans

5. If you really plan to use it for sweeping, it's safer to use steel pipes or PVC pipes 😂
*Steel pipe wall thickness is generally 1mm, choose an outer diameter of 22mm

*PVC pipe wall thickness is generally 2mm, choose an outer diameter of 25mm

*Steel pipe connection effect:


Display!

Welcome to follow my other works on the homepage, click the image to go directly:


License
You shall not share, sub-license, sell, rent, host, transfer, or distribute in any way the digital or 3D printed versions of this object, nor any other derivative work of this object in its digital or physical format (including - but not limited to - remixes of this object, and hosting on other digital platforms). The objects may not be used without permission in any way whatsoever in which you charge money, or collect fees.
Comment & Rating (18)