Bed Level Indicator Dial Adapter (X1C/P1S)


Print Profile(2)


Description
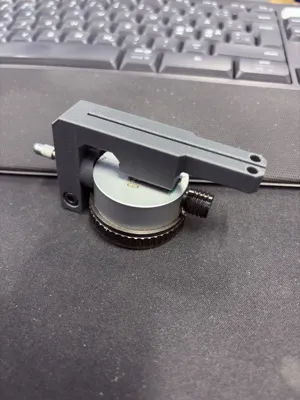
🔧 3D-Printed Adapter for Mahr Dial Indicator (8 mm Shaft)
This adapter is designed to mount a Mahr dial indicator with an 8 mm shaft directly onto your 3D printer’s extruder/carriage. It may also fit other indicators that use the same shaft diameter (such as some Mitutoyo models), but compatibility with other manufacturers is not guaranteed.
The adapter replaces your hot end and uses the same screws and mounting points, making installation simple and quick:
- 🔩 Snap the adapter into place
- 🔧 Fasten it using your original hot-end screws
- 📏 Insert your dial indicator and begin calibration
This adapter has been tested on both the Bambu Lab X1C and the P1S.
🖨️ Print Recommendations
- Material: PLA (ideal since it’s not exposed to heat or heavy load)
- Layer Height: 0.2 mm
- Infill: 25%
- Supports: Only if needed for the indicator shaft opening
- Walls: 3 perimeters
PLA provides excellent stiffness and dimensional precision for accurate measurements.
🔒 Optional Hardware (Recommended)
For extra rigidity and to fully secure the indicator in place, you can use:
- 1× M4×12 mm screw
- 1× M4 nut
This ensures the dial indicator shaft is firmly secured during calibration.
❗ Very Important Note
🛑 Use a bed plate that is completely FLAT.
Do NOT use the PEI textured plate, as the texture will cause inconsistent contact points and lead to faulty or inaccurate measurements.
A smooth, flat plate (such as the standard smooth PEI or a glass plate) is strongly recommended.
📐 My Bed Calibration Method
(This may not be the optimal or “correct” method, but it works well for me.)
- 🔌 Turn off the printer and replace your hot end with the adapter.
- 🔄 Turn the printer back on and move the carriage to the center of the heatbed.
- ⬆️ Manually raise the heatbed until it just touches the dial indicator slightly.
- ⚪ Zero the dial indicator.
- 🎯 Move the carriage to the first measurement point (the farthest back position) and adjust the bed knob underneath the heatbed until the reading is as close to 0 as possible.
- ➡️ Continue moving to the remaining calibration points, adjusting each one until the readings are near zero, until your bed is fully leveled.
This method offers a fast and effective way to check bed flatness and mechanical accuracy using the dial indicator.
📝 Additional Note
I do not include any bed screw adjustment tools with this design, as there are plenty available on MakerWorld.com.
⚠️ IMPORTANT – Disclaimer
I take no responsibility for any damage, misalignment, or improper use of this adapter with your 3D printer.
All usage is entirely at your own risk.
By downloading or using this design, you acknowledge and accept all associated risks.
License
You shall not share, sub-license, sell, rent, host, transfer, or distribute in any way the digital or 3D printed versions of this object, nor any other derivative work of this object in its digital or physical format (including - but not limited to - remixes of this object, and hosting on other digital platforms). The objects may not be used without permission in any way whatsoever in which you charge money, or collect fees.
Comment & Rating (18)