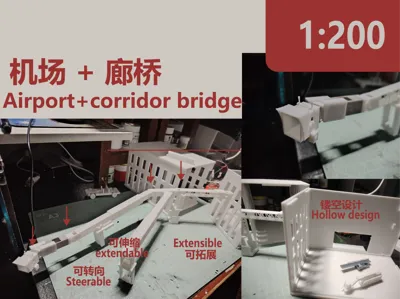
1:200 Airport Terminal Building and Jet Bridges


Print Profile(1)

Description
Boost Me (for free)
Hope you like it
Model content: The building occupies most of the area, while the jet bridge only takes up two plates

First, let me introduce the main character of the model: the jet bridge
I divided the complete jet bridge into two parts. Part 1 is the core part, an optimal combination that cannot be further divided, covering steering and telescopic functions. It can be directly connected to the building's windows
The framed part with the star symbol is an Easter egg. I will explain it later; its function is relatively minor
Compared to Part 1, Part 2 adds non-movable support pillars and a jet bridge section with greater freedom for connecting to different building heights

This is Part 1:

This is Part 2:

After printing Part 1, proceed with gluing first
Glue the light and control room (red line)
Glue the stair slot and jet bridge (yellow line)
Glue the control room and jet bridge, as well as other parts (blue line)

The stairs snap directly into place here, and these stairs can be folded for vertical storage


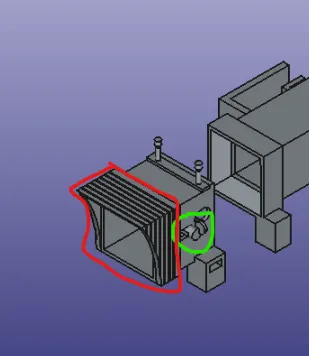
The red box indicates a fitted door, held by friction
The green box indicates a rearview mirror; simply insert it directly, held by friction
Continue gluing other parts of Part 1:
Glue the jet bridge (blue line)
Pay attention to alignment, glue the power box (red line)
The jet bridge and upper support pillar can optionally be glued or left unglued. If glued, pay attention to aligning the indicated parts, then glue the support pillar and jet bridge (green line)
Glue the lower support pillar and control panel (orange line)
The upper and lower parts of the support pillar, once aligned, can control the T-slot rod to adjust the support's height

The two halves of the wheel are in the printing plate, glue them together, then insert them into the slot


For the telescopic part, the thick one covers the two thin ones

Continue gluing the rear section of the jet bridge (blue line)
And glue to the building (green line)
After completion, this is the complete assembly of Part 1, the core of the jet bridge

You can choose different window heights of the building for gluing

Regarding Part 2, whether it is necessary depends on whether you plan to add some unique features
For example, if you want to extend it further, wish to add permanent support pillars, or give the straight jet bridge a 'Z'-shaped characteristic, and so on
You can choose to include them
This is Part 2 of the jet bridge

Glue Part 1 and Part 2 of the jet bridge together (blue line)
The upper part of the support pillar can optionally be glued to the main body of the jet bridge; when gluing, you need to align with the orange line (orange line)
The base and lower support can be glued (red line)
Finally, glue to the building's window (green line)

Regarding the part in the image below, this is a crossroad that allows for extending a second jet bridge from the side
Moreover, based on the horizontal and rotational effects of the joint, the rotation direction (front, back, left, right) can be freely defined


The component in the image below is for beautifying the rotating part

It can cover the window and also reinforce the joint to prevent sliding

Up to now, I have finished introducing Part 1 and Part 2; now let's introduce the building
The building with windows is the boarding terminal, while the building with only two main entrances is the ground vehicle parking lot

The building with windows, I divided it into two symmetrical parts, both parts can be glued. Flipping it 180 degrees reveals the back of the building

The ground and roof are universal; flipping it 180 degrees forms the roof, and similarly needs to be glued. It is universal for both the boarding terminal and the parking building

The walls of the parking lot also need to be glued,
There are also two ramps (green circle), glue them in front of the exit at the bottom of the building


For the side of the building, after rotating 180 degrees, the left side can become the right side. As shown in the image above, I connected the jet bridge to the side mentioned here

The part in the image below is decoration for the building with windows. For example, after connecting the jet bridge to the side of the building, the inside of the building is empty, which means the end of the jet bridge is connected to a cliff

This is the side of the building and its corresponding cover

Therefore, it needs to be glued on the inside to cover it
I divided everything into two halves; the model on one plate in the image above covers the area within the green circle in the image below

My design reference comes from the most efficient airport design in the world
In fact, some people might say that you only have one type of 'box-shaped' building, which is too monotonous
However, if you want to apply divergent thinking, you can learn from the game 'Minecraft' by stacking several box shapes together to create different buildings

Hartsfield-Jackson Atlanta International Airport (IATA: ATL, ICAO: KATL, FAA LID: ATL), abbreviated as 'Atlanta Airport, Hartsfield Airport, Hartsfield-Jackson Airport', is located at the junction of the Southside of Atlanta, Fulton County, United States, and University City, Clayton County, Georgia. It is 12.5 kilometers north of downtown Atlanta, serving as a 4F-class international airport and international aviation hub. Hartsfield-Jackson Atlanta International Airport is the main operating base and headquarters for Delta Air Lines, with its mainline and regional flights accounting for over 80% of the airport's total flights

License
You shall not share, sub-license, sell, rent, host, transfer, or distribute in any way the digital or 3D printed versions of this object, nor any other derivative work of this object in its digital or physical format (including - but not limited to - remixes of this object, and hosting on other digital platforms). The objects may not be used without permission in any way whatsoever in which you charge money, or collect fees.
Comment & Rating (2)