DJI Osmo Action HandGrip - V2


Print Profile(1)

Description
This is the very next V2 version of the handgrip kit designed specifically for the DJI Osmo Action 3/4/5. After drawing on the experience from V1 and taking inspiration from the Tilta brand, I have created my next version, which aims to serve even more versatile purposes.
✨ What Makes This Product Special:
- A more ergonomic grip
- A shutter lever with more versatile functions
Now, let's start printing, with a few important notes to keep in mind:
- Please print the handgrip using the "fuzzy skin" setting I've already configured — this will provide a better grip and a nicer look.

Prepare two 8x2 magnets to insert into the pre-made slots of the lever. Pay attention to the magnet orientation to ensure it
matches the DJI Action setup.

- The remaining accessories can be printed as usual.

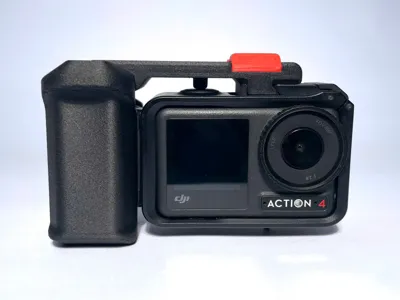
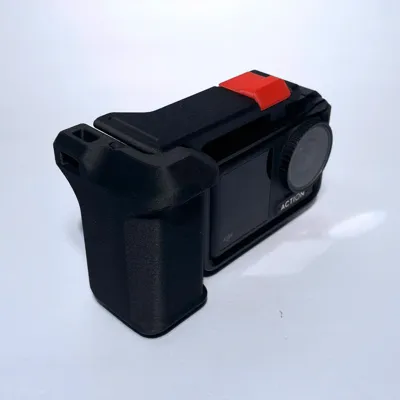
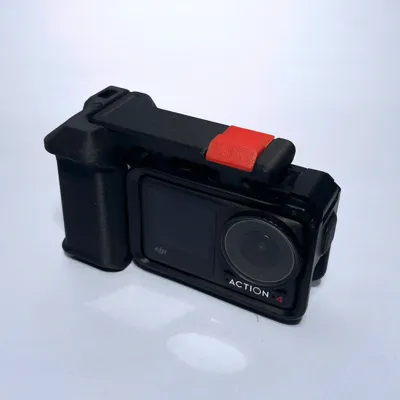
And here is the final product you will get.

You can buy me a coffee to give me the motivation to release Version 3 (V3)!
buymeacoffee.com/nguyenvuvig
------------------------------------------------------------------------------------------------------------------------------------------------------------
This is the next V2 version of the handgrip kit designed specifically for the DJI Osmo Action 3/4/5. After learning from V1 and taking inspiration from the Tilta brand, I have created my next version, aiming for more versatile purposes.
✨ Product Highlights:
- A better ergonomic grip
- A shutter lever with more flexible functions
Now, let's start printing the product, with a few important notes to keep in mind:
Please print the handgrip using the "fuzzy skin" setting I've already configured — this will provide a better grip and a nicer look.
Prepare two 8x2 magnets to insert into the pre-made slots on the lever. Pay attention to the magnet orientation to ensure it matches the DJI Action setup.
The remaining accessories can be printed as usual.
And here is the final product you will get.
If you find them useful, please boost me or support me at buymeacoffee.com/nguyenvuvig
License
You shall not share, sub-license, sell, rent, host, transfer, or distribute in any way the digital or 3D printed versions of this object, nor any other derivative work of this object in its digital or physical format (including - but not limited to - remixes of this object, and hosting on other digital platforms). The objects may not be used without permission in any way whatsoever in which you charge money, or collect fees.
Comment & Rating (76)