ESP32 Real Time Stock Watcher


Print Profile(1)

Description
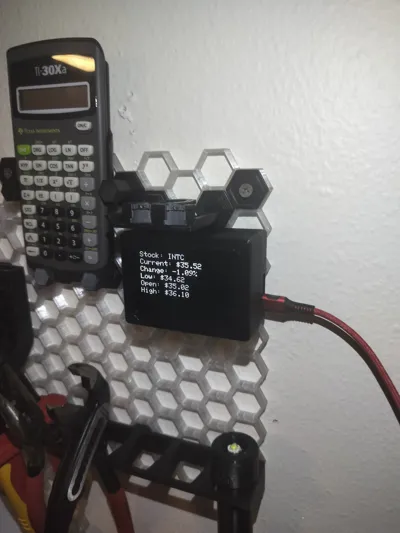
This will show stock info for any desired stock for 7 seconds and switch over the the next stock. Made with an ESP32 S3 and a HiLetgo 2.42 OLED display
Code and wiring diagram is attached in zip file
NOTE: I was unable to get pictures of the build process because I fully assembled it to test the snap fit connection and it is a very tight connection. You will likely not be able to disassemble it without damaging the plastic
0. Make a finnhub account at https://finnhub.io/ and generate an API key - The instructions for doing so are clear on their website.
1. Flash the ESP32 via Arduino IDE (code attached in notes)
You will need to edit the code to add your SSID, Password and Finnhub API key - The Finnhub API key is required to retrieve stock data. It is free you just need to make an account. You will also need to edit the code to add/remove any stocks and reflash
2. Place the display into its spot - It is just a friction fit.
3. Wire everything together - note that I needed 4.7k pull up resistors in order to stabilize the display. The display that is linked has a separate set of pads that you can solder the resistors to so you don't need to mess with soldering where you attach the wires.
I used dupont connectors and super glued them in place but you could also solder wires directly to the pads.
The code provided is using pins 16 and 17 for SDA and SCL - these can be edited to whatever GPIO pins you want to use
4. Place ESP32 S3 into its spot on the back side and use the 2 provided fittings to hold it in to place
Optionally you can add some glue if you want added stability to the ESP32 but I haven't found I needed any.
5. Once everything is assembled the 2 halves just click together and you are good to go. I would test everything before clicking it together because as I said it is nearly impossible to get them apart once assembled.
6. Enjoy and leave a 5 star review for me
7. I just glued on some honeycomb pieces to attach to my honeycomb wall and it works great - just insert the pieces to the wall, apply superglue to inserts and activator spray to the stock ticker back and stick it on there.
Documentation (1)
License
You shall not share, sub-license, sell, rent, host, transfer, or distribute in any way the digital or 3D printed versions of this object, nor any other derivative work of this object in its digital or physical format (including - but not limited to - remixes of this object, and hosting on other digital platforms). The objects may not be used without permission in any way whatsoever in which you charge money, or collect fees.
Comment & Rating (0)