Search models, users, collections, and posts

P2S build plate codes - ArUco/QR Labels (Niimbot)

Print Profile(1)

All
P2S
H2D
P1P
X1 Carbon
P1S
X1E
H2D Pro
X1
H2C
A1 mini
A1
H2S
X2D
A2L

P2S Code Positioning Guide, 0.2mm layer, 2 walls, 15% infill
Designer
12 min
1 plate
4.9(41)

Open in Bambu Studio
Boost
172
682
96
14
546
283
Released 

Bill of Materials

Bambu Filaments
Select all
Jade White (10100) / Filament with spool / 1kg

Description

I have experimented with several 3D-printed versions and laser-printed ones. I even bought some, but they did not work at all, probably because the newer codes are slightly bigger.


In the end, I created the codes for all my plates myself and continue using all my build plates on the P2S. 
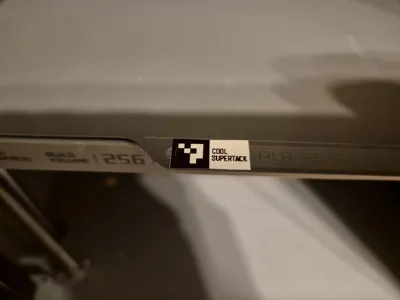
Some official versions are not yet available on the P2S, such as SuperTack.


These are intended to be printed with a thermal label printer and 12 x 40 mm adhesive labels, but you can adapt them to suit your printer and labels.

I have prepared a zip archive with labels to import into the desktop app and png files to use with anything else:
Dropbox P2S_aruco_codes__niimbot_labels_12x40mm.zip (or) 
smashd.de P2S_aruco_codes__niimbot_labels_12x40mm.zip


If you're using the mobile version, copy one of the blocks of text to the clipboard and open the Niimbot app. The app will then prompt you to import the label.

If you need a label printer (they are ridiculously cheap) here's an affiliate link:
AliExpress Niimbot D110 *
Amazon DE Niimbot D110 *

Niimbot Label Import (copy block to clipboard and open the app)

【BL P2S 5 PEI NEW TEX(40*12)】
⊙6917c64cd842f90d840afde9⊙

【BL P2S 0 SUPERTACK(40*12)】
⊙6917c6743de6325a1bdae13b⊙

【BL P2S 2 HT SMOOTH(40*12)】
⊙6917c665d842f90d840afdeb⊙

【BL P2S 11 ENGINEER(40*12)】
⊙6917c68589222204596cefb8⊙


Use the P2S label positioning guide provided to ensure you stick them in the correct position.

Thing to note: 
Niimbot uses RFID to lock down 3rd party label usage, so you have to stick to their official labels.
No-name or off-brand labels are a lot cheaper - but in my opinion niimbot labels are high quality and to be honest… how many hundreds of labels are you going to print anyway where the price begins to matter. 😅

If you're worried about them holding up even one print since the “printing” happens due to a chemical reaction at a specific temperature:
110 is the upper range of where this type of labels typically chemically reacts to temperature (blackens) which is typically somewhere between 60 to 120 °C... HOWEVER I have tested with the Niimbot 12x40mm white label and a more or less accurate mini hot plate and 110°C seems to be juuuust at the edge of the reaction happening. It does not really blacken yet until about 115, at 120 it kicks in visibly ... but your experience may vary.


Effect on label after having it on the Hotplate @115 °C (pressed down several seconds): minor to nothing


*The used link(s) is/are so-called affiliate link(s). When you buy a product using this link, I will receive a small provision. The price itself does not change. Thanks so much for your support :)


Thanks for downloading and printing! 

Boost Me (for free)

If this model brought joy, convenience, or made your printer do something vaguely impressive, please consider tossing me one of your boosts. It costs you nothing… except a tiny piece of your prints. (Just kidding! It’s free! And helps a lot.)


Comment & Rating (96)

(0/1000)

Okay, so here are my versions of the images. They all contain the triangle and rectangle that seem to be needed for reliable reading. In addition, I took the time to clean up the codes to make them true 1-bit black and white with smooth edges all around. I'm using a Dymo Rhino 6000 label maker connected to my PC to print the images, as I wanted labels that were going to be heat and chemical resistant. It's fairly low resolution, so the edge cleanup and 1-bit true black and white images were needed, as the labels were pretty much unusable if half-toning came into play. EDIT: I'm adding in 4 more, with a letter added at the end of the label to make it easier to ID, especially if printing directly from my label maker, sans PC. They're labelled as follows: (C)ool Supertack, (E)ngineering, (S)mooth and (T)extured. Hopefully the attached images come through without any issues. I could also send the original PNGs to the OP in a ZIP if they'd like to add them to the page here.
(Edited)
The designer has replied
7
Reply
Thank you very much for the images. I used the top row and everything works great with them. Printed on Brother PT750W printer
(Edited)
0
Reply
First row worked for me also. Printer at 12mm high. Thanks
0
Reply
Thanks very much for making these available for everybody! Just FYI ... this isn't abandoned, I just can't wrap my head around the variety of success/fail messages. I do have the occasional "plate not detected", but that's ... I don't know ... 1 out of 20 times? Which I am ok with. Rock solid detection would be awesome... But since it's an optical recognition at an angle with unknown ambient light with a "normal/cheap" camera with plates being black, solid color, reflective, gold, ... there are so many variables that make it difficult for the process to iron out any quirks. Btw, I wish I could pin one or more comments to the top.
0
Reply
I downloaded the tool and used it, printed the stickers as instructed but my P2S will not recognize them. I did "camera calibration" but that seem to have no effect. It seems like my machine is looking for the white triangle that's normally on there. I've managed to get a version to work by using an image of the Bambu cool plate and creating an image matching the proportions (which are about the same size). I was able to print it on sticker paper and that worked fine. So, now I've got to work to check out one of two options. 1. the newest firmware is looking for the entire image not just the "P" dots. -- this is an easy fix if its true, as it just needs a little more graphics (see image) and/or 2. my machine's scanner is not looking in the same place. -- I'm really hoping this is not the case as that means I'll have trouble forever.
(Edited)
0
Reply
it's nice to hear you got it working with the p2s, can share your image please 🙏.
0
Reply
Replying to @Carlosraf20 :
@Carlosraf20 Here you go! prints the same height (11mm?) as the other image. just includes the triangle and white bar the P2S apparently needs.
1
Reply
Replying to @viddwizard :
Thanks for sharing.
0
Reply
Boosted
Hi, thanks for the stickers. I found another way to retrofit build plates with your Niimbot P2S QR codes. The stickers can be printed on a regular laser printer and glued on with a Bambu glue stick. The Windows print dialog has an option to resize the image, and you can set the height precisely to 1.2 cm. My method: a) Print the label on regular A4 paper (Niimbot paper not suitable). b) Glue it on with water-washable glue (a glue stick). Let it dry, then print something on your P2S to verify the label is aligned correctly. c) With a sharp hobby knife, cut out the white parts, peel them off, and scrape off the glue underneath. d) Paint on the mask you created with an oil-based marker like this one: https://www.aliexpress.com/item/1005006966436606.html e) Let the paint dry; you can use a hair dryer if you want to speed it up. f) Put a drop of water and wait a few minutes for the paper and glue to soften. g) Gently scrape off the softened paper with the tip of the knife. QR label ready;)
(Edited)
The designer has replied
2
Reply
That's a step further than I've anticipated (essentially using this as a mask and applying proper paint) but there you go, glad it works! Great instructions!👍🏻
1
Reply
Boosted
Replying to @smashd :
BTW I foundthat the oil-based marker has very good adhesion.
1
Reply
Boosted
Replying to @slibbinas :
For everyone ! One more important point - exact label location is not necessary. for example on stock engineering plate label position on one side from other differs by 3mm. On textured - location on both sides is the same. What matter - camera calibration. I think light and reflections do matter for the recognition. Since I calibrated the camera, no recognition issues with paper, printed or other labels.
1
Reply
Boosted
Bought the D110 at Amazon for 19€ incl. enough labels and it worked perfekt for me. Thank you very much
The designer has replied
1
Reply
I am seeing you're getting the same artifact in the same spot (after the first column of squares): faint white line ... curious why that happens?!
0
Reply
Boosted
Replying to @smashd :
I have this only for my first print - all other worked perfect
0
Reply
Replying to @sil1902 :
Maybe some over-aggressively algorithm heating up the printing resistors or whatever from a cold state?! I don't know ... thanks for the comments and photos, hopefully the labels work well for you, too.
0
Reply
Print Profile
P2S Code Positioning Guide, 0.2mm layer, 2 walls, 15% infill
Plates were recognized excellently Printed with Brother PT-P710BT
Show original
profile
3
Reply
cant get it to work on my X2D 😞 Edit: this one from the comments works great on my X2D!
(Edited)
0
Reply
how did you align it? the jig does not work on these plates, or does it?
0
Reply
Print Profile
P2S Code Positioning Guide, 0.2mm layer, 2 walls, 15% infill
THE solution I needed for my x1c Build Plates and the new cyro for my new p2s…thanks!
profile
1
Reply
Print Profile
P2S Code Positioning Guide, 0.2mm layer, 2 walls, 15% infill
Thank you so much, you saved me about 10 plates from my old x1c now I can use them without problems in my new x2d. I printed the QR codes with my professional label maker so I won't have problems with temperatures. As soon as I have a boost available it will definitely be yours
Show original
0
Reply
I downloaded the image of the QR code, inserted it into the Niimbot app and also pressed label 40x30. Cut it out and placed it on the replica plate using the original plate as a guide. Both Bambu Studio and Orca Slicer now recognize the plate… finally, no more error messages. thank you very much
Show original
0
Reply
Print Profile
P2S Code Positioning Guide, 0.2mm layer, 2 walls, 15% infill
Very good function
Show original
0
Reply

License

This user content is licensed under a Standard Digital File License.

You shall not share, sub-license, sell, rent, host, transfer, or distribute in any way the digital or 3D printed versions of this object, nor any other derivative work of this object in its digital or physical format (including - but not limited to - remixes of this object, and hosting on other digital platforms). The objects may not be used without permission in any way whatsoever in which you charge money, or collect fees.