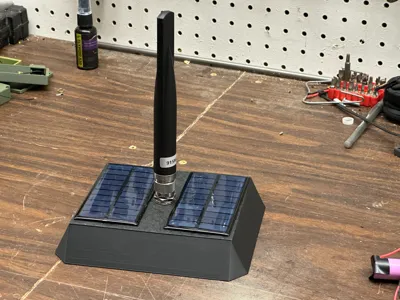
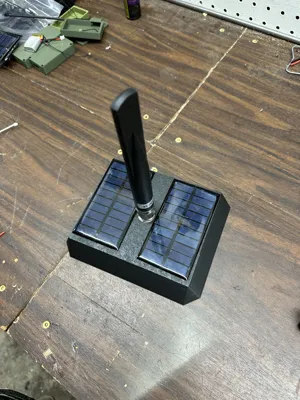
Meshtastic / Meshcore Car Roof Node


Print Profile(5)


Description
I designed a housing that can potentially be weatherproof/waterproof if built right.
You can find the parts list below.
For best results, print the housing out of ASA-CF, ASA, or even PETG.
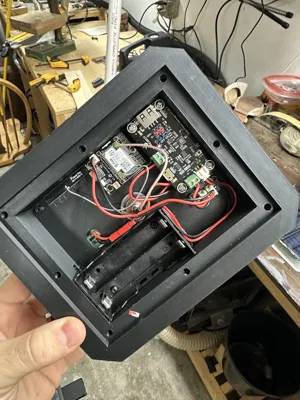
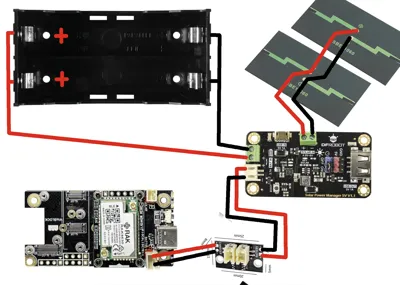
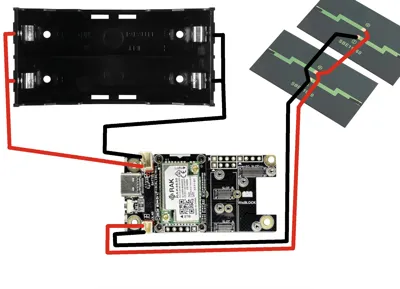
I have two (crude) wiring diagrams shown in the pictures. One that includes a solar MPPT and a low-voltage protection board, and a diagram without. Your call as to what you want to use. You probably don't need the fancy option if this is going on your car.
Note that the batteries and the two solar panels must be connected in parallel. If you connect them in series, you will fry your Wisblock.
When wiring in the low-voltage protection board, the charger/load side goes to the Wisblock, and the battery side goes to the battery/battery port on the MPPT
Instructions:
After printing, spray a light coat of the sealant on, let it dry, and repeat.
After the sealant has completely dried, install the solar panels by putting a generous amount of glue around the solar panel holes. This will effectively use the solar panels to waterproof those holes.
Make sure you have already soldered wires to the solar panel if you got the ones that didn’t come with pre-soldered wires.
Use a generous amount of glue for the magnets. A tip to get the magnets flush is to glue them in, and then put packing or painters tape over them, then lay the cover down on something magnetic (your car, washing machine, etc.). The tape will prevent the glue from sticking to your vehicle, etc., while it's drying, and the metal will pull the magnets flush.
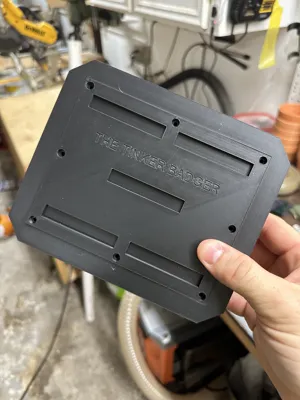
Then use a soldering iron to install the threaded inserts (Tutorial) around the cover plate and optionally on the battery tray area. Note that the antenna pigtail must be installed before the battery tray.
After that, install the wisblock, solar MPPT board (if using one), glue in the battery tray, install the antenna, and solder all the wires as needed.
The TPU parts include a gasket to help water-seal the housing, and the TPU protective cover can help prevent the magnets from scratching your car.
Make sure to only power on the unit if the LoRa and Bluetooth antennas are installed. Powering on without an antenna can ruin your board.
After everything is installed, I typically paint the unit a lighter color so that the sun doesn't bake my black filament housing and potentially cause issues with the battery. Make sure to tape off the solar panel with painter's tape. Once all that is done, I spray the whole thing, including the underside (solar panel still taped off), with one more coat of water sealant.
Feel free to reach out to me at TheTinkerBadger@gmail.com with questions, suggestions, or if you would like to buy one ready-made.
Parts list:
N-type antenna and N-type Female to UFL/IPEX pigtail
Clear waterproofing sealant for housing (do not use something that requires a porous surface) This may work too but I haven't tested it.
Magnets for the cover plate 60mm x 10mm x 3mm
M3 Screws for cover plate
M3 button top screws for the battery tray (or just glue it in)
M3 threaded inserts for plastic M3x4.6x5.7
The RAK19007 Wisblock or The RAK19003 Wisblock
Optional DFrobot MPPT solar charge manager or Amazon link
and Li-Ion low-voltage cutoff protection, or this option
Battery tray for 18650 or any other option that is 21mm tall or less
I typically don't recommend getting 18650 batteries from Amazon, as they are overpriced and usually low quality. If you must use Amazon, these may work. However, these are much better (or really any from this store)
You can also use a 1s Lipo battery like a 103450, such as this one. Check Polarity!!!
MAKE SURE THE POLARITY IS CORRECT ON THE PLUG! The plug is sometimes wired backwards. You can use a small pin or knife to gently lift the retaining tabs on the wire to switch them around if they are wrong. The Wisblocks have the positive side towards the middle of the board.
VERIFY CORRECT POLARITY!
Some JST PH2.0 connectors or a kit to make them yourself
A cheap-ish soldering iron set
License
You shall not share, sub-license, sell, rent, host, transfer, or distribute in any way the digital or 3D printed versions of this object, nor any other derivative work of this object in its digital or physical format (including - but not limited to - remixes of this object, and hosting on other digital platforms). The objects may not be used without permission in any way whatsoever in which you charge money, or collect fees.
Comment & Rating (40)