Search models, users, collections, and posts

Golf – Putt-Startline-Trainer_2.0

Print Profile(2)

All
P1S
P1P
A1
X1
H2D Pro
X1 Carbon
H2C
H2S
X1E
H2D
P2S
X2D
A2L

PLA/PETG 0.2mm layer, 3 walls, 15% infill
Designer
4 h
3 plates
4.9(47)

0.2mm layer, 3 walls, 15% infill
4.1 h
4 plates
5.0(1)

Open in Bambu Studio
Boost
269
1055
81
40
1.1 k
870
Released 

Bill of Materials

List other parts
  • Senkkopfschraube M5x10 x 2:
  • Senkkopfschraube M5x20 x 2:

Description

Content has been automatically translated.
Show original

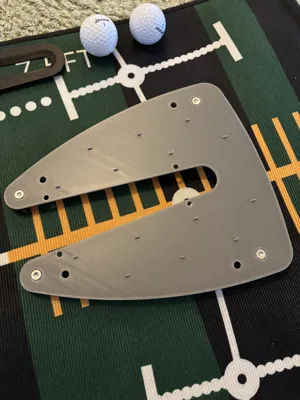
Here is version 2.0 of my Putt Startline Trainer.


Due to high demand, I have developed an alignment aid for the training tool.

The base plate received 4 additional holes to attach the aid.

I have also simplified the gate buttons so that they can now be printed without supports.

During assembly, the 4 printed U-washers must be placed under the buttons.


Otherwise, nothing has changed with the model.


I printed the main part from PLA+.

The buttons are made of PETG.


Have fun training.

Comment & Rating (81)

(0/1000)

Print Profile
PLA/PETG 0.2mm layer, 3 walls, 15% infill
great print!
0
Reply
question, as I am printing this for someone who loves golf and I don't understand something. Is the black middle part supposed to be removed? what is the purpose of this black piece if you just remove it.
0
Reply
Replying to @user_3187412558 :
Yes. The original design this model is based off of has instructions online but it's simple. 1) With the alignment guide (black insert) installed, line it up with the desired target/hole and take a few test shots. Adjust your aim so that a good shot is guaranteed to be on the right line and go in. 2) Remove the alignment guide, adjust the fins on the back based on putter width, adjust the fins on the front (easy > hard modes) 3) Practice your putting until you get good.
(Edited)
0
Reply
You may be unaware of your design that is fantastic. Made this for one guy in the office that liked this, now word has traveled and now i'm on make #5. Early christmas presents for all. Thanks
The designer has replied
0
Reply
Thanks for your review. Glad to hear that
Show original
0
Reply
I've attempted to print this 5 times, and it fails at the same spot each time. Doesn't adhere to the bed in this spot. I've tried glue, hair spray, raising the bed temp, Cool super tack plate, textures pei plate. What am I doing wrong?
0
Reply
Boosted
Print Profile
PLA/PETG 0.2mm layer, 3 walls, 15% infill
Printed two. Probably should not have given the second to a buddy I am hopping to finally beat.
0
Reply
Boosted
Lovely design, works as planned. Lets see if the putting can improve.
0
Reply
Print Profile
PLA/PETG 0.2mm layer, 3 walls, 15% infill
happy husband. used BBl PETG-hf
0
Reply
Boosted
Turned out great. Didn't have that long of screws but don't think they are really necessary anyway. Just need to be long enough to grab the button.
0
Reply
Print Profile
PLA/PETG 0.2mm layer, 3 walls, 15% infill
absolutely perfect printed right off the mobile app with no issues at all!!
0
Reply
Works perfectly, TOP!
Show original
0
Reply
Print Profile
PLA/PETG 0.2mm layer, 3 walls, 15% infill
I have printed a few of these now, they are great thanks.
(Edited)
0
Reply

License

This user content is licensed under a Standard Digital File License.

You shall not share, sub-license, sell, rent, host, transfer, or distribute in any way the digital or 3D printed versions of this object, nor any other derivative work of this object in its digital or physical format (including - but not limited to - remixes of this object, and hosting on other digital platforms). The objects may not be used without permission in any way whatsoever in which you charge money, or collect fees.