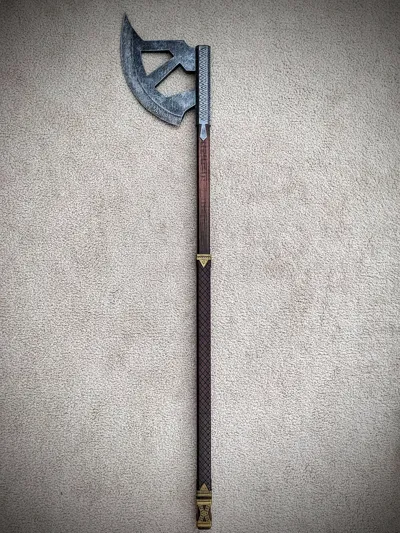
Gimli's Walking Axe


Print Profile(2)


Description
Gimli was given this axe by his father Gloin, but you can simply forge your own.
As with most of my prints, this one utilizes the entire volume of my P1S, so sorry to A1 mini fans. I have done other builds without use of internal structures, but there has been lot of feedback about having some cheap internal structure to keep everything together better, so this model utilizes an internal ½ inch PVC pipe that can be purchased at a hardware store. You will need about 1020 mm, so I purchased a 5ft piece.
Print Guide
- There are two print profiles that I have posted:
- One is for printing everything in generic PLA for those that may wish to post process
- The other uses settings to print the handle out of TPU and the “metal” portions out of silk PLA (which is what is seen in the first photos).
- Most printing will be relatively straightforward with most of the pieces being printed in the vertical direction and not needing supports
- The blade is printed in the only orientation that makes sense as a single piece, so this requires quite a bit of support. However, the supports should come off easily
- There are two plates for the blade, but only one of the two plates needs to be printed
- One plate is for a smooth blade
- The other has been edited in blender to give the some blade battle damaged texture
- The upper handle has been designed with wood texture
- I printed using chestnut brown PLA from Sunlu,and I printed in light brown and stained it to give more realistic look
Assembly Guide
- For ease, all pins have been designed as the same size. However, due to the design, the depth of the cutouts in the model differ in the handle sections to accommodate the other parts that go above or below them
- Dry fit the pins ahead of gluing
- It is most likely easier to glue in the pins before putting the section onto the PVC
- The handle sections are a seamless pattern that needs to line up perfectly, so the way these are put together matters
- To help the process, each piece's top has been debossed with lettering indicating the order they should go together; the debossed letters face the same direction to ensure the print is as seamless as possible
- BT stands for Bottom Top-this means that face should go up and that piece is the bottom-most handle.
- MT stands for Middle Top-this means that face should go up and is the middle section. The middle will have both peg connectors stick out the same amount
- TT stands for Top Top-this means that face should go up and this is the top section.
- To help the process, each piece's top has been debossed with lettering indicating the order they should go together; the debossed letters face the same direction to ensure the print is as seamless as possible

- I assembled the handle as a single piece before final assembly as I found this easier than stacking everything one at a time onto the PVC pipe. I also put the butt over the bottom of the pipe and then slid down the entire handle flush while pressing the bottom ring into the floor, this allowed for the handle to move down to the prefect height that it should be before gluing the bottom ring
- The wooden handle is also two pieces that must be joined in the right orientation due to the texture
- To help the process, each piece's top has also been debossed with lettering indicating the order they should go together; the debossed letters face the same direction to ensure the print is as seamless as possible
- BT stands for Bottom Top-this means that face should go up and that piece is the bottom-most handle.
- TT stands for Top Top-this means that face should go up and this is the top section.
- To help the process, each piece's top has also been debossed with lettering indicating the order they should go together; the debossed letters face the same direction to ensure the print is as seamless as possible

- The vertical stacking is fairly straightforward
- The lower ornament slides over the butt and can be carefully glued in place
- The butt is then glued to be flush against the bottom of the PVC pipe
- The bottom ring faces up with the flat flush against the butt
- The handle section then slides down onto the PVC and connects inside the lower ring
- The top ring slides down and sits over the handle
- The wooden handle then slides down and sits flush against the top ring
- Be careful if gluing with superglue as this reacts very strongly with the PVC and it may be too hard to move the pieces down. I would suggest to only add glue to the connectors and the faces and to work fast when pushing the pieces onto the PVC (dry fit before gluing)
The top section can then be put on--though I assembled this entire section first:
- Glue the blade connectors in place and then glue on the blade--again dry fit this connection before gluing
- Slide down the entire upper piece to sit flush against the wooden handle
- Be extremely careful with the upper piece's two thin overhangs. These can easily snap if they are dropped or too much force is applied laterally.
- These should have a little glue added to them so they are pressed against the wooden handle--making it very unlikely they break after assembly
- Be extremely careful with the upper piece's two thin overhangs. These can easily snap if they are dropped or too much force is applied laterally.

Post-Processing Tips
For my silk PLA axe, I still performed a bit of post processing to give a more realistic look
The handle section was printed out of white TPU in order to both give a softer texture and to dye the TPU to look more like leather
To dye to TPU, you can use Rit brand Synthetic dye. To give darker / redish brown look, I used the a combination of red and brown dyes
- For the TPU, I find that Eryone white TPU prints and dyes amazingly--below is a picture before dyeing
- To dye the handle, its mostly just following instructions on the bottle and waiting long enough to get the color you are after
- In a large pot add a small squirt of dish soap and 1500 mL of hot water
- Heat this on the stove to just before boiling (keep the temperature warm but not boiling throughout)
- Add 15 mL brown dye and 10 mL red dye
- Add the three pieces and constantly move and roll them (they will float so you have to rotate them to soak evenly)
- The darker the color, the longer the time necessary to yield the color you desire--this took about 25-30 minutes to get the color very dark brown (almost black)
- Wash the parts to get them clean of excess dye and the soap
- Dry these in the dryer for about 10 hours at 48C to remove any moisture trapped inside the print (not quite waterproof)

- The wooden handle can also be sanded and stained with a water based wood stain to give a more realistic look
- Connect the two wooden handle pieces and fill the seam using your preferred method
- Sand the seam smooth and sand the rest of the print using 200-250 grit sandpaper followed by 400 grit sandpaper
- Using a water based stain, apply to a microfiber cloth and liberally rub on the piece and then wipe away with a clean cloth
- Let dry a couple mins and repeat he process as man times as necessary to get the look you want
- The darker the desired color, the more times you'll need to apply
- Be careful and some stains can reactivate if they are not dry enough before reapplication
- I used two different colored stains (a cherry and dark walnut) separately and in combination to yield the color I was after
- I sealed the stain with matte rustoleum clear coat

License
You shall not share, sub-license, sell, rent, host, transfer, or distribute in any way the digital or 3D printed versions of this object, nor any other derivative work of this object in its digital or physical format (including - but not limited to - remixes of this object, and hosting on other digital platforms). The objects may not be used without permission in any way whatsoever in which you charge money, or collect fees.
Comment & Rating (15)