Search models, users, collections, and posts

P1S Chamber HD camera , VERY CHEAP and EASY!!

GIF
GIF

Print Profile(3)

All
P1S
X1E
X1 Carbon
X1
P2S
A1
P1P
H2D Pro
A1 mini
H2S
H2D
H2C
X2D
A2L

New and improved model
Designer
13 min
1 plate
5.0(1)

Thicker sturdier profile
Designer
18 min
1 plate

An even beefier print profile.
Designer
18 min
1 plate

Open in Bambu Studio
Boost
14
24
7
0
8
3
Released 

Description

EDIT : 

After popular demand (literally not even one of you clicked a "like") I am uploading a improved version free of charge !!!

A better mount with less plastic used , provides better thermal behavior and just works !

END EDIT .


INTRO !

Are you too poor to buy a P2S ?

Do you still think that p1s Kicks ass ?

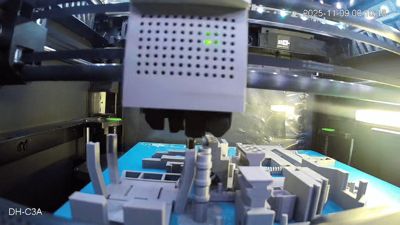
How about a 15 dollar HD 1080p 60fps intra-dimension super-duper camera upgrade that can fold space and time to show to YOU ,YES YOU , the real status of your printer in beautiful colors and smooth framerate.


Here is a very crude model that works™ with a very cheap (17 euros or 15 dollars in freedom units) camera . 

The camera model is : DAHUA CUBE A1     (DH-C3A)

Buttery smooth 60fps video feed , if you like to get more involved you can remove the glue that holds the lens and focus it to make it better , but it works fine as it is.


All you need is to sign up your camera to the dedicated DAHUA camera app (DMSS was for me on android).

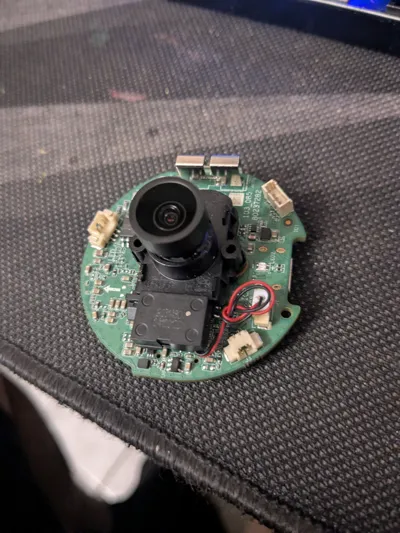
Then remove the 1 screw behind the case of the camera and pry open the shell.

Remove all cables , the camera works fine without sound led and infrared connector btw.

Put the camera into the 3d printed part and you are ready to go.

Oh and btw you need to flip the image in settings because we re mounting the camera upside down .( not necessary if you live in Austria ,find a kangaroo to do it for you there… )


The cable goes straight up and does not interfere with the chain system.

You can reroute the cable from other ways to hide it and make it seem more professional.


This is just a working idea , i am not responsible if your goldfish catches fire or you have to sacrifice your newborn son to Cthulhu to escape the gravity of xenon 2… we have all been there…


Remix the model and make it better !

I am just showing you that you can have nice things even if your printer is somewhat old and you are …. poor…. , i mean you like retro vintage classic stuff.

Comment & Rating (7)

(0/1000)

First of all, I want to thank you for taking the time and effort to share this project. it's exactly the thing I was looking for to add as a nozzle camera to my Bambu Labs p1s printer. I bought a bunch of Onn brand cameras during Black Friday and they're ideal for these kinds of projects. I've got a question and an observation that I would like to make. first of all, the design with your camera and the bracket, was it simply a press fit? Because the board on my camera of course isn't quite the same size, I will need to glue the bracket onto the camera module to keep it in place. secondly, I have a problem with the fragility of your bracket. As you can see from the photo, the first one I made broke with only minor handling. the second one that I printed hasn't broken yet. but it's simply too thin to use. Was your first design thicker? If so, maybe you could put it back online as an option for someone such as myself.
The designer has replied
designer
1
Reply
Yes unfortunately my design is not very sturdy ... Because i cannot really draw using 3d programs. But i have a solution. During my searches i found this model here on makerworld that fit exactly my camera and probably yours. Here is the link. https://makerworld.com/en/models/499741-tapo-c110-internal-camera-holder#profileId-757090 Also yes my design was press fit and still stays still.I will try to beef up the model to make it sturdier at the base. Thanks for printing it. Also look up the other design i linked because it is a very good model.
designer
1
Reply
I have uploaded 2 new print profiles that you can check. Please also check the clearances behind and in front of the camera (belts and print head). Also you can see the objects in the model , locate the grey cylinder that is a negative part ,you can make it smaller to get a nice tight fit to your lens. Also remember that you can tighten the lens to focus closer to your build plate and make the image better ! Thanks for the feedback ! I hope i can help.
designer
1
Reply
Replying to @madrandomize :
Thank you for taking the time to upload those two new profiles. I used the Heaviest profile and adjusted the hole size and moved the hole and it came out perfect for my Onn camera boards as you can see from the photo. I did go ahead and super glue the bracket to the camera module body just to be safe. Thank you again for your work, I think this method of mounting a secondary camera into my p1s is superior to hanging a camera off of the front door or something like that.
(Edited)
designer
1
Reply
Print Profile
New and improved model
The profile uploader has replied
0
Reply
Thank you for the rating!
(Edited)
profile
1
Reply
No more