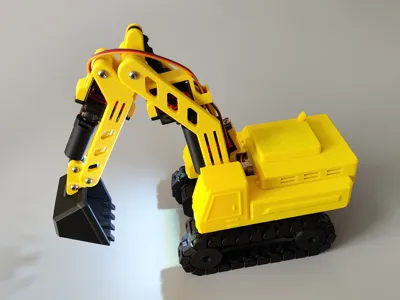
CyberBrick kit Remote control excavator (no supports, no TPU, no electrical slip ring base, can rotate about 2 turns)


Print Profile(2)


Description
Boost Me (for free)
Your likes and boosts are my motivation to update!!! Thank you~
First, I want to apologize to everyone (╥_╥) It was originally planned to be completed in 2 weeks, but while working on it, I found many shortcomings, and spent another 2 weeks tirelessly searching for the root cause and solutions for the screw rod and base gear jamming issue (the installation tutorial took a few days)!! (If you need to modify the screw rod, please download the STL/CAD files. Note: You need Blender 5.0 to open and view them; the software is free and open-source, but you need some basic software operation skills to make modifications)
I originally considered compatibility with official servos, MG90S, and SG90, but unfortunately the kit's screws were not long enough and would require separate purchase, so I had to give up, and the price difference between MG90S and SG90 is not significant!! Overall, I personally feel the time spent on the finished product was worthwhile, I just don't know if anyone will like it..!! Except for the base servo which is at 50% speed, the other 3 are at 100%. The voltage and current of the MG90S servo are close to those of the official servo, and no receiver voltage circuit mismatch was found during testing. The movable angles of the bucket, forearm, and main arm can be seen in the preview animation!!Installation is not difficult, but there are many steps!!(Dimensions with arm extended: LWH approx. 312.6*109.6*43.7mm)
2026.2.8 Update: Adjusted PDF for assembly guide sequence 2, the diagrams for the 2 screw rods and sleeves were reversed, my mistake (thanks to 2 friends for pointing it out, I didn't notice it the first time it was mentioned = =)

Each PDF installation tutorialonly has 1 page of diagrams, because the actual photos are quite large, resulting in single pages being tens of MB. I won't use actual photos next time = =, (single PDF upload limit is 50MB)!!
Except for the servos, the rest of the materials are from the CyberBrick kit. The official website lists the material models; if you need to purchase them separately, you can check there!!
Please read the entire PDF installation tutorial before printing to avoid being unable to install it after printing!!
Please read the entire PDF installation tutorial before printing to avoid being unable to install it after printing!!
Please read the entire PDF installation tutorial before printing to avoid being unable to install it after printing!!
The diagram below shows how each switch on Remote Control Style 2 controls the excavator parts:
①Left shoulder joystick: Main arm ②Right shoulder joystick: Forearm
③Left joystick: Y for forward/backward, X for left/right steering ④Right joystick: Y for bucket, X for base rotation
⑤Left button: Short press for solid white light, long press to turn off light ⑥Right button: Short press to cycle yellow light flashing every 1 second, long press to turn off light

Remote Control Style 2 download address:https://makerworld.com.cn/zh/models/1464085-cyberbrickjin-cou-kuan-yao-kong-shou-bing-aaadian#profileId-1594526
Precautions:
1. Additionally required: 1 micro switch, 1 single-channel joystick (Note: CyberBrick standard version components need to be purchased from the official store, as shown in the figure below)

2.Requires separate purchase: 4 x 360° MG90S all-metal servos with 5-hole rocker arms (approx. 5 yuan each on certain platforms), considering durability and the official store not selling 360° servos (Note: Since rocker arm sizes vary for different holes, do not buy the wrong one, as shown in the red circle in the figure below. Do not use 180° servos, as they will automatically reset)

3. Since the base does not use a slip ring, the length of the wires will affect the number of rotations. It is recommended to be 25cm (approx. 2.5 rotations); if too long, it might protrude and get stuck in the gears. If it's gone, do not use wires thinner than those in the kit, to prevent them from getting stuck in gaps!!
4. If the shaking phenomenon shown in the animation below occurs, it means the screw rod sleeve screw is not tightened!!

5. If the phenomenon shown in the animation below occurs, it is normal, due to tolerances and the servo gears being able to move up and down!!

6.The black parts are all movable components, not recommended to be printed with PLA Lite. It is suggested to use PLA Basic or filaments with better layer adhesion to avoid breakage at the arrow in the figure below!!

7. When the arm is extended, it will be a bit front-heavy, and descending ladder-like structures will not be very stable. You can add iron plates or similar items to the small slot behind the battery (LWH: 5*59*18mm) to increase weight (Note: needs to be purchased separately, and should be wrapped when used to avoid damaging the battery)!!
8. Not recommended for younger children to play with, to avoid pinching hands or similar injuries, or they should play under adult supervision, safety first!!
The animations below show the installation of some components, which will be more intuitive than text descriptions:Pay attention to safety during installation!! Pay attention to safety during installation!!
1 animation:

2 animation:

3-1 animation:

3-2 animation:

4 animation:

5 animation:

6 animation:

Please forgive any shortcomings, but congratulations, you have completed the assembly and can now play, great effort~!! (Note: If the animations are not clear, you can download the STL/CAD files, which contain complete shell animations. The file format is blend, and requires Blender 4.5 or above to open!!)
Note: 1. Both PLA and PETG can be printed. It's best to understand the characteristics of these two materials before printing to avoid printing failures!! For example, PLA can become brittle if left for a long time or at low temperatures, while PETG has good toughness. Please choose the filament that suits you!!
2. If it's for younger children, and the parts are small and easy to disassemble, it's better to glue them firmly with 502 or other adhesives to prevent them from being swallowed!!
3. If there are no special requirements, please do not use your own advanced process settings for printing~ to avoid printing failures!!
If your printd part has local spaghetti, or the filament doesn't stick to the build plate, please recall if you touched that area (hands secrete sweat and oil, touching it has a very high chance of causing spaghetti) or if the build plate is dirty. The solution is to search online for how to clean a 3D print plate!! If other problems occur, please describe it in the comments section and add pictures, so it's easier for us to solve it~ Otherwise, I can't imagine the situation = =!!
Documentation (13)

License
You shall not share, sub-license, sell, rent, host, transfer, or distribute in any way the digital or 3D printed versions of this object, nor any other derivative work of this object in its digital or physical format (including - but not limited to - remixes of this object, and hosting on other digital platforms). The objects may not be used without permission in any way whatsoever in which you charge money, or collect fees.
Comment & Rating (32)