Search models, users, collections, and posts

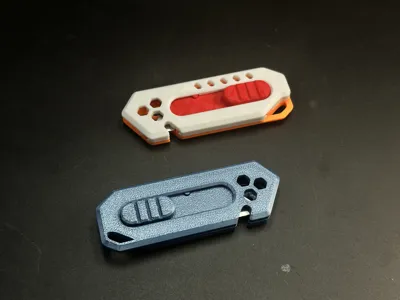
EDC-Friendly Lightweight Utility Knife III

IP Report

Print Profile(5)

All
A1 mini
P1P
P1S
H2D
X1 Carbon
X1
H2S
P2S
X1E
A1
H2D Pro
H2C
X2D
A2L

0.2mm layer, 2 walls, 15% infill
Designer
1 h
1 plate
4.9(303)

Version without rope cutting notch
Designer
54 min
1 plate
4.9(57)

P2S/P1S Ready| 3 walls|12% infill|Rope Cutting Notch Version
47 min
1 plate
4.8(71)

2 Colors - 1 Plate by Object and Colors seperated also
2 h
3 plates
5.0(20)
Click to see more

Open in Bambu Studio
Boost
2227
5961
517
197
6.8 k
4.5 k
Released 

Description

This is a redesigned version of a previous project. While retaining the same design style, all internal components have been completely redesigned.


Its external dimensions remain largely identical to the original design, but the thickness has been increased by 3.5 mm, significantly enhancing its strength.


It provides clear tactile click feedback during blade sliding.


Easy to print – no supports required.

Easy to assemble – no additional hardware, glue, or tools needed.

This project is designed based on the dimensions of Stanley-style blades, with a length of 62 mm. It can also accommodate slightly shorter blades.


Assembly Video: 


Assembly Tutorial:

1.Show all components.

2.Interlock the two blade holder parts.

3.Insert one button into the blade holder. Pay attention to the orientation as shown in the image.

4.Insert one end of the other button into the holder, then rotate it so that the two buttons lock together.


5.Press the two protrusions on the top of the blade holder to open the gap in the middle, then insert the blade.

6.Place the blade holder into the right-side shell, ensuring it fits firmly against the rightmost position.

7.Join the left shell with the right shell. This is a two-step process – please refer to the diagram below.

If the shells are too difficult to join, you can follow the method shown in the image below.Note: Always ensure the blade faces downward to prevent accidental injury.

The strength of 3D-printed knives cannot be guaranteed and they are suitable only for light-duty tasks, such as cutting paper or opening Amazon packages. Unless otherwise specified, all of my knife designs are intended for light-duty use only.


My similar projects, click on the picture


Membership

Join


Comment & Rating (517)

(0/1000)

Pinned by Designer
Print Profile
0.2mm layer, 2 walls, 15% infill
2
Reply
Print Profile
0.2mm layer, 2 walls, 15% infill
Cool design, prints great and the blade stopper is more sturdy.
profile
2
Reply
Love the colors, is that a two-tone filament on the shell parts?
0
Reply
Replying to @Tsopperi :
Looks even better irl, it is PolyTerra PLA Dual Mixed Berries Red-Dark Blue
0
Reply
Replying to @ARTilldawn :
That's awesome!
0
Reply
printed in PLA, rather stiff and had to hammer on it to assemble. after deploying it about 20 times forcefully, it became much smoother. accidentally nicked my finger too but minor scratch only
designer
3
Reply
was looking at your comment and immediately sliced my finger lol
0
Reply
printed in petg, I couldn't fit it and I cut myself half an hour ago and it won't stop bleeding, a scratch haha but it keeps screwing me over to fit it
Show original
0
Reply
Print Profile
Version without rope cutting notch
Still printing and assembling because my employees will receive that in addition to the items from the advent calendar :-)
(Edited)
Show original
profile
5
Reply
Damn near perfect.... I don't think I'd use it for sheet rocking a room. But, opening boxes or cutting up cardboard / paper all day long. Be careful changing or flipping the blades! (Orange PLA)
designer
2
Reply
how do you change the blade
0
Reply
Replying to @user_3294515016 :
close the blade them slide the top and bottom apart - the reverse of putting it together for the first time - Note nothing can be in the lanyard hole
0
Reply
I've been using it for like a month now, every day use at work, incredibly engineered and strong I love it, changed it a bit to make it cloud themed
designer
2
Reply
wow that looks amazing!
0
Reply
Print Profile
0.2mm layer, 2 walls, 15% infill
It came out great! For some reason it’s very tight. It was very difficult to close all the way and it was very hard to slide. I added Super Lube in the tracks and it’s good now.
profile
3
Reply
Print Profile
0.2mm layer, 2 walls, 15% infill
This is great! Printed in Petg and went together smooth! Thanks!
(Edited)
profile
3
Reply
nice tool, a little bit difficult to open for changing blades printed with pla.
(Edited)
2
Reply
Print Profile
0.2mm layer, 2 walls, 15% infill
Great print . These are two of the first four I’ve made have given them others as gifts.
profile
1
Reply
One of the nicer knifes I have used from here
designer
1
Reply

License

If you want to use this model commercially, please join my membership.
Join Now
This user content is licensed under a Standard Digital File License.

You shall not share, sub-license, sell, rent, host, transfer, or distribute in any way the digital or 3D printed versions of this object, nor any other derivative work of this object in its digital or physical format (including - but not limited to - remixes of this object, and hosting on other digital platforms). The objects may not be used without permission in any way whatsoever in which you charge money, or collect fees.