Color-separated and Part-divided (no AMS required) Mashin Hero Wataru Ryujinmaru


Print Profile(5)


Description
First edition has two monochrome versions, with low printing and assembly difficulty, but painting takes time; the AMS color-separated and multi-part version has low painting difficulty, but printing and assembly take time
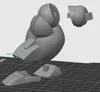
Ryuo-maru and Ryujin Maru from Super Mashin Hero Wataru have been released. Everyone is welcome to continue their support
Boost Me (for free)
The IP is not original, but this model is DIY, with custom part and color separation, and adjustments. I'm a third-rate modeler, and this old man who smokes like a chimney is working himself to death. I hope everyone likes it, thank you partners!
Update and Optimization Log
2025.11.04: Separately updated the print profile: a right hand that can hold a sword. Many thanks to Xiao Lu @freewind112 for the technical support.
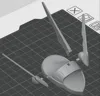
2025.10.23: Added assembly pins for the three antennas.
2025.10.20: Optimized the issue of the two part connectors on the right side being too tight.
2025.10.19: Optimized the actual printing precision of the assembly gaps for the color-separated, multi-part model's face and head (Tested on A1 mini, PETG material).
2025.10.18: ①Color-separated, multi-part 40cm version uploaded (Scaled up proportionally from the optimized palm-sized version, A1 mini was pushed to its plating limits and supports were tested); ②Facial details re-drawn; ③Optimized assembly precision for some parts (forehead, back of head, shoulder covers, etc.).
2025.10.16: Re-designed the small-sized sword stand to prevent breakage when inserting the sword.
2025.10.14: Optimized the supports for some small parts to prevent collapse.
===============
1. The finished model in the picture is 40cm in size (first edition large parts version). PETG material was personally tested throughout the entire process with no issues (printing, painting, assembly). For AMS separated parts and colors, all separate parts are a single color except for the eyes (eyes are easy to paint, bright green is recommended).
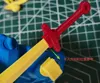
2. The equipment I use is A1 mini, so the sword can only be printed in three parts. For machines larger than A1, this should not be necessary. A complete, unsplit sword is specially provided for everyone to debug.
3. There are three slimes on the large-sized version, used for testing parameters such as flow rate and line width. I thought they were cute, so I didn't delete them. The slimes are not part of the model itself; if you are not interested, you can delete them or skip them during printing.
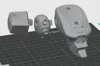
4. Parts that need positioning have assembly connections. Those less necessary do not have assembly connections (I was lazy), but they all have corresponding indentations for gluing, so assembly difficulty is not high. Some assembly screenshots have been uploaded as attachments for everyone's assembly reference.
5. Painting and spraying paint on the monochrome version (paint has thickness) may affect assembly precision matching. I personally tested it, and the impact is not significant. If it truly cannot be pressed in after coloring, sand down the paint layer.
6. Everyone's equipment, materials, and temperature environments are different, so assembly tolerances cannot adapt to all situations. If you know how to model, adjust slightly according to your situation. If not, manually sand it a bit, and it can usually be solved.
Special TIPS: I set the outer wall line width to 0.55 (0.13mm more than default) to match my material and machine. If there is wall overflow during printing (usually there won't be any issues), you can change it back to default.
Documentation (5)

License
You shall not share, sub-license, sell, rent, host, transfer, or distribute in any way the digital or 3D printed versions of this object, nor any other derivative work of this object in its digital or physical format (including - but not limited to - remixes of this object, and hosting on other digital platforms). The objects may not be used without permission in any way whatsoever in which you charge money, or collect fees.
Comment & Rating (3)