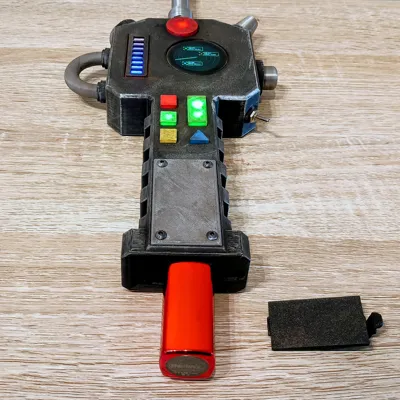
Auspex Hand Scanner (40k-style) — Animated Display


Print Profile(1)

Bill of Materials


Description
Thanks for checking out my model! Interested in supporting my work or selling prints?
Support Crew – Show some love and help keep the projects flowing
Galactic Maker Foundry – Sell physical prints of my original designs
Foundry License+ – Sell prints and use my photos for listings
🎉 Supporter-only Discord coming soon – get early access, tips, and sneak peeks!
Membership
Join here to support or get a license
Fragment: Field Tech Brief / Pattern VIG/IX “Watchman Auspex Hand Scanner”
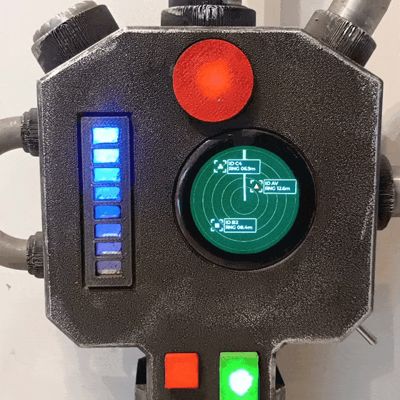
Issued to recon squads operating beyond sanctioned perimeters. The Watchman is a rugged hand scanner tuned for ferro-ceramic partitions, void salts, and warm-body signatures behind plated bulkheads. Standard drill: sweep in arcs, watch for interference spikes, and trust the lower indicators—if the triangle and bottom square pulse in sequence, you’re not alone. The bar band shows movement along your plane; the round dial hints at proximity and intent. Keep the toggle live when you lose vox. If the casing hums, brace.
This is a chunky, game-style “Watchman” Auspex Hand Scanner (Pattern VIG/IX) designed around a 1.28" round TFT with a built-in ESP32 for the animated display. Lighting is simple: 3 mm LEDs sit under the square/rectangle/triangle diffusers (with self-flashing 3 mm LEDs in the triangle and bottom square for a subtle blink) and a 5 mm LED sits under the large circular diffuser. A 70 mm COB “meteor” LED runs beneath the bar diffuser (use a 100 Ω series resistor on +), hot-glued into its slot.
Power comes from a USB battery bank inside the body. The LEDs, meteor strip, and screen are all fed from a USB Cable wired inside, so you just plug straight into the power bank and turn it on and off with the toggle switch.
Battery bay limit: up to 25 mm (H) × 32 mm (W) × 120 mm (L).
Originally sized for a compact ~5000 mAh bank that’s now hard to find, so i've provided alternatives—add a foam shims if your bank is smaller to keep it snug and stop it from rattling around.
Upload the animation to the ESP32 via Arduino IDE, Download the ZIP from the Documentation section, extract the Auspex_Scanner folder (contains Auspex_Scanner.ino + lv_conf.h), install esp32 (Espressif) + LovyanGFX + LVGL in Arduino IDE, open the .ino, select your ESP32C3 board/port, Upload, then seat the display with the adhesive strip, close the case, and power it from the battery bank.
Electronics
- Screen/MCU: 1.28" round TFT with built-in ESP32 (single board)
- LEDs:
- 3 mm LEDs (x6) under the square, rectangle, and triangle diffusers
- 5 mm LED (x1) under the large circle diffuser
- Flashing LEDs in the triangle and bottom square diffusers (extra visual punch)
- Bar Diffuser: 70 mm COB Meteor LED strip mounted underneath
- Power: USB battery bank (accessible via a bottom hatch)
- Switching: Inline toggle switch controlling the USB power feed
- Connector: Male USB-C plug wired inside the prop
Tip: If your 3 mm/5 mm LEDs aren’t pre-resistored, add appropriate series resistors. The meteor strip gets a 100 Ω inline resistor on positive (see wiring).
Wiring (quick guide)
- LED placement: Add a small touch of CA glue to each LED and seat them in their holes under the diffusers (3 mm LEDs under square/rectangle/triangle; 5 mm LED under large circle).
- Meteor strip: Solder the wires to the COB Meteor and put a 100 Ω resistor in series on + (positive). Fix the strip in its slot with a dab of hot glue.
- USB-C Connector: Solder a + (red) and – (black) to the male USB-C connector.
- Toggle switch: Solder two wires to the switch—one to each pin; the order doesn’t matter.
- Power bus: Strip/twist and heat-shrink the positive bundle together (6× 3 mm LEDs, 1× 5 mm LED, Meteor + after resistor, Male USB-C connector +, and one wire from the Toggle Switch). Do the same for the negative bundle (all LED negatives, meteor –, Male USB-C connector –, and USB cable –). Join the USB cable’s red (+) to the remaining wire on the toggle switch: strip both ends, twist together, tin, solder, and heat-shrink.
- Test: Plug into the battery bank, switch ON, verify all LEDs and the meteor strip light correctly.
- Firmware (upload the sketch):
- Download the ZIP from the Documentation section and extract it.
- Open the extracted folder named Auspex_Scanner. You should see Auspex_Scanner.ino and lv_conf.h together in this same folder.
- Start Arduino IDE. Click File, then Open, and choose Auspex_Scanner.ino.
- Install support for ESP32 boards: open Tools, choose Board Manager, search for esp32 by Espressif Systems, and install it.
- Install the libraries: open Tools, choose Library Manager, search for LovyanGFX and LVGL, and install both.
- Tell Arduino IDE which board you have: open Tools, choose Board, then pick ESP32C3 Dev Module (or the ESP32-C3 board that matches your module).
- Tell Arduino IDE which port to use: open Tools, choose Port, then choose the new port that appeared when you plugged the board in (e.g., COM11 on Windows or /dev/cu.usbmodem… on Mac).
Click the Upload button. Wait until it says the upload is complete.
- Mount screen: Insert the 1.28" ESP display into the bezel and secure using the included adhesive strip.
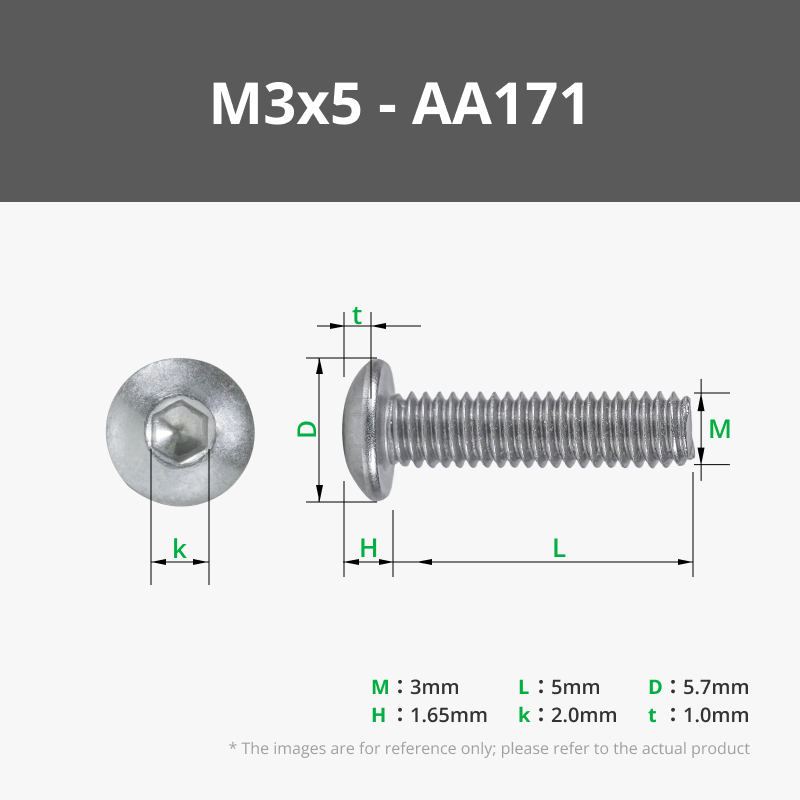
- Final fit & power: Insert the USB-C male connector into screen, close the body with M3 5mm screws, and power from the battery bank to confirm everything again.
Closure & Finishing
- Glue the diffusers, antenna parts, and tubes in place.
- Fit the front and back covers; add a tiny touch of CA to the front cover if desired.
- If the power bank rattles, add foam inside the bay so it’s snug and silent.
- Weathering (quick recipe):
- Base grime: thin washes of brown and raw umber acrylics; push into recesses, wipe high spots.
- Soot/grease: light black acrylic wash around vents and edges.
Edge wear: dry-brush or rub silver on raised edges: Rub ’n Buff Silver Leaf or AK Metallic Wax (Silver) both work great.
- For technique inspiration, Adam Savage’s Tested channel has excellent weathering tutorials.
Bill of Materials (BOM)
Documentation (1)
License
You shall not share, sub-license, sell, rent, host, transfer, or distribute in any way the digital or 3D printed versions of this object, nor any other derivative work of this object in its digital or physical format (including - but not limited to - remixes of this object, and hosting on other digital platforms). The objects may not be used without permission in any way whatsoever in which you charge money, or collect fees.
Comment & Rating (2)