Halo Warthog Keychain (PIP WW Vortek)


Print Profile(2)

Bill of Materials


Description
If you enjoyed this model, remember to like, follow, and support my work with a nice
Boost Me (for free)
Boooost!
If you're interested in using my models, several membership plans are available, even if you just want to buy me a coffee to show appreciation for my work :D
Membership
Join me or buy me a coffèèè
If you have any requests, don't hesitate to ask in the comments or personal messages!
For anything, don't hesitate to contact me; every request will be fulfilled promptly!


*Gregorian chants in the background*
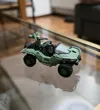
A piece of everyone's gaming history comes to life in this commemorative keychain for the Halo Warthog.
The perfect model to celebrate the 25th anniversary of the release of the first game and, most touchingly for me, the 18th anniversary of Halo 3, the best installment in the saga, in my opinion.
I must admit, this is the best model printed (so far, of course) using the PIP technique and my now-antiquated P1S, which still performs admirably. The model features fully functional wheels once the supports are removed, which are easy to remove, as most of them are external to the model and the wheels.
The model includes an antenna that, unfortunately, didn't hold up very well. I recommend ignoring it and leaving the model "minimal," if you can call it that, given the enormous amount of detail :D
I used matcha green CF PLA and I have to say I couldn't be more pleased with the result, especially the porous effect it gives the model.
I was worried about the machine gun being too fragile, but even here I was pleasantly surprised by the resistance I gave it.
And now, a few words about the model...
"The Warthog Force Application Vehicle, more commonly known as the Warthog or simply the Hog, is the name for a series of light utility vehicles serving as the United Nations Space Command's primary joint light tactical ground vehicle. Its variants are capable of performing armament carrier, utility, command and control (shelter), ambulance, reconnaissance and a variety of other tactical and logistic support roles. It is a highly mobile, all-wheel-drive, all-wheel-steering, hydrogen-injected ICE-powered vehicle equipped with a manual transmission.
The most ubiquitous model is the M12 Light Reconnaissance Vehicle and its variants, which is equipped with advanced surveillance and a turret-mounted machine gun for a basic defensive capability. The M12 has been a part of the UNSC's mechanized infantry divisions and armored vehicle divisions since 2319, and is the most publicly recognizable vehicle in their arsenal"
I hope you enjoyed this model as much as I enjoyed doing this, leave a comment if you intend to print it and remember to
Boost Me (for free)
worth worth worth!
Every model is PIP; the wheels are actually working.
I used AMS to achieve optimal multicolor results.
The model requires no assembly; you just need to carefully remove the tree supports already set in the print profile.
Better results can be achieved using the 0.2 mm printhead, at the expense of increased print times.
It's recommended NOT to change the print profile settings to avoid having problems with the final result.
I invite you to use tweezers and small pliers to remove the supports.
In more recent models, I've used smaller tolerances for the wheel alignment, to ensure a higher level of detail and fewer supports to remove in that area.
For this reason, it's necessary to "break in" the car once the supports have been removed (trying a couple of times) :D

License
You shall not share, sub-license, sell, rent, host, transfer, or distribute in any way the digital or 3D printed versions of this object, nor any other derivative work of this object in its digital or physical format (including - but not limited to - remixes of this object, and hosting on other digital platforms). The objects may not be used without permission in any way whatsoever in which you charge money, or collect fees.
Comment & Rating (18)