Reese‘s Peanut Butter Cup Container- Magnetic Lid


Print Profile(1)

Bill of Materials


Description
Boost Me (for free)
Thanks for checking out my models! If you enjoy unique 3D prints—lanterns, puzzles, dioramas, containers with clever mechanics, and playful designs built for fast, satisfying prints—consider giving this project a boost. It helps my little corner of MakerWorld grow and keeps new designs coming your way. I’m always working on fresh ideas, experimenting with textures, magnets, lighting, and fun surprises to make every print feel special. Your boost keeps the creativity flowing!
Reese‘s Peanut Butter Cup Container- Magnetic Lid
A sweet 3D-printed twist on the classic peanut butter cup.
✅ Overview
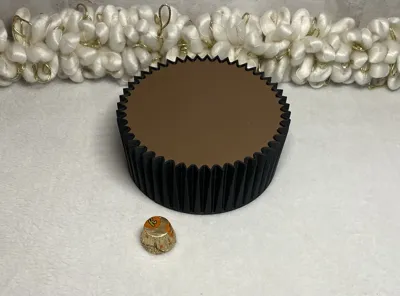
The Reese‘s Peanut Butter Cup Container- Magnetic Lid takes the shape of everyone’s favorite peanut butter cup and turns it into a functional 3D-printed container. Measuring 60 mm (2 3/8”) tall and 150 mm (6”) in diameter, it’s just the right size for candy, trinkets, desk snacks, or surprise gifts.
The fluted chocolate-style wall design and flat “peanut butter” lid give it a realistic candy-shop charm that makes people smile at first glance. It’s a parody piece that bridges novelty and practicality—perfect for makers who enjoy humor in their design work.
Despite the playful theme, the build quality is solid. The lid and base each house four 6 × 3 mm neodymium magnets, providing a smooth, secure closure. You can slide the lid off sideways to open it with a satisfying magnetic snap—no threads, no twisting, no mess.
Every detail of this print was modeled manually—no AI assistance—to capture the classic candy form in accurate proportion and tactile realism.
Magnetic Lid System
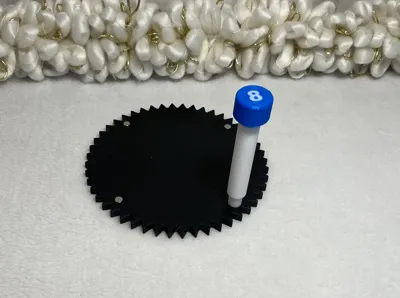
Four 6 × 3 mm neodymium magnets align precisely to hold the lid tight—strong enough to feel secure, yet effortless to open with a simple slide-off motion. For correct polarity every time, use the Magnet Presser with Stand when installing your magnets.
🧩 Why Magnets Instead of Threads to be
- Smooth Access: no twisting, lift or slide.
- Durability: magnets never strip or seize.
- Cleaner look: preserves the plate-stack silhouette.
- Fast Printing: no need for threaded tolerances or supports.
- Tactile Satisfaction: every open and close gives that solid “click.”
🖨️ Recommended Print Settings
- Minimum bed: 150 × 150 mm
- Layer height: 0.16 mm (to help reduce layer lines)
- Walls: 5
- Top/Bottom: 5 layers
- Infill: 10–15 % gyroid
- Contrast filaments (dark body + light lid) for an authentic “peanut butter cup” look
- Suggest a textured build plate for the chocolate insert adding just a bit of realism
💡 Fun Ideas
- Fill it with mini peanut butter cups or wrapped candies for display.
- Print a second lid with your name or a funny candy-themed slogan in Bambu Studio.
- Scale it up for a “giant cup” effect or down for gift favors.
📦 Bill of Materials
- 8× round magnets – 6 mm diameter x 3 mm thick
- 4 magnets for the lid
- 4 magnets for the box body
- A drop of CA (super glue) for securing magnets (optional but recommended).
Tip: Mark one face of all magnets with a marker before installation so you keep polarity consistent.
All primary parts are 3D printed.
🔧 Assembly Instructions
Tools Needed
- A small amount of CA gel adhesive
- Magnet Presser with Stand (recommended for perfect polarity and depth alignment)
- Optional: Lightweight Hammer
1️⃣ Install Insert
- Apply a few drops of gel CA glue to the lid and place the insert, centered in the lid. Note: There should be a slight gap around the edges to resemble a peanut butter cup.
2️⃣ Install Magnets in the Container
- Place the first magnet into the Red Magnet Presser.
- Apply a tiny drop of gel CA into the magnet location of the container. Use the Magnet Presser to press the magnet gently into its pocket.
- The presser ensures even pressure and prevents chipping or tilting.
- A small hobby hammer may be needed to press in place.
- Ensure the magnet is level with the surface or very slightly below. Note: if the magnet is raised above the surface, a gap will form between the lid and the container.
- Repeat for the remaining three recesses using the Red Magnet Presser.
3️⃣ Align and Install Magnets in the Lid
- Repeat Step 1 for the lid using the Blue Magnet Presser, ensuring the magnet poles face each other and the lid “clicks” shut cleanly every time.
4️⃣ Cure and Test Fit
- Allow adhesive to cure fully (usually 10–15 min).
- Once cured, test-fit the lid. It should align magnetically and slide open with a smooth pull.
License
You shall not share, sub-license, sell, rent, host, transfer, or distribute in any way the digital or 3D printed versions of this object, nor any other derivative work of this object in its digital or physical format (including - but not limited to - remixes of this object, and hosting on other digital platforms). The objects may not be used without permission in any way whatsoever in which you charge money, or collect fees.
Comment & Rating (11)