Books Read Annual Counter Hanging Sign Decor (AMS)


Print Profile(2)


Description
Update 20FEB2026
Hi everyone, I truly appreciate all the boosts, reviews, and photos you’ve shared of this model. This was my first fully developed design on this platform, and seeing your support has meant a lot to me. ❤️
That said, today I discovered at least four small shops that are selling my design without my permission. It’s been less than four months since I posted it, and that was honestly discouraging. I did consider taking the model down, but I’ve decided to keep it up for those of you who are using and supporting it respectfully.
To clarify: I do not currently offer a commercial license for this model, nor do I plan on making one available. Do not print and sell this file, whether online or in person. Unauthorized commercial use will result in a DMCA takedown and further legal action.
Thank you again to everyone who has supported my work the right way — I genuinely appreciate it.
Update 30OCT2025
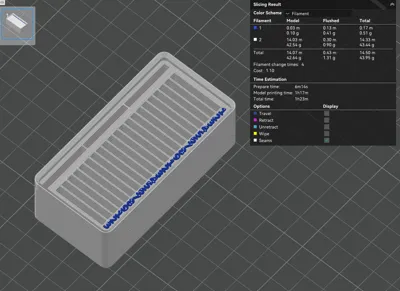
I've added a new Profile for this project for a Gridfinity bin to hold all the number cards. This piece is a 1 x 2 bin with 4u height. It's approximately 44g of Filament and has 4 filament changes.
I. Introduction
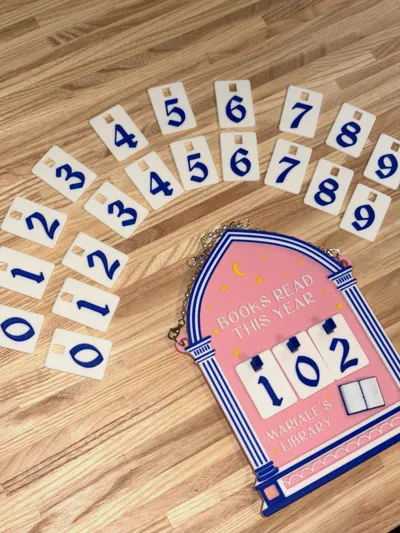
Hi all! I wanted to display the number of books I've read as my personal counter to keep track of my annual goal. This cute sign was designed to hang above my desk. I also designed the hooks from which the sign hangs to fit specifically an IKEA Mosslanda picture ledge. That model can be found in my profile. I've also thought about making a stand for this sign so that it could also be displayed on a shelf. If there's enough interest for that, maybe I'll try to add a profile in the future.
Project Finished size: 128.5 x 164 x 15 mm | 5.06" x 6.45" x 0.59"
II. File Contents
- Plate 1 | Number Cards & Border Piece: 2 colors, 3 filament changes (AMS not needed, could insert a pause in the print) - approximately 60 grams of filament and 2h4m.
- Plate 2 | Base Piece: 4 colors, 10 filament changes (AMS needed) - approximately 54 grams of filament and 1h27m.
- Plate 3 | DO NOT PRINT: I've included this plate just as an example of how you are going to assemble all pieces for this project.
III. Customizations
[YOUR NAME]'S LIBRARY
- In Prepare mode, click on Plate 2
- Click on the Objects process button in the left pane
- Expand Plate 2 > expand Assembly > find the object titled “Text3 - YOUR NAME”
- Click on the Text Shape button from the top menu, or click the letter T on your keyboard
- In the Input Text box, enter your desired name. This is where you make sure the text won't too big. If it is, you must reduce the size. You can also delete or move around the objects titled “Star 13 - Move if necessary” and “Star 14 - Move if necessary” if you need to make room for your text. Remember that the border piece will go over the base piece, so try to not add text that will go too close to the edge.
- Once finished, click anywhere outside the menu.
- Now you may Slice and Print.
OPEN BOOK
The book object displayed in my final assembly example plate was designed and posted to Maker World by user Pinalinne and is titled A decorative open book. If you'd like to include it in the final design, you can print that piece separately from my project, and color it with coordinating hues. I scaled my book uniformly so that its printed dimensions were approximately (x) 24.3 x (y) 18.2 x (z) 4.5 mm.
IV. Bill of Materials
To assemble the project, you'll also need the following (P.S. I do not receive any money from these links):
- Loctite Super Glue Ultra Gel Control (0.14 fl oz. bottle from Walmart or Amazon)
- Silver Metal Jewelry Jump Rings - 4 x 9mm and 4 x 5mm
- ~16" Chain (depending on what length you want) - I purchased mine from Hobby Lobby
- 2 x Jewelry Lobster Clasps
- Jewelry pliers
V. Assembly
This part is pretty straight forward. Once you've printed your pieces, lay down strings of crazy glue on the back of the border piece and paste it on top of the base piece, aligning the edges. If you are printing the book, make sure you place three number cards on the pegs BEFORE you glue down the book. The number cards will act as a guide so that you don't accidentally place the book too high and it collides with the cards. Once everything is dry, attach the 9mm jump rings to the base piece loops and the Mosslanda hooks (if hanging). Then, adjust your chain length to the length you want, making sure to cut two lengths of chain the same size. Use the lobster claws and small jump rings at the end of the chains. Clip everything together, and read on :)
VI. Disclaimers
- Font used on the Number Cards is Old English Five by Typographer Mediengestaltung - Download & License Link
- Font used on the Base Piece is Carmana by Hishand Studio - Download & License Link
- Book object used on the Base Piece assembly is A decorative open book by Pinalinne - Link
- Everything else in this file is my own creation and must not be commercially distributed, shared, or adapted without my explicit permission.
License
You shall not share, sub-license, sell, rent, host, transfer, or distribute in any way the digital or 3D printed versions of this object, nor any other derivative work of this object in its digital or physical format (including - but not limited to - remixes of this object, and hosting on other digital platforms). The objects may not be used without permission in any way whatsoever in which you charge money, or collect fees.
Comment & Rating (42)