Search models, users, collections, and posts
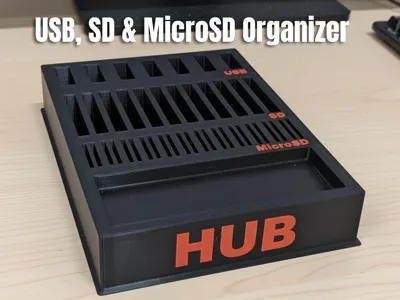
USB, SD & MicroSD 3D Desk Hub - Clean design
IP Report

Print Profile(1)

0.2mm layer, 3 walls, 25% infill
Designer
4 h
1 plate
Open in Bambu Studio
Boost
0
4
0
0
5
4
Released
Description
Keep your desk tidy and your media organized with this 3D-printable USB, SD & MicroSD Desk Hub — a compact, stylish organizer that holds USB adapters, full-size SD cards, and microSD cards, with an extra front tray for small items like keys, cables, or adapters.
This model is optimized for 3D printing and for real-world usability:
- Designed for common adapters — USB-A adapters, SD cards, and microSD adapters fit snugly while remaining easy to remove.
- Two-tone lettering option — recessed letters allow for easy color fills or filament swaps for a premium look.
- Stable desk footprint — low profile with a slight lip at the base so the hub doesn’t slide easily.
- Functional front tray — space for small items: screws, keys, dongles or a pen.
Perfect use cases:
- Home office organization
- Maker bench / electronics hobbyists
- Studio / photo memory management
- Gift for tech-savvy friends
✅ Files included
- Main hub body (multi-part or single STL depending on your preference)
- Optional printable inlays for two-color lettering
- README with recommended print settings and fit notes
🖨️ Recommended print settings (start here)
- Material: PLA (easy printing) or PETG for extra durability
- Layer height: 0.16–0.24 mm (0.16 for higher detail on lettering)
- Perimeters / Walls: 3–4
- Infill: 12–25% (25% if you want a stiffer tray)
- Supports: Minimal / none — design is optimized for few or no supports; enable supports only for your printer’s overhang tolerance
- Nozzle: 0.4 mm recommended
- Bed temp: 60°C (PLA) / 70–80°C (PETG)
- Print speed: 40–60 mm/s for best surface finish
- Tolerance: If your printer tends to be tight, add +0.2 mm scale on card/USB slots or increase X/Y by 0.5–1% to ensure smooth insertion/removal
🔧 Print tips & multi-color options
- For two-color lettering, print the lettering in a contrasting filament and glue into the recessed cavities, or use pause-at-layer / color-swap for single-extruder printers.
- Light sanding and a small dab of glue will keep inlays flush and clean.
- If cards are a tight fit, test-print a single slot at 100% scale first and adjust in your slicer using uniform scale or X/Y compensation.
Boost Me (for free)
🚀 Love organized desks? Give this 3D-printed USB & SD Hub a boost and help more makers discover it!
License
This user content is licensed under a
Creative Commons Attribution-Noncommercial
Comment & Rating (0)