Iowa Class Battleship FULL-SCALE 16" AP Round


Print Profile(1)

Description
This is a full-scale model of an Iowa class battleship's 16-inch Armor Piercing shell. It is sliced to fit on a 256x256x256mm build plate. There are 26 plates and takes almost 12 KG of filament (at 5% infill) and over 8 days to print. Recommend printing the layers in sequence as each four plates (1-4, 5-8, 9-12, etc.) combine to form a layer except plates 25 and 26, they are single layer pieces. I used 5% infill on all plates except plate 25 (9%) and plate 26 (15%).
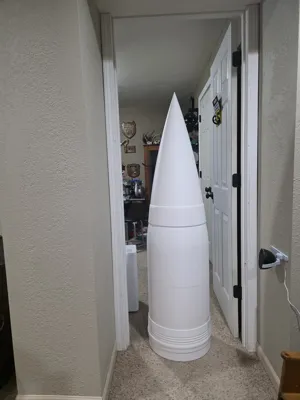
For size comparison, added a picture of the shell sitting in a 6' 8" tall door frame.
Build suggestions:
- Dry fit all pieces before gluing. I used a deburring tool to slightly bevel the outside rim of each peg hole. (Allows for easier peg alignment when assembling).
- Ensure all support material is off the underside of each horizontal peg (the pieces need to meet flush).
- In a layer, join 2 pieces first, then join the other 2 pieces. Then join these connected pieces (dry fit each layer first then dry fit on lower layer!!!).
- Be careful, layers 2 and 3 look alike. I randomly placed pegs so each piece will only fit one way. I marked each layer section on the inside with a sharpie. I also matched up one layer piece with its lower layer position and marked a line on both. Made for quicker alignment when getting ready to mate two layers.
- I screwed up plates 15 (Layer 4-3) and 16 (Layer4-4) negative pieces on the inside. The inner hollow (negative) area will not look round but the pieces fit together well and cause no outside display issues. (my bad).
- Use a slow setting glue to allow alignment time (I used 6 tubes of Testors plastic model glue for entire build)
- I also used straps and clamps to hold each glued layer until glue set. Be careful using clamps on top pegs, I broke one off.
- Recommend printing next layer and dry fitting together to act as top guides when gluing lower layer pieces together.
- If you use care, will almost have no gaps. I have some small gaps but will easily fill in and sand.
I printed all plates using the same P1S printer. Used inexpensive white Sunlu PLA+ filament ($10.95@). Had ten automatic AMS mid-print filament changes and all worked flawlessly. The end of the filament pulls clean (and straight) from the roll. Printed all 26 plates without any issue or misprints.
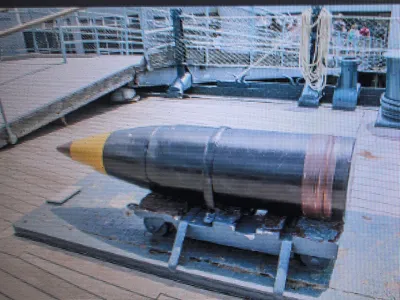
I plan on painting per the attached picture (black, yellow, copper, and brass). My plan is to admire for a while then donate to my local American Legion. They don't know it yet so mums the word!
Mainly printed just to see if I could do it.
Comment & Rating (28)