BRZ/86/FRS Engine Belt Covers (1st Gen)


Print Profile(2)


Bill of Materials


- 10mm O/D Aluminium Tube x 1: 10mm O/D Aluminium tubing required for the bolt sleeves. The tubing is to prevent the Coefficient of Thermal Expansion on the plastic whilst under torque from the bolts. You will need the metal sleeves to be 9mm long for each bolt hole.
Description
Model Details:
Note: The model that is attached is a blank version with no logo.
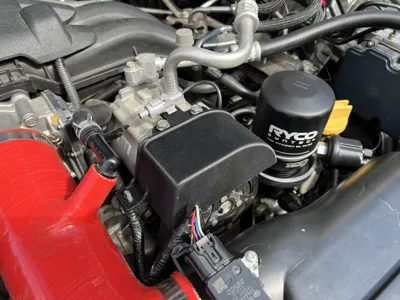
I have recreated the 1st Gen OEM BRZ/86/FRS Alternator and A/C Compressor belt covers for the engine bay.
They adopt the same metal sleeve inserts to prevent the Coefficient of Thermal Expansion on the plastic whilst under torque from the bolts.
10mm O/D Aluminium tubing required for the bolt sleeves. You will need the metal sleeves to be 9mm long for each bolt hole.
Recommended Material:
ABS/ASA, PA6, PPA/PPS
What I used:
- PA6-CF from Bambu Lab (Dried for at least 16hrs with the AMS-HT at 80c)
- 10mm O/D Aluminium Tubing
The holes located on each part are designed for the aluminium tube inserts, if you struggle to insert them then I would recommend using a 10mm drill bit and drilling the holes by hand to minimise as much material removal as possible. You want the inserts to have a slight amount of friction so they don't fall out during installation.
Installation:
1. Remove OEM engine belt covers.
2. Install the aluminium tube inserts.
3. Start with the alternator cover and hand-tighten the 10mm screws on either side evenly until snug and then tighten fully (nothing crazy).
4. Repeat step 3 for A/C Compressor and reinstall the cable management brackets into the cover last.
I highly recommend any makers that plan to print out of CF or GF filaments to be mindful of the risks involved with these materials. This is because of the fine carbon/glass fibres that come off the part when touched, possibly leading to ingestion and future health complications. If you find yourself touching these parts consistently then I would recommend having them clear coated, my ideal spray is Rustoleum Ultra Satin Clear 2K (printed models shown above are not clear coated).
Good luck and happy printing!
Boost Me (for free)
Please feel free to leave a positive rating and consider Boosting me to support my future releases of free high quality models. Thank you!
Comment & Rating (0)