Search models, users, collections, and posts
Ninebot Segway ZT3 Pro e-Scooter Luggage/Bag Mount
IP Report


Print Profile(1)

0.2mm Strength @BBLA1M
Designer
2.2 h
1 plate
Open in Bambu Studio
Boost
36
94
7
2
79
31
Released
Description
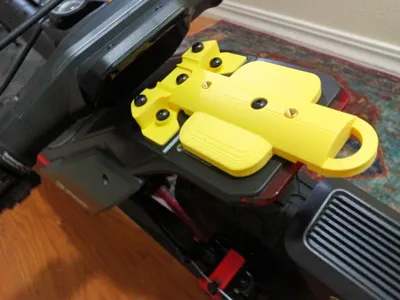
This luggage adapter fits your rear mounts on the Segway Ninebot ZT3 Pro and allows you to mount a some handle-bar mounted bags to the rear. The design is intentionally very minimal & flat to improve strength along with a flat plate to prevent flex & tipping. Even with PLA this is a very strong mount, though for hot climates other materials (PETG/ABS/PC) will likely be a better choice. This can be printed on the A1 mini and bigger.
Features
- Built for strength.
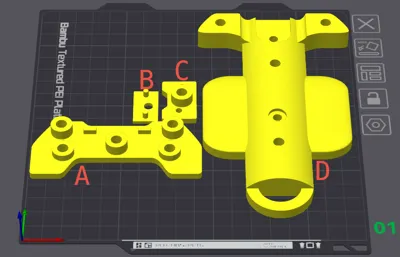
- The primary mounting part D is detachable from the base components (parts A, B, C) so if you need to craft a custom attachment for specific luggage, it's easy to swap out.
- Includes zip-tie cutouts in part D (see photo).
Additional materials needed:
- 6x M5 screws, button-head.
- 3x M5x25mm
- 3x M5x12mm
- 6x M5 washers.
- 8x M5x6x7 threaded inserts
Note: can technically be omitted, but not recommended as your securing strength will rely purely on the plastic.
Instructions
See build plate image for reference.
- Pop the covers off the two rear mounting areas exposing to forward 2x screw attachment and behind single screw attachment.
Install (melt) the threaded inserts into the parts A, C, & D.

- 5x into the holes in part A.
- 1x into the hole in part C.
- 2x into the top-most holes in part D (these two are used to secure luggage clips).
It's strongly recommended, shortly after placing the inserts, to test screw through parts A & C on the rear attachment areas on the scooter itself to ensure alignment. Ideally this is done when the plastic is still warm and not fully set- DO NOT TIGHTEN, just make sure they are aligned (straight up, centered, not askew).
- Place part B under part C so the hole aligns and drop it into the scooter's rear attachment area (making sure the holes align).
Do not screw in yet. - Place part B on the scooter's front attachment area and attach with 2x M5x25mm screws with 2x washers (leave the raised 3 mounts on part B unattached at this time).
- Attach part D (the biggest) over the other parts. It should cleanly align with the raised posts.
- Screw the 3x M5x12mm screws (with 1x washer each) into the holes in part D that now align with part A.
- Screw the final M5x25mm screw and washer into the hole in part D that aligns with part C (& B).
- The mount should now be securely attached to your scooter!
Here's the materials I used from Amazon:
- 240 Pcs M5 Screws Assortment Kit, M5x6mm/8mm/10mm/12mm/16mm/20mm/25mm/30mm, Metric Hex Button Head Socket Cap Screws Nuts Washers Kit with Wrench, Black Zinc Plated
https://www.amazon.com/dp/B0DRYD9LWQ - M5 Threaded Inserts for Plastic Heat Set Insert Brass Insert Assortment Kit for 3D Printing Injection Molding Press Thread Nuts (M5x6x7, M5x8x7(70Pcs))
https://www.amazon.com/dp/B0FH4VJRVK - Rhinowalk Scooter Bag Handlebar Bag Waterproof Front Storage Bag Bike Frame Bag for Electric Scooter
https://www.amazon.com/dp/B0CHMJFWYD
License
This user content is licensed under a
Creative Commons Attribution-Noncommercial-Share Alike
Comment & Rating (7)