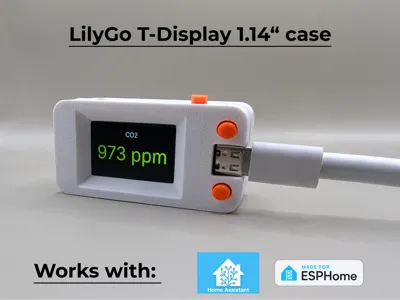
LilyGo T-Display 1.14" case


Print Profile(1)

Description
Boost Me (for free)
🛠️ This project took a lot of time, patience, and several rounds of prototyping to get everything just right – from tight component fit to practical usability. If you like it or find it useful, a little boost would mean the world and help me keep creating more! 🙌
This project is a remix of a basic LilyGo T-Display 1.14" ESP32 case.
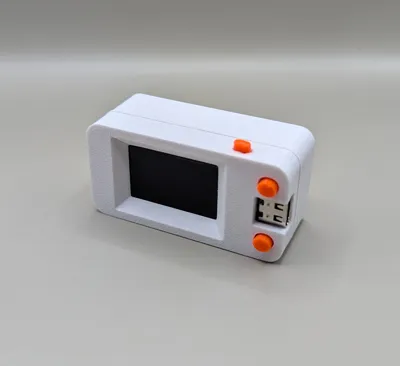
The model has been widened so it can comfortably rest on its side without rolling, and the lid alignment has been reworked for a much cleaner fit between the top and bottom parts.
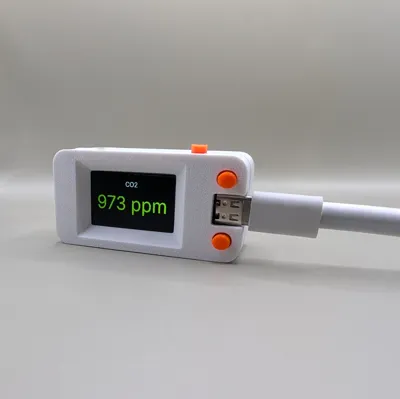
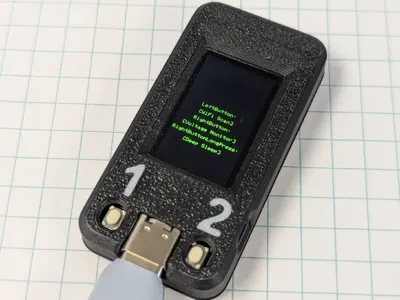
The design now includes three functional buttons — one on the side for reset and two on the front for user controls next to the display.
Each button is a separate insert with a locking edge, ensuring smooth movement and preventing them from falling out.
There is also enough space to add a small battery compartment inside the bottom part.
If you'd like to see that version, let me know in the comments!
The case prints easily without supports and fits tightly around the board!
🌟 Remix Features:
- Wider case body – now stable when placed on its side
- Three fully functional buttons – two on the front (GPIO) + one side reset
- Button inserts with locking edges – smooth travel, no falling out
- Improved lid alignment – top and bottom parts fit flush together
- Optional battery space – can be added to the bottom section (comment if interested!)
- No supports needed – prints cleanly in one go
- Perfect fit for LilyGo T-Display 1.14" ESP32 board
👉 Once you know the key features, let’s move on to printing and assembly.
🖨️ Printing
All parts are placed on a single print plate — just slice and print.
For best results, reduce print speed or use finer layer heights.
If you want top surface detail and sharper button edges, try printing with a 0.2 mm nozzle.
⚙️ Hardware (BOM)
- 🧠 LilyGo T-Display 1.14" ESP32 board – the main component this case is built for → AliExpress link
- 🔌 USB-C cable – for programming and power
💬 Note:
The case was designed around the standard LilyGo T-Display 1.14" model.
If you use a clone or variant, double-check the USB and button alignment before printing.
🖥️ Software (ESPHome Setup)
The easiest way to flash the LilyGo T-Display 1.14" with ESPHome is by using the ESPHome Web Flasher.
1️⃣ Connect the board to your PC
Use a USB-C cable that supports data transfer (not just charging).
Wait a few seconds until your system detects the serial device.
2️⃣ Open the Web Flasher
Go to 👉 https://web.esphome.io/ in your browser (Chrome or Edge).
Click Connect, then select your T-Display board from the list.
3️⃣ Install ESPHome
Click Install ESPHome, confirm the prompt, and wait until flashing is finished.
During installation, you’ll be asked to enter your Wi-Fi name and password —
once flashing is done, the device will automatically connect to your network.
4️⃣ Add to Home Assistant
After a minute or two, open Home Assistant → Settings → Devices & Services → ESPHome → Add device.
Your T-Display should appear automatically once it’s online.
💡 Tip:
Once integrated, you can edit its YAML directly in ESPHome to define the display and button logic — for example to show CO₂, temperature, or other Home Assistant entities.
You can find full YAML code here.
This configuration displays CO₂ levels from Home Assistant on the LilyGo T-Display 1.14″ with smooth color transitions depending on air quality.
⚙️ What to change
- ssid / password for wifi and hotspot→ replace with your own Wi-Fi credentials.
- entity_id → change to match your CO₂ sensor in Home Assistant
(for example: sensor.livingroom_co2) - Optional: rename friendly_name and name if you’re using multiple displays.
🛠️ Assembly
1️⃣ Install the buttons
Start with the three push buttons — two on the front (for controls) and one on the side (reset).
Make sure they sit firmly in place. The side button needs to be pressed in slightly harder so it doesn’t block the physical reset switch on the board.
2️⃣ Insert the ESP board
Hold the top cover with the side button facing down, so it doesn’t fall out.
Slide the LilyGo T-Display in from the USB-C side first, then gently push the rest of the board into position.
3️⃣ Close the case
Once the board is seated correctly, snap the bottom part on from above until it clicks in place.
You can now connect the USB-C cable and power it up — the display should light up immediately.
🎉 Final Notes
This project is a remix designed for the LilyGo T-Display 1.14″, created to be compact, functional, and easy to print.
It includes three physical buttons — one side reset button and two front control buttons — and a body that can comfortably rest on its side for better screen visibility.
The case has been widened for stability and the closing mechanism has been redesigned to fit precisely and hold firmly.
The layout is optimized for use as a CO₂ display, but of course, you can show any Home Assistant data on the screen — temperature, humidity, or even sensor status.
If you print your own version, I’d love to see it — share your build in the Makes section.
And if anything’s unclear, feel free to ask in the comments — I’m happy to help. 🙌
Comment & Rating (25)