


Print Profile(3)

Description
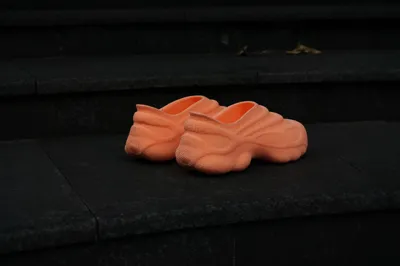
OneStep — Fully Integrated 3D Printed Shoe
Introduction
OneStep marks my first step into the world of 3D printed footwear.
This shoe is designed specifically for FDM 3D printing — a fully integrated model that balances aesthetics and comfort. It might just change the way you think about “FDM-printed shoes,” offering an experience beyond expectations.

⚠️ Important Notice
“Printing with TPU is challenging”
Before you start, please read the following notes carefully. They’ll help you avoid common issues and ensure a smooth printing process. (If you’re an experienced maker, feel free to explore and fine-tune.)
The tests were performed on the Bambu Lab A1 printer with a 0.4 mm nozzle. The A1 model tends to encounter more TPU-related issues compared to others, making it ideal for demonstration and troubleshooting.
If you’re using a CoreXY direct-drive printer such as the P1 series, your printing process will be much easier, and many potential issues will naturally disappear.
🧵 Printing Filament Recommendations
- Recommended: Bambu Lab 85A TPU, Kexcelled 85A TPU
- Not recommended: More Softer or harder TPU grades
- You can also experiment with foamed TPU-Aero, which provides better comfort and surface quality. This is the filament I use most often, though it’s relatively expensive and still under extended testing — so it’s not yet part of the this setup guide.
🔥 Printing Difficulty
- 85A TPU is extremely flexible and prone to nozzle clogging. It’s not recommended for beginners who have little experience with clog troubleshooting.
- When printing with the official A1 extruder, I initially couldn’t complete a successful 85A TPU print. The key to success was replacing the extruder lever, which allowed proper filament tensioning.
- This modification requires some mechanical skill, and I’ll describe the method later in this guide.
💧 Drying the Filament
TPU is highly hygroscopic. Whether newly opened or stored for a while, always dry it before printing.
My reference settings:
- Drying temperature:70℃
- Drying time:10 hours
- Storage:Airtight container with desiccant (humidity around 10%)
🚫 Usage Limitations
This shoe is designed for casual, everyday wear only:
- ❌ Not suitable for running, hiking, or high-intensity sports
- ❌ Avoid use in rainy, muddy, or complex terrain
🧩 Printing Guidelines
The current model orientation is based on experience from printing over a dozen pairs, balancing support structures, print time, and surface quality.
The way the shoe is positioned is extremely important — it directly affects overhangs, textures, and print integrity.
If scaling the model (for larger sizes) exceeds your build plate dimensions, you’ll need to rotate the model.
This may require custom supports and could introduce new challenges, so weigh your options carefully.
- Use Bambu Studio V2.3.0 or later
- Each shoe weighs ~280 g; supports add ~50 g (measured from my size)
- 1 kg roll of TPU is enough for a full pair with extra remaining
- Always print a small test sample first before the full model
Printing TPU shoes takes patience and persistence — success comes with practice.
Good luck, and enjoy the journey!
🛠️ Printer Notes and Adjustments
🔸 Bambu Lab A1
✅ If you still want to try printing TPU on the A1 after reading all the above — proceed carefully:
Replacing the extruder lever
【remove Bambu Lab A1 the original lever】https://wiki.bambulab.com/en/a1-mini/troubleshooting/extruder-clog
【Download the Model】https://makerworld.com/zh/models/607244-a1-extruder-lever-for-tpu-pultruded-pet#profileId-530177
【The official A1 extruder has a gap between the drive gear and idler wheel, preventing proper tension on 85A TPU even when the side screw is fully tightened.Replacing the extruder lever is essential for reliable 85A TPU extrusion.】
【After replacement, don’t overtighten the side screw — leave the screw head slightly visible】

- Follow this Bambu Lab tutorial to printing
https://wiki.bambulab.com/en/filament-acc/filament/tpu-85a-90a-printing-guide-for-a-series Key pre-print settings — optimized version of guideline #2 (also applicable to other printer models, same principle).
① Use a dry box with bearings, keep humidity below 20%,Feed filament from the side, and place a roll of filament on top to weigh it down, preventing the box from tipping when the print head moves as the spool gets lighter.
② Place the box higher than the printer for smooth feeding。
③ Remove the PTFE guide tube and feed directly into the extruder。
④ Secure all cables to prevent interference with the print head.【Download the Model】https://makerworld.com.cn/zh/models/125951-a1-a1-mini-dan-xing-xian-cao#profileId-9783
Before printing, **heat to 250 °C** and repeatedly extrude until the flow becomes smooth and thick.

If you can’t achieve a smooth, steady filament flow, the print will likely fail.

Drawback:
Due to the A1’s i3 gantry design, the moving Y-bed causes vibrations.
With soft TPU, the print may wobble like “gelatin,” degrading surface quality at higher Z heights.
Post-processing can help improve this.
🔸 P1 Series and Other CoreXY Direct-Drive Printers
✅ Follow this Bambu Lab tutorial to printing
【TPU 85A / 90A 打印指南】https://wiki.bambulab.com/en/filament-acc/filament/tpu-85a-90a
📏 Sizing and Scaling
Shoe sizes are for reference only — accurate foot length measurement is key.
You can print a measuring ruler to determine your foot length precisely.【Download the Model】https://makerworld.com/zh/models/1916280-3d-printed-shoe-sizer#profileId-2055675
Once you know your length, scale the model proportionally to fit.
Add the new shoe size customization feature (Oct 30, 2025) simplifies this process:
1. Click “Customize.”
2. Select your printer model.
3. Choose or input your shoe size (based on foot length).
4. Export the customized `.3mf` file.
5. Open it in **Bambu Studio** and start printing.

(You can easily select the right size using the customization feature above. The following size data is for users who downloaded earlier versions.)

How to scale to your size:
Measure your foot length (either manually or using the measuring ruler provided above as accurately as possible), find the corresponding proportional scale value from the table, and enter it to confirm.
🧽 Post-Processing
Even if print quality from an i3-style printer isn’t perfect, careful finishing can deliver great results.
Take your time — put on your favorite music, take it slow, and enjoy the fun of hands-on work. 🎶
1️⃣ Removing from the Build Plate
- Spray a bit of alcohol at the contact area
Use tweezers to lift one edge gradually and peel off completely

2️⃣ Removing Supports
- Pull supports gently by hand while using a craft knife to score separation points
Repeat until fully removed

3️⃣ Cleaning Stringing
Use a heat gun and precision snips to remove all fine strings without damaging the surface

4️⃣ Surface Smoothing
Use a soldering iron at 240–250 °C to gently smooth rough or uneven spots until even and glossy

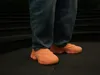
5️⃣ Final Result
- The finished shoe looks great!

🌟 Final Words
Wishing you successful prints and a great first step with 「OneStep」.I look forward to your feedback, experiences, and creative improvements. If you have any suggestions or ideas — I’d love to hear them!
Boost Me (for free)
If you like my work, you can support me by giving it a boost—it’s free!
License
You shall not share, sub-license, sell, rent, host, transfer, or distribute in any way the digital or 3D printed versions of this object, nor any other derivative work of this object in its digital or physical format (including - but not limited to - remixes of this object, and hosting on other digital platforms). The objects may not be used without permission in any way whatsoever in which you charge money, or collect fees.
Comment & Rating (52)