


Print Profile(1)

Description
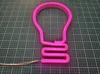
Neon Light Bulb
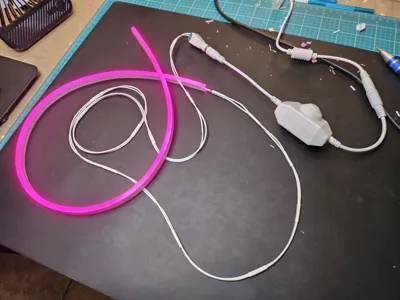
This model is perfectly designed to secure some (about 30 inches) “Neon Rope” LED light strip to create a legacy “light bulb” shaped sign. It has three small holes in the backing that can optionally be used to nail the sign to the wall.
You will need:
- Neon Rope LED light strip - 6 mm X 12 mm
- I recommend LED strip that cuts every 1 cm (0.39 inches)
- I used about 30 inches (762 mm) for this sign
- I used this LED (not affiliated or specifically recommending)
- Power adapter
- This might be included or integrated with the LED strip
- I believe these Neon LED strips are generally 12V
- A short section of LED for the sign would likely only need a 2A power adapter (maybe 1A)
- I use this 3A (not affiliated or specifically recommending)
- Dimmer switch (recommended)
- A small section of LED strip may pull a lot of current (per led) because it is short. It will likely be very bright and get hot with time. I previously had a different sign warp from the heat.
- I recommend a dimmer swith to reduce the brightness and heat
- I use this dimmer (not affiliated or specifically recommending)
- Some thin electrical wire (like 22 awg)
- Soldering iron
- Sharp “exacto” style knife
Instructions:
- A “Neon Rope” or “Neon Flex” LED is a legacy LED strip encased in a flexible silicon housing. Perfect for deffusing the light for a neon style sign.
- You will need to cut a section to fit the bulb sign.
- If you are using a new LED strip, you could simply use the original power connector and cut the strip to your required length.
- If you are cutting additional sections, you will need to solder a new power connector for each section.
- Depending on the original power connector, you might even prefer to replace it and solder on a new connector (two wires and barrel connector).
- Because you are shortening the LED strip, the power supply (original or new) might provide too much current.
- I'm not an electrician. I believe this guide is correct and safe but get additional advice if you are not 100% sure for yourself.
- I recommend getting an LED dimmer (see above) and adding it between the LED strip and power supply (original or custom).
- I setup my sign with a 12V LED strip connected to a 12V 3A LED dimmer switch then connected to a new 12V 3A power supply. The power supply and dimmer included the 5.5mm x 2.1mm barrel connectors.
- If you are using the original power connection, you will not need to solder anything. You can feed / push the neon LED in to the sign and cut the LED to fit. This is why you ideally want an LED that cuts every 1 cm.
Cut and Solder Instructions (if needed):
These photos and more are included in the “Doctmentation” section below. Perfect for zooming in to the full detail.
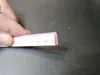
Cut the neon LED strip at a cut mark (ideally these are every 1 cm)

- You should be able to see the “legacy LED strip” close to the side that shows the cut marks. The cut marks are actually on the legacy LED strip.
- Flip the neon LED strip to see the other side (no cut marks)
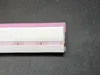
Carefully and slowly, cut a square hole in the side. Don't cut the top or bottom, especially the top that has the color silicone. Start small and extend to uncover the next two solder points (1 cm further). In this photo, you can see that the first solder points are very small. This is because the cut line is in the middle of them. Soldering on to these tiny solder points is not ideal so we cut the silicone to the next full solder points. Also take note of the polarity of the LED strip. I believe positive (+) is generally on the edge nearest to the color strip (e.g. pink here). You will need to correctly connect the + and - terminals to the barrel connector and/or power supply.

Now you can cut the end off leaving only the solder points

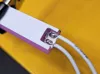
Now solder electrical wire (I use 22 awg) to the two solder points. If you are not familar with soldering, watch a few YouTube videos. Its easy but not intuitive. I thought I knew better and thought my cheap soldering iron was defective. Nope, it was me. At least I now have a nice soldering iron.

Hint: add solder to the wire then add solder to the solder point, then melt the solder on the solder point to attach the wire (no more solder). Clean and tin (add solder) the iron after every step.

- Ideally you need to add a barrel connector to the two wires. Ensure that the + and - wires are correct.
If you are adding a dimmer switch, you can now simply connect it to this barrel connector of the LED strip and barrel connector of the power supply.

- Plug in the power supply and turn it on to test that it works
- Optionally, fill the gap above the solder point with something to block light bleed. The start of the neon LED where you just soldered the power wires has a gap where light will shine through. Not a major issue but you can improve the sign by blocking it. Find some putty or sticky tack that does not conduct electricity that can block the light. I covered the terminals with a little paper (to be safe) and filled the gap with sticky tack.
Feed / push the neon LED in to the sign and cut the LED to fit. This is why you ideally want an LED that cuts every 1 cm.
Boost Me (for free)
Please support my designs so that I can share even more with the community.
Documentation (13)


License
You shall not share, sub-license, sell, rent, host, transfer, or distribute in any way the digital or 3D printed versions of this object, nor any other derivative work of this object in its digital or physical format (including - but not limited to - remixes of this object, and hosting on other digital platforms). The objects may not be used without permission in any way whatsoever in which you charge money, or collect fees.
Comment & Rating (2)