Lighted Rummikub Tile Stands & Game Carrying Case


Print Profile(1)

Description
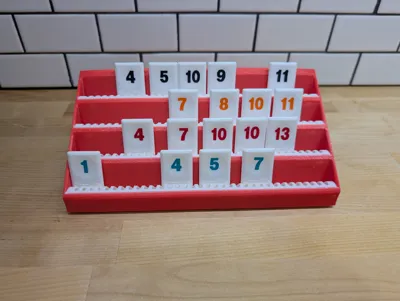
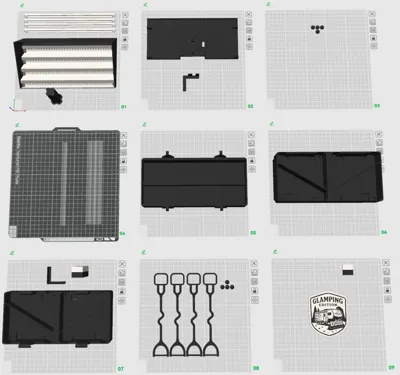
Lighted Rummikub tile stands (8X4) and carrying case for 4 stands and tiles. I designed and built these for friends that had great camping memories playing Rummikub late into the night. So late that they said they couldn't even see the tiles. I fixed their problem and down the rabbit hole I went trying to make something custom and unique. The overall design came out so well, I thought I would share. I separated the plates by materials. The first 4 build one tile stand. The last 5 build the carrying case.
Filaments:
Along the way, I used new materials had a great time. I printed his set out of ASA as I knew it would be stored in his camper (hot in the summer). The profile i included is for PLA as I'm sure most will go this route. All the rubber parts (mounting feet and straps to secure the case) are made from TPE. Inside I put light diffusers above the LED light to make them less bright / harsh. The diffusers are made from Transparent PETG. I'd like to add that the diffusers are optional as you may be ok with the lights without them. I printed the emblem with a 0.2mm nozzle to get as much detail as I could. You don't have to do this if you don't have one.
Purchased Materials:
All screws used for assembly are M3 X 10 self tapping screws. The switch came from Amazon: https://www.amazon.com/dp/B0CSJTHZHR?ref_=ppx_hzsearch_conn_dt_b_fed_asin_title_1&th=1 The battery holder came from amazon as well: https://www.amazon.com/dp/B0156V1JGQ?ref_=ppx_hzsearch_conn_dt_b_fed_asin_title_1&th=1 The final part I had to order was the lights from Amazon as well: https://www.amazon.com/dp/B0CS6VGW4J?ref_=ppx_hzsearch_conn_dt_b_fed_asin_title_1&th=1
Construction:
I took the full light roll and cut the strips down to the size I needed for the light bars. In construction, the only difficult part is that the light diffuser to the front is a unique one and needs to be glued on. You will see on the printed plate, there are three diffusers that are identical and one that is different. It's also a tight fit and you need to flex the case a bit to get it in there. As you can see in the pics, it does fit. The rest of the diffusers slide on over the lights and light parts. You will need to do some basic wiring and soldering to put it all together. I'll just include a bunch of pictures so you can understand how it works. If you have any specific questions, please ask and I'll help the best I can.
Enjoy!
Foot glue guides to clue the rubber feet in the perfect position. This is one for the stands and a different one for the case:


Battery Holder Install - I used M2.5 screws for this on because I needed a short head height


Light bar only with lights stuck on and wires:

Light Diffuser sliding over the light bar with lights.


Fully Wiring Picture. It's important to wire the + on the lights to the red off the battery holder. The red wire from the battery holder goes one terminal on the switch. The other terminal is connected to all wires from the + side of the lights. The black wire from the battery holder is connected to all the wires from the - side of the lights. If you have questions, Please ask.

License
You shall not share, sub-license, sell, rent, host, transfer, or distribute in any way the digital or 3D printed versions of this object, nor any other derivative work of this object in its digital or physical format (including - but not limited to - remixes of this object, and hosting on other digital platforms). The objects may not be used without permission in any way whatsoever in which you charge money, or collect fees.
Comment & Rating (2)