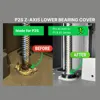
P2S lower Z-axis bearing cover


Print Profile(4)


Bill of Materials

Description
Boost Me (for free)
✨ If you like this model, I'd be super happy about a boost – it helps me share more cool projects! 🙌
🧩 Z-Axis Covers for the Bambu Lab P2S
IMPORTANT NOTE:
Since thread diameters can vary between batches, there are 3 print plates with scaling of 100%, 102%, and 105% please measure your diameter beforehand and compare it with the print plates to choose the optimal one for your printer
“EARLY MODEL only” print profile is really only for “EARLY MODELS” if it doesn't hold for YOU, YOU MUST measure and use the OTHER PRINT PROFILE!!!!
These covers were specially developed for the Bambu Lab P2S to keep the sensitive lower Z-axis bearings permanently clean.
Dust, filament residue, and other particles quickly accumulate there – this simple but effective solution reliably protects the mechanics
🔧 Advantages & Design Features:
- Effective Protection: Prevents dirt or filament residue from sticking to the lower bearings
- Easy Maintenance: The covers can be effortlessly lifted or removed to lubricate the Z-spindles
- Practical Details: Fine notches on the underside facilitate gripping and lifting
- 100% Compatible: Installation does not affect the operation of the P2S in any way – no loss of freedom of movement, no contact with moving parts
- This version was precisely designed for the P2S, but also fits the P1 and X1 series
💡 Note:
If you print with PLA or PETG, occasionally check if the part deforms due to the higher temperature inside the printer – this avoids later problems
Installation:
STEP 1:
Place the first part in its designated position
STEP 2:
Slide the second part from above along the Z-axis spindle onto the first
No force is required!
The screw at the back causes slight problems due to limited space for fingers, but with a little patience, it can be attached
Also check out my other P2S models:
P2S Flash Drive Dust Cover


https://makerworld.com/de/models/1936745-p2s-usb-port-cover-minimalist#profileId-2079685
License
You shall not share, sub-license, sell, rent, host, transfer, or distribute in any way the digital or 3D printed versions of this object, nor any other derivative work of this object in its digital or physical format (including - but not limited to - remixes of this object, and hosting on other digital platforms). The objects may not be used without permission in any way whatsoever in which you charge money, or collect fees.
Comment & Rating (853)