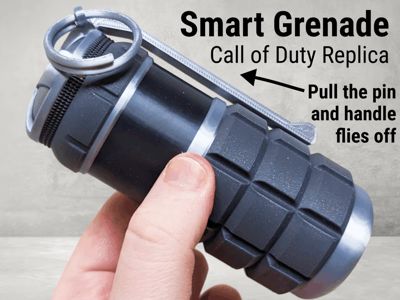
Smart Grenade | Pull the pin, handle flies off


Print Profile(2)


Description
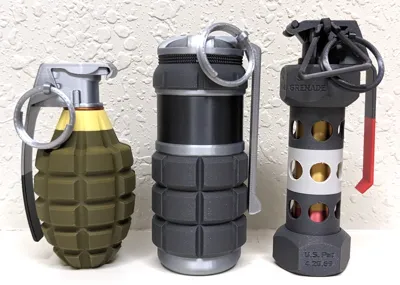
Want more like this model? Check out these collections: Grenades | Artillery & Ammo | Life-size Weapons | Missiles & Bombs | and more (3)… |
Summary
Want a futuristic Smart Grenade like you see in the Call of Duty games? This grenade has lots of realistic detail, and best of all the handle flies off when you pull the pin, just like a real grenade.
From the Fandom Wiki: The Smart Grenade is a lethal grenade featured in Call of Duty: Advanced Warfare. It was first seen in the "Induction" trailer, where Mitchell throws it at enemies above him. Upon being thrown, the smart grenade will fly into the air for a couple seconds before homing in on enemies and flying towards them. It is only available in single-player: the individual grenade is available in the first two missions, "Induction" and "Atlas", then its effects can be used within the Variable Grenade for the rest of the campaign.
Spring options
- Metal Spring (recommended) – if you have a metal spring, even a pen spring will often work, then print the metal spring profile. It is designed to work with the Bambu Store's 0.5x7x12mm spring (linked lower on the page). If you use a pen spring, you can usually cut it in half and get two springs.
- Plastic Spring (print-in-place) – if you don't have a metal spring, but still want the handle to fly off, then print the plastic spring profile. (see details below for more info about plastic spring).
- Don't leave the spring under tension when not using it as it will wear out much faster.
- If you want a spring that lasts longer, consider using the metal spring version, keep in mind even pen springs usually work.
- No Flying Handle - if you don't want the handle to fly off and just want a grenade model, simply print the metal spring profile and don't put a spring in it.
Bambu Filaments used
- Silk+ Silver
- Sunlu Black Silk (Amazon link)
- Polymaker Metallic Chrome (Amazon link)
Plastic Spring Assembly
None, the spring is printed right inside the printed grenade, simply remove it and its ready to use.
Metal Spring Assembly
- First insert the T shaped peg/plunger into the rectangular insert.
- Then place in a spring behind that.
- Lastly insert the insert with the peg/plunger and the spring into the top of the grenade.
- Keep in mind that its easier upside down.
- If your spring is rather long, then I would recommend using the rectangular peg insert with the hole on the bottom, its on the last plate.


Boost Me (for free)
If you enjoy my work and would like to help support my ability to share more (and even better) models in the future, please consider boosting or buying me a coffee at the link below. Your support is what helps me have enough filament and supplies to do all the print testing required for my models to be high quality and easy to assemble. It takes a mountain of test prints for each model. Thanks :-)
| Here's a link to my Buy Me a Coffee page, thanks for the support! |
( ! ) Do not sell my prints — I have not authorized selling prints. If you sell my prints on Etsy, Amazon, eBay, etc, I will find out.
This 3D print is intended for decorative purposes only and is not suitable for children. Small parts may present a choking hazard and edges may be sharp. By printing this 3D print, you assume all liability for any harm to yourself or others resulting from its use.
License
You shall not share, sub-license, sell, rent, host, transfer, or distribute in any way the digital or 3D printed versions of this object, nor any other derivative work of this object in its digital or physical format (including - but not limited to - remixes of this object, and hosting on other digital platforms). The objects may not be used without permission in any way whatsoever in which you charge money, or collect fees.
Comment & Rating (45)