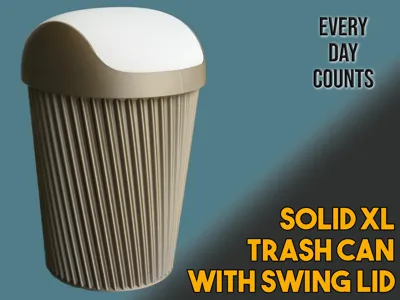
Solid XL Trash Can with domed SWING lid


Print Profile(2)


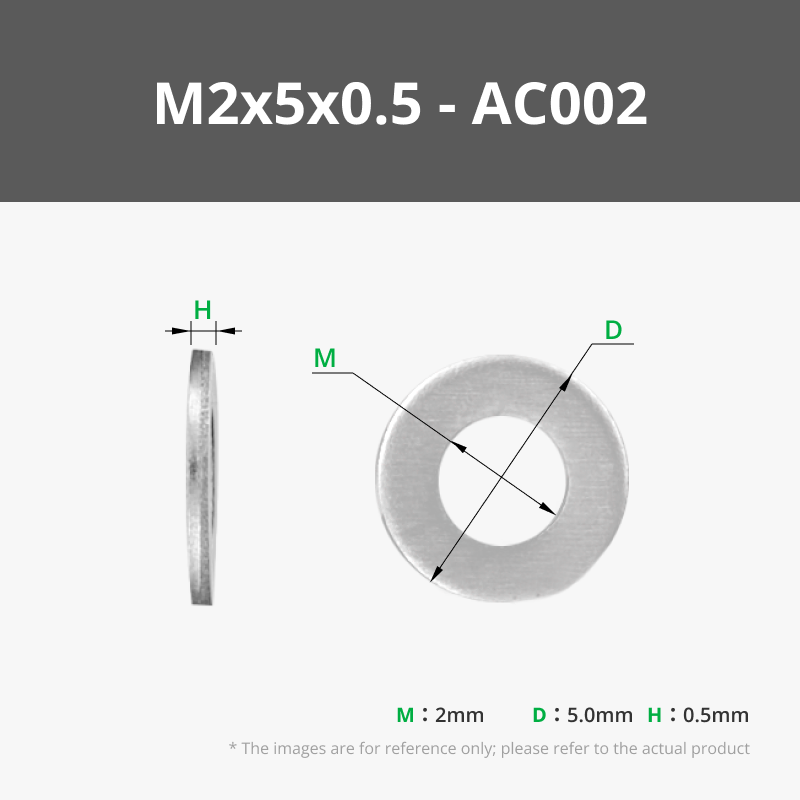
Bill of Materials


Description
This is the latest evolution of my XL Trash Can series, featuring a beautifully domed swing lid that offers smooth operation and a stylish, modern appearance.
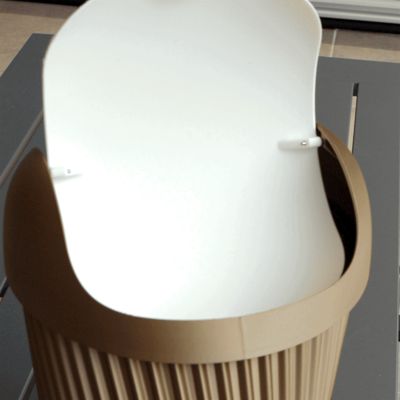
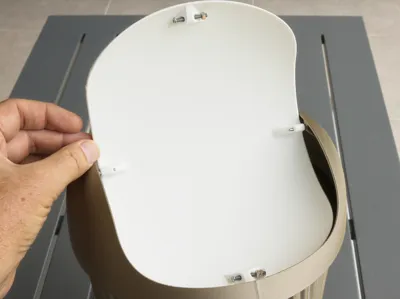
The lid uses a small internal hardware mechanism that allows it to self-balance and close cleanly — giving it a premium, practical touch. Of all my lid styles, this one feels the most natural and satisfying in daily use.
The overall height is 330 mm, with a 210 mm diameter (8.25 inches). The design remains solid and strong, intended for printing in ‘Standard’ mode for extra rigidity and durability.
The test model shown was printed in Bambu Lab PLA Metal (Iridium Gold Metallic) for the body and Basic PLA White for the lid, creating a beautiful two-tone contrast.
As always, this model has not been designed for scaling. Reducing its size could weaken the walls and alter lid clearances.
Please share your prints — I’d love to see how you finish yours!
⭐ If you enjoy the design, please like, collect, post a photo, and Boost it to help others discover it.
HINT: I used a bolt with some nuts on the lid to give it a bit more weight and to balance it. I use more nuts on one side than the other to get the perfect close every time.
✨ Your support makes a difference! ✨
If you enjoy this model, please consider leaving a review, adding a comment, or sharing a photo of your print—I love seeing your creations!
Feedback and suggestions are always welcome, and if you’d like to show extra appreciation, Boosts are very much appreciated.
🔸 Interested in commercial use?
Check out my affordable commercial license program—details available on my profile.
Thank you for supporting my work! 🌟
Boost Me (for free)
🌟 Enjoying this model? Please consider giving it a Boost! Boosts help support creators who go the extra mile to deliver quality models, adding encouragement and motivation to keep creating more for you. Your support truly makes a difference—thank you! 😊✨
Membership
Unlock unlimited commercial use of my 3D models with a low-cost membership! Perfect for makers and small businesses, this plan gives you full freedom to print and sell without limits. Join today and start creating with confidence!
License
You shall not share, sub-license, sell, rent, host, transfer, or distribute in any way the digital or 3D printed versions of this object, nor any other derivative work of this object in its digital or physical format (including - but not limited to - remixes of this object, and hosting on other digital platforms). The objects may not be used without permission in any way whatsoever in which you charge money, or collect fees.
Comment & Rating (13)